Lab 1: Setup a Simple Flow and make a test call

In this Lab, we will go through the tasks that are required to setup a Simple flow and make a test call into the Contact Center.
Table of Contents
Overview
Lab Objective
- This lab is designed to help you to make an end to end test call into the contact center.
- The lab contains material to send a test call from the caller (customer) to the agent desktop using a Simple Flow.
Pre-requisites
- You have an assigned POD and Attendee ID (Refer to your Lab Details).
- You have the customer admin login credentials.
- You have the calling DNIS.
- You have the agent’s extension number.
- Prompt Wav files are uploaded, TEAM, SITE and USER are created.
Quick Links
Control hub: https://admin.webex.com\
Agent Desktop: https://desktop.wxcc-us1.cisco.com/
Mailinator (Can Be Used to Create a New User user@mailinator.com): https://www.mailinator.com/
Lab
Video: Lab 1 - Setting up a Simple Flow
The following video outlines the process to create a simple flow. The video uses a generic example.
You will use the naming convention of
EntryPoint_CL_Lab_<ID>where<ID>is your attendee ID provided. This is to keep a track of all the configuration created end to end.
E.g: If you are attendee 123 you would use EntryPoint_CL_Lab_123
The video serves as a reference. View detailed steps in text below.
Task 1 - Timestamps
00:00 - 1:24 — Overview
1:24 - 2:50 — Upload Wav Files
2:50 - 5:27 — Flow Creation
5:28 - 6:52 — Entry Point Creation
6:52 - 11:42 —Routing Strategy Creation
11:43 - 13:08 — DN — EP Mapping
13:09 - 13:57 — Troubleshoot & Test the flow
Task 2 - Timestamps
13:58 - 14:14 — Overview
14:15 - 15:11 — Site Creation
15:12 - 16:54 — Team Creation
16:55 - 18:34 —- Queue Creation
18:35 - 21:33 — Flow Creation
21:34 - 25.22 — Troubleshoot & Test the Flow
| User Role | Contents | Extension-DN Allotted |
|---|---|---|
| Admin | admin1pod<POD>@email.carehybrid.com |
3001 |
NOTE:
Your <POD> is your POD ID allocated.
Steps
1. Verify that your users are ready to login
Note: Go to
Provisioning -> Usersto check theSitethat the user admin1pod__@email.carehybrid.com is assigned to. And create theTeam_CiscoLiveunder the right Site.
- If you would like to Create a Team, create the Team under that Site - and assign the Team to the Agent.
Agent>Siterelationship cannot be changed. So all teams will need to be created under the same site.- With the steps outlined in the previous lab and recap above, you should now be able to login to the agent desktop.
Only teams that are in the same site of the Agent will be visible to assign to the agent.
2. Verify your inbound numbers are correctly setup on Calling
- The inbound Numbers need to be added on Control Hub.
- The telephony option on the location needs to be set to Intelepeer.
- Settings page needs to have Intelepeer configured for subsequent locations created.
3. Create an inbound Voice Entry Point and Voice Queue
-
Login to Portal and create an inbound voice entry point and voice queue. (Provisioning > Entry Point / Queue).
-
Create the Entry Point named
EntryPoint_CL_Lab_<ID>where<ID>is your attendee ID provided. -
Create the Queue named
Queue_LAA_<ID>where<ID>is your attendee ID provided.
Here are the Queue Settings
| Configuration | field Value |
|---|---|
| Name | Queue_LAA_<ID> |
| Channel Type | Telephony |
| —- Contact Routing Settings — | |
| Queue Routing Type | Longest Available Agent |
| Call Distribution | <Add team> |
| —- Advanced Settings — | |
| Service Level Threshold | 20 |
| Maximum Time in Queue | 7200 |
| Time Zone | Default |
<ID>is your attendee ID provided.
- Map the DN from Control Hub - that is assigned to Wx Calling - on the Entry Point Mappings page. (Proivisioning > Entry Point Mappings). Map the DN to EP_voice_wxcclab
4. Verify the Audio Prompts, Create the Entry Point flow.
- The audio prompts required for the script build out are wav files. The whole bundle of wav files can be found here But these are already uploaded for you.
Note: Uploaded audio files are already under > Routing Strategy (from Portal) > Resources > Audio Files.
5. Configure and Publish the flow
- Configure the flow
flow_Lab1_Task1<ID>with a Play prompt - welcome message and Disconnect - Configure the flow
flow_Lab1_Task2<ID>with a Play prompt - welcome message and queue block and play music block. - Configure the Queue Block to
Queue_LAA_<ID>. Map the queue inside of the q ueue block. - Configure the play music to loop, and start 0, end 10 to play 10 seconds of music.
-
Verify and publish the flow.
- Note:
<ID>is your attendee ID provided.
6. Configure the Entry Point Routing Strategy
- Configure the Open 24x7 routing strategy time of day on the Entry Point Routing strategy by selecting it on the Routing Strategies >
EntryPoint_CL_Lab_<ID>. - Map the flow flow_wxcclab you just created in there.
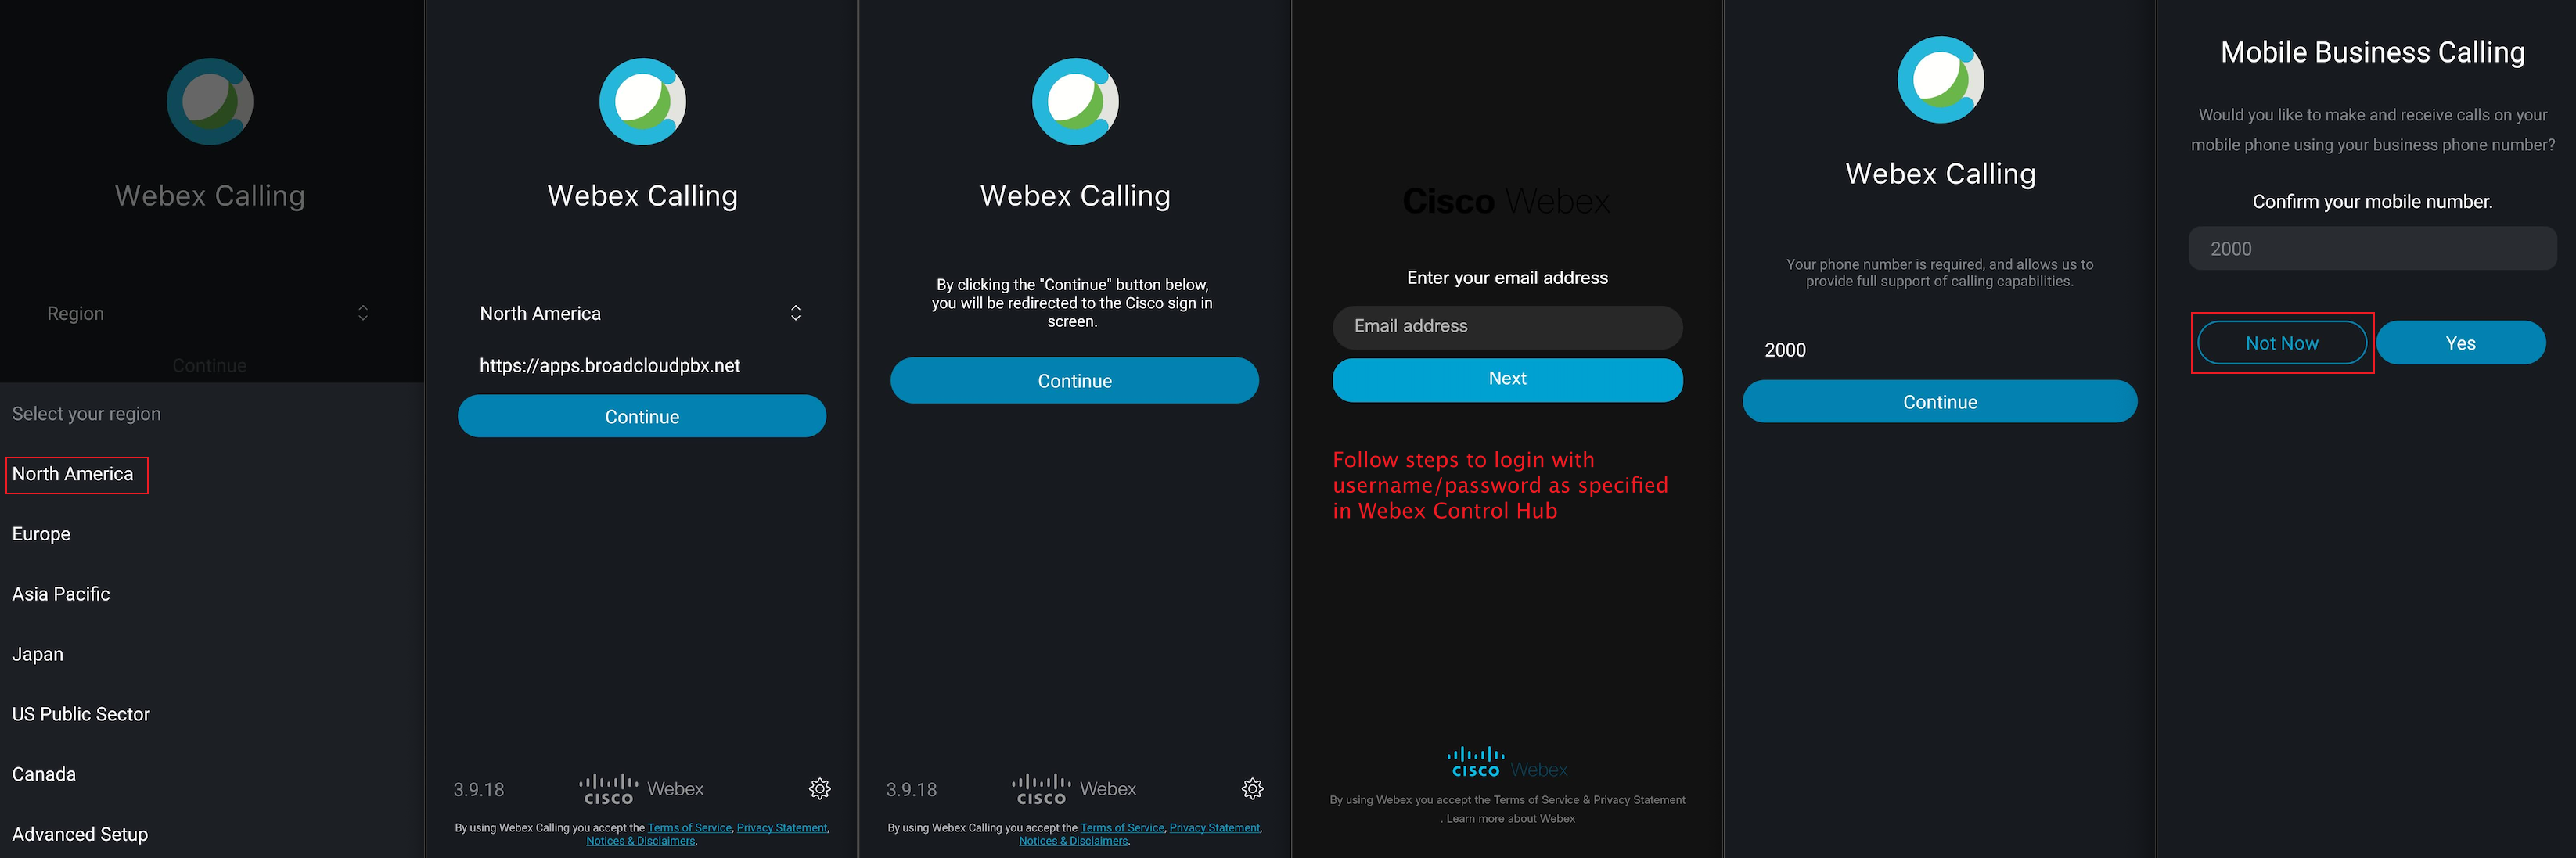
7. OPTIONAL Download and Login in the Webex Calling app for mobile
Note: If you are outside the US, you need two Webex Calling app for placing a call to Entry Point and accepting on the agent side. In this lab, we will use the Webex Calling app for mobile for supervisor account.
-
Open the Application Manager (Play Store or App Store) on your mobile phone.
-
Search for webex calling.
-
Download and Open the app. Click
Get Started. -
Login in the app by selecting Region as North America.
-
Login using Email address
supervisor_<ID>@mailinator.comand same Password as the admin account.
Note: Make sure that you give access to the phone’s microphone for the calling app.
8. Make a test call
-
Login to the agent desktop into
Team_CiscoLiveand go to a ready state. - Task 1 > Call the Dial number > Hear the welcome prompt and call should get disconnected.
- Task 2 > Call the Dial number > Available agent gets connected immediately, If the Agent is not available the call is queued and music is played.
Congratulations! You’re done!
You are now ready to start the next Lab!
Lab 2: Add Menu and Queue treatment to the call
Note: If you would like to go back to the HOME PAGE, CLICK HERE
Index: Quick Links
- Important: Pre-Requisites
- Lab 1: Setup a Simple Flow and make a test call
- Lab 2: Add Menu and Queue treatment to the call
- Lab 3: Setup an advanced HTTP Request
- Lab 4: Setup Skills Based Routing (SBR)