Lab 2: Email Configuration
Table of Contents
- Step 1. Gmail account configuration
- Step 2. Create Email Asset and Register to WebeXCC
- Step 3. Email Entry Point and Queue creation
- Step 4. Create/Upload Email flow
- Verification: Send an Email and accept the task
Introduction
Lab Objective
In this Lab, we will go through the tasks that are required to complete the basic email configuration. You will be able to initiate an email to the Contact Center and be able to accept/respond to the email by logging in as an agent.
In this lab you will be configuring Gmail Account settings, Email Assets, Entry Point and corresponding workflows. All those steps are required for connecting the Email account with our application.
Pre-requisite
- You received an admin credentials to configure in Management Portal and Webex Connect.
- You received Email account credentials.
- You have successfully compleated the previous Lab1 Preconfiguration.
Quick Links
Control Hub: https://admin.webex.com
Portal: https://portal.wxcc-us1.cisco.com/portal
Agent Desktop: https://desktop.wxcc-us1.cisco.com
Gmail: https://mail.google.com
Workflows: GitHub page
Webex Connect: https://cl1pod<ID>.imiconnect.io/ (where <ID> is your POD number)
Lab Section
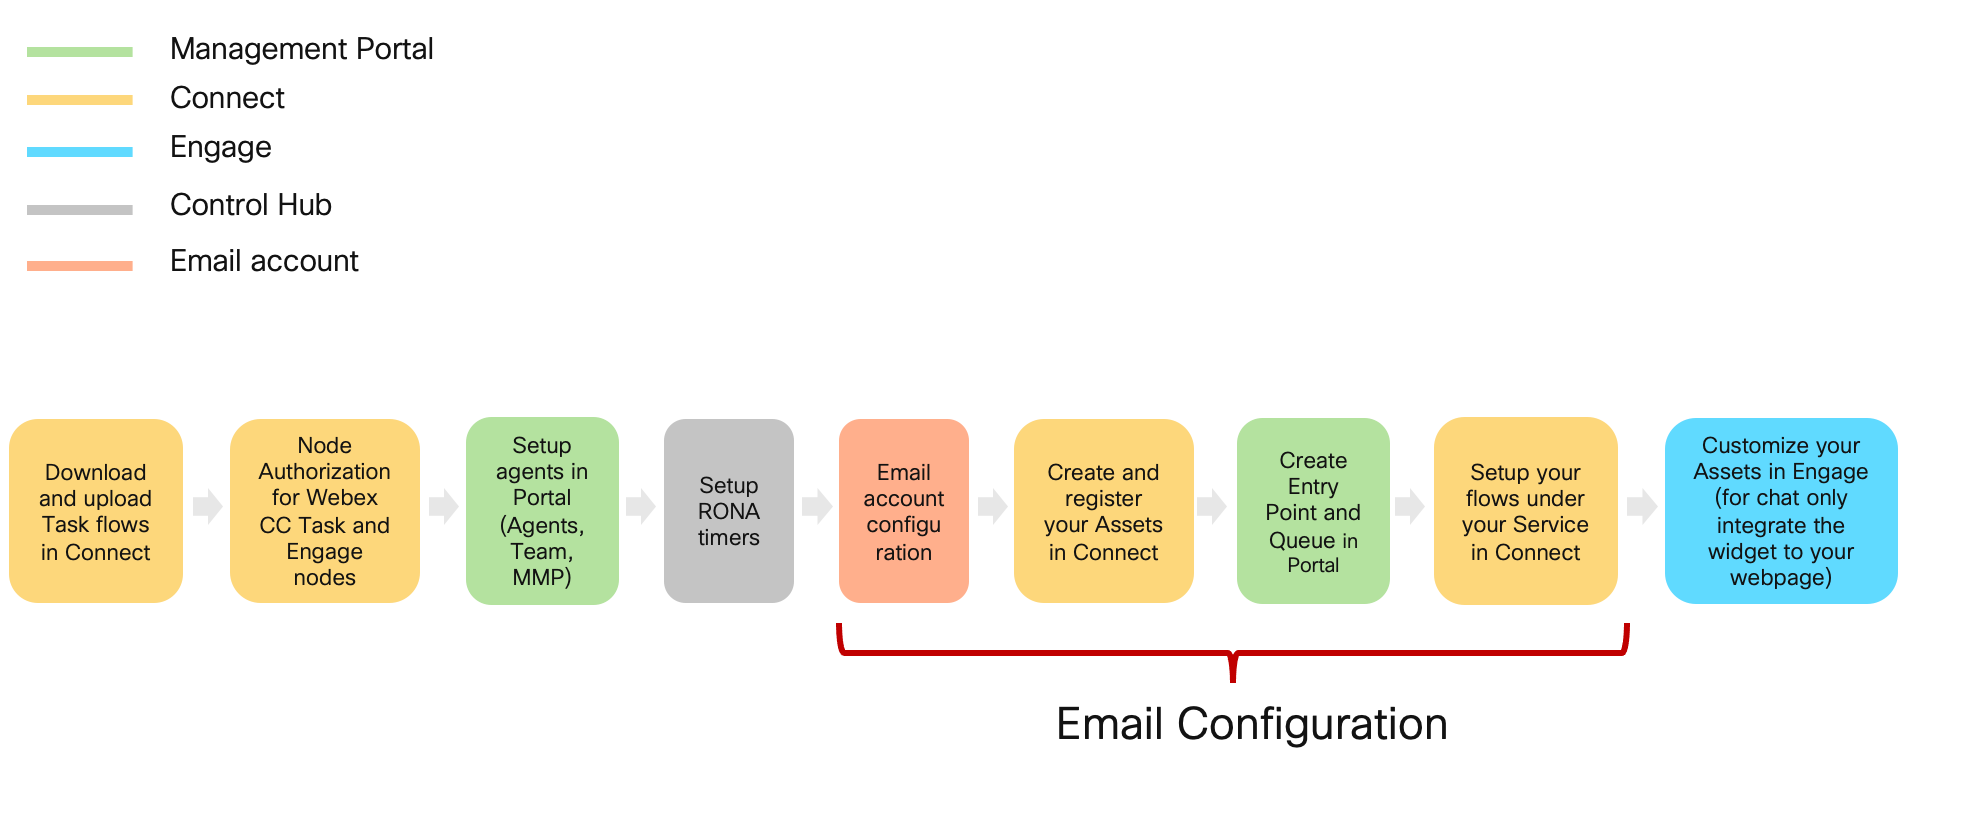
Configuration Order
Step 1. Gmail account configuration
Starting from May 30 the Less Secure Apps feature was disabled on all Google accounts. As long as this setting was enabled, it was possible to send emails via Gmail SMTP. In this lab, we will be using new OAuth 2.0 authentication for outbound email functionality.
Note: For this lab, we have created a Gmail account. Optionally, use your own account for polling and handling the emails. It can be a Gmail account or Office 365 account or any account which has email forwarding. The instructions below are applicable only for the Gmail accounts.
1. Gmail forwarding activation (for incoming emails)
| User email |
|---|
| cl1webex<ID>@gmail.com |
Note: Your <ID> was provided to you personally. <ID> is the unique number equal to your POD.
-
Login to the Gmail account with the credentials above https://mail.google.com. The password is the same as for Webex admin account. During first login select Turn off smart features
-
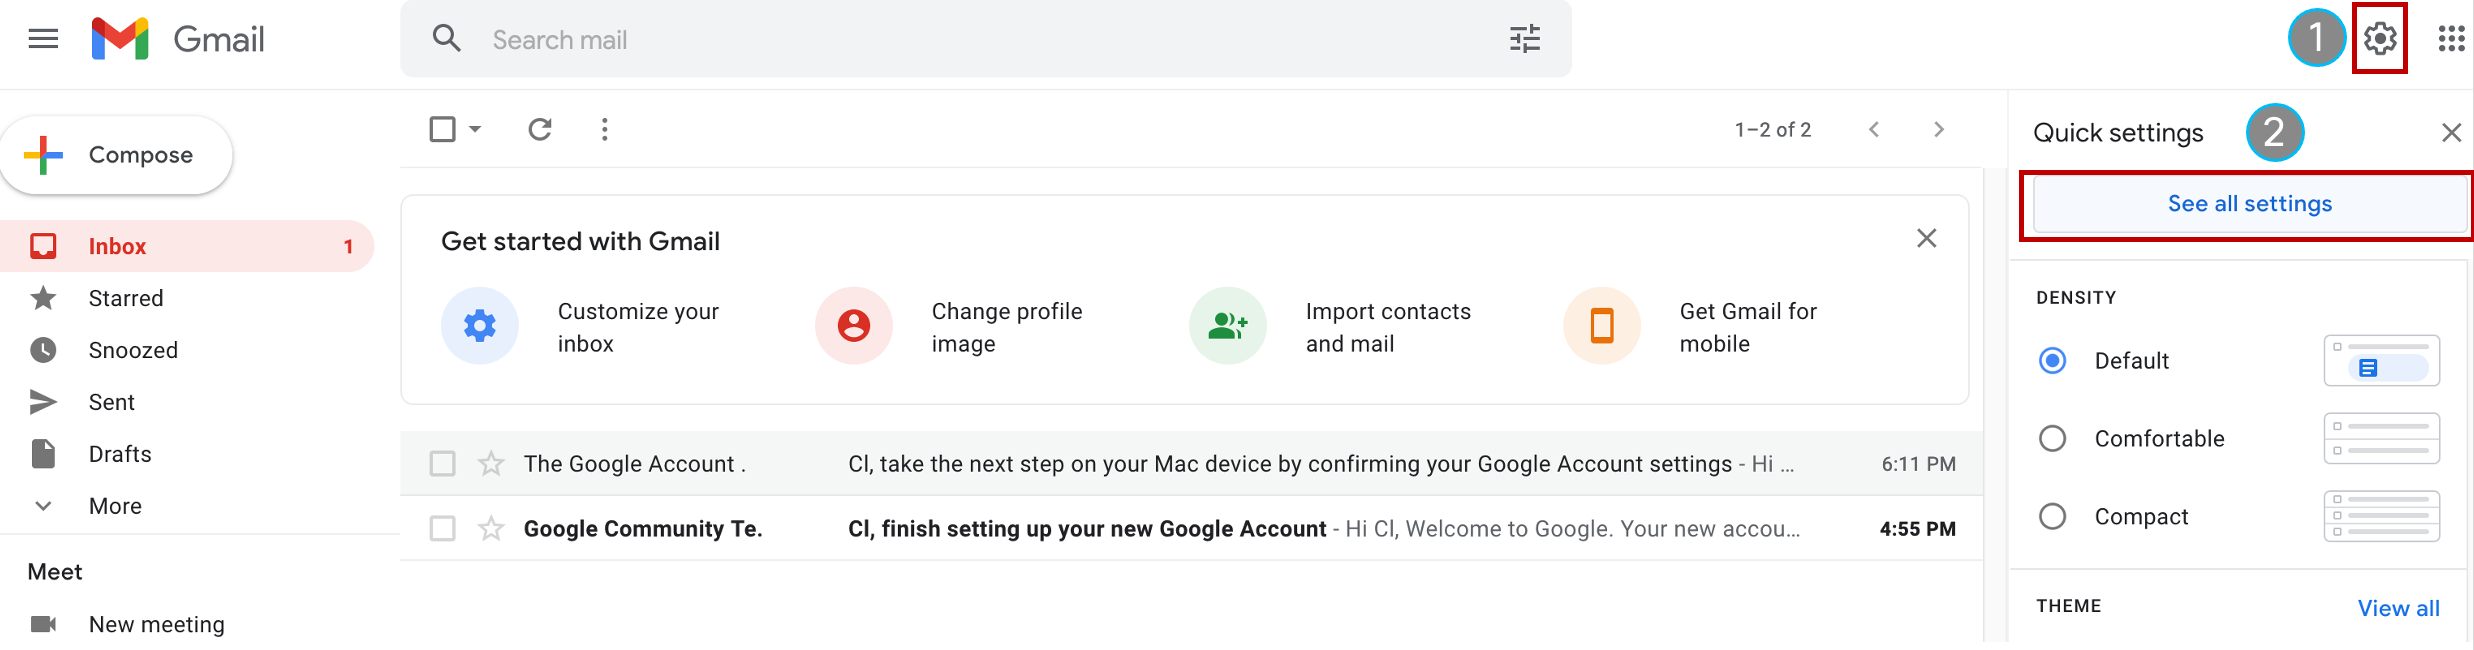
Enable POP3/IMAP setting by clicking on settings icon on top right corner and selecting See all settings.
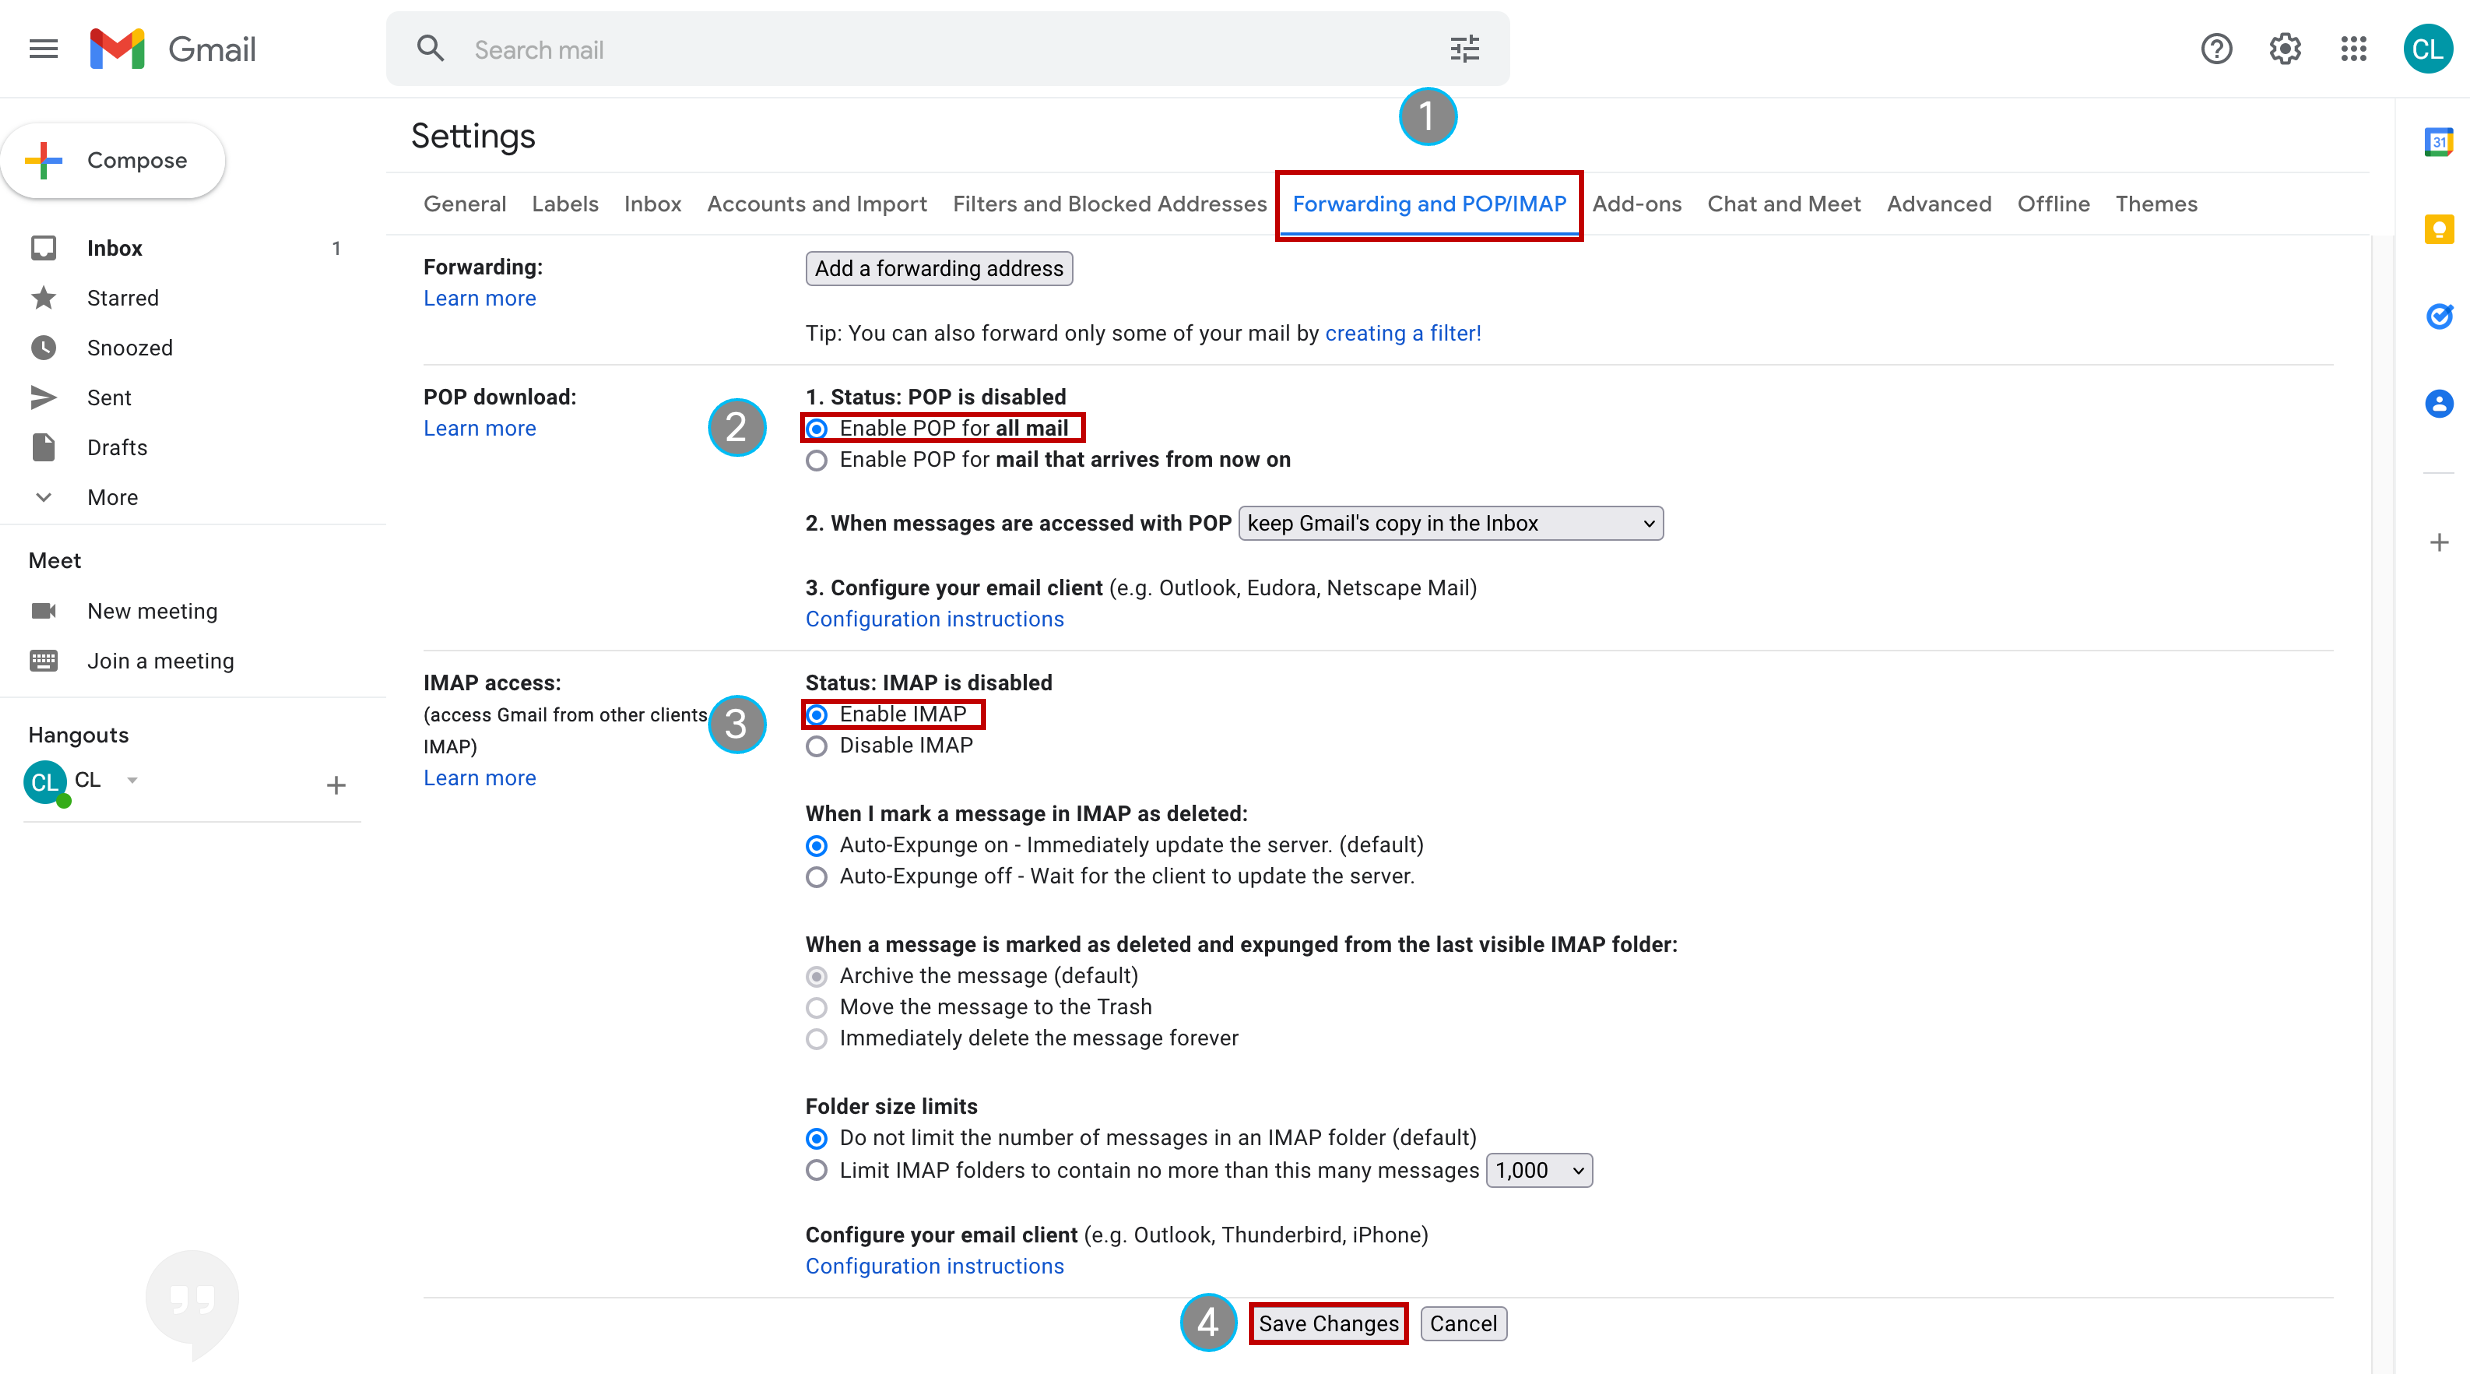
- Now Click on Forwarding and POP/IMAP, enable the
POP DownloadandIMAP accessthen click Save Changes.
2. Create a project at Google API Console
We need to activate API if we want to use Gmail accont for outbound emails.
-
Login to Google Developers Console with the credentials above. The password is the same as for Webex CC admin account.
-
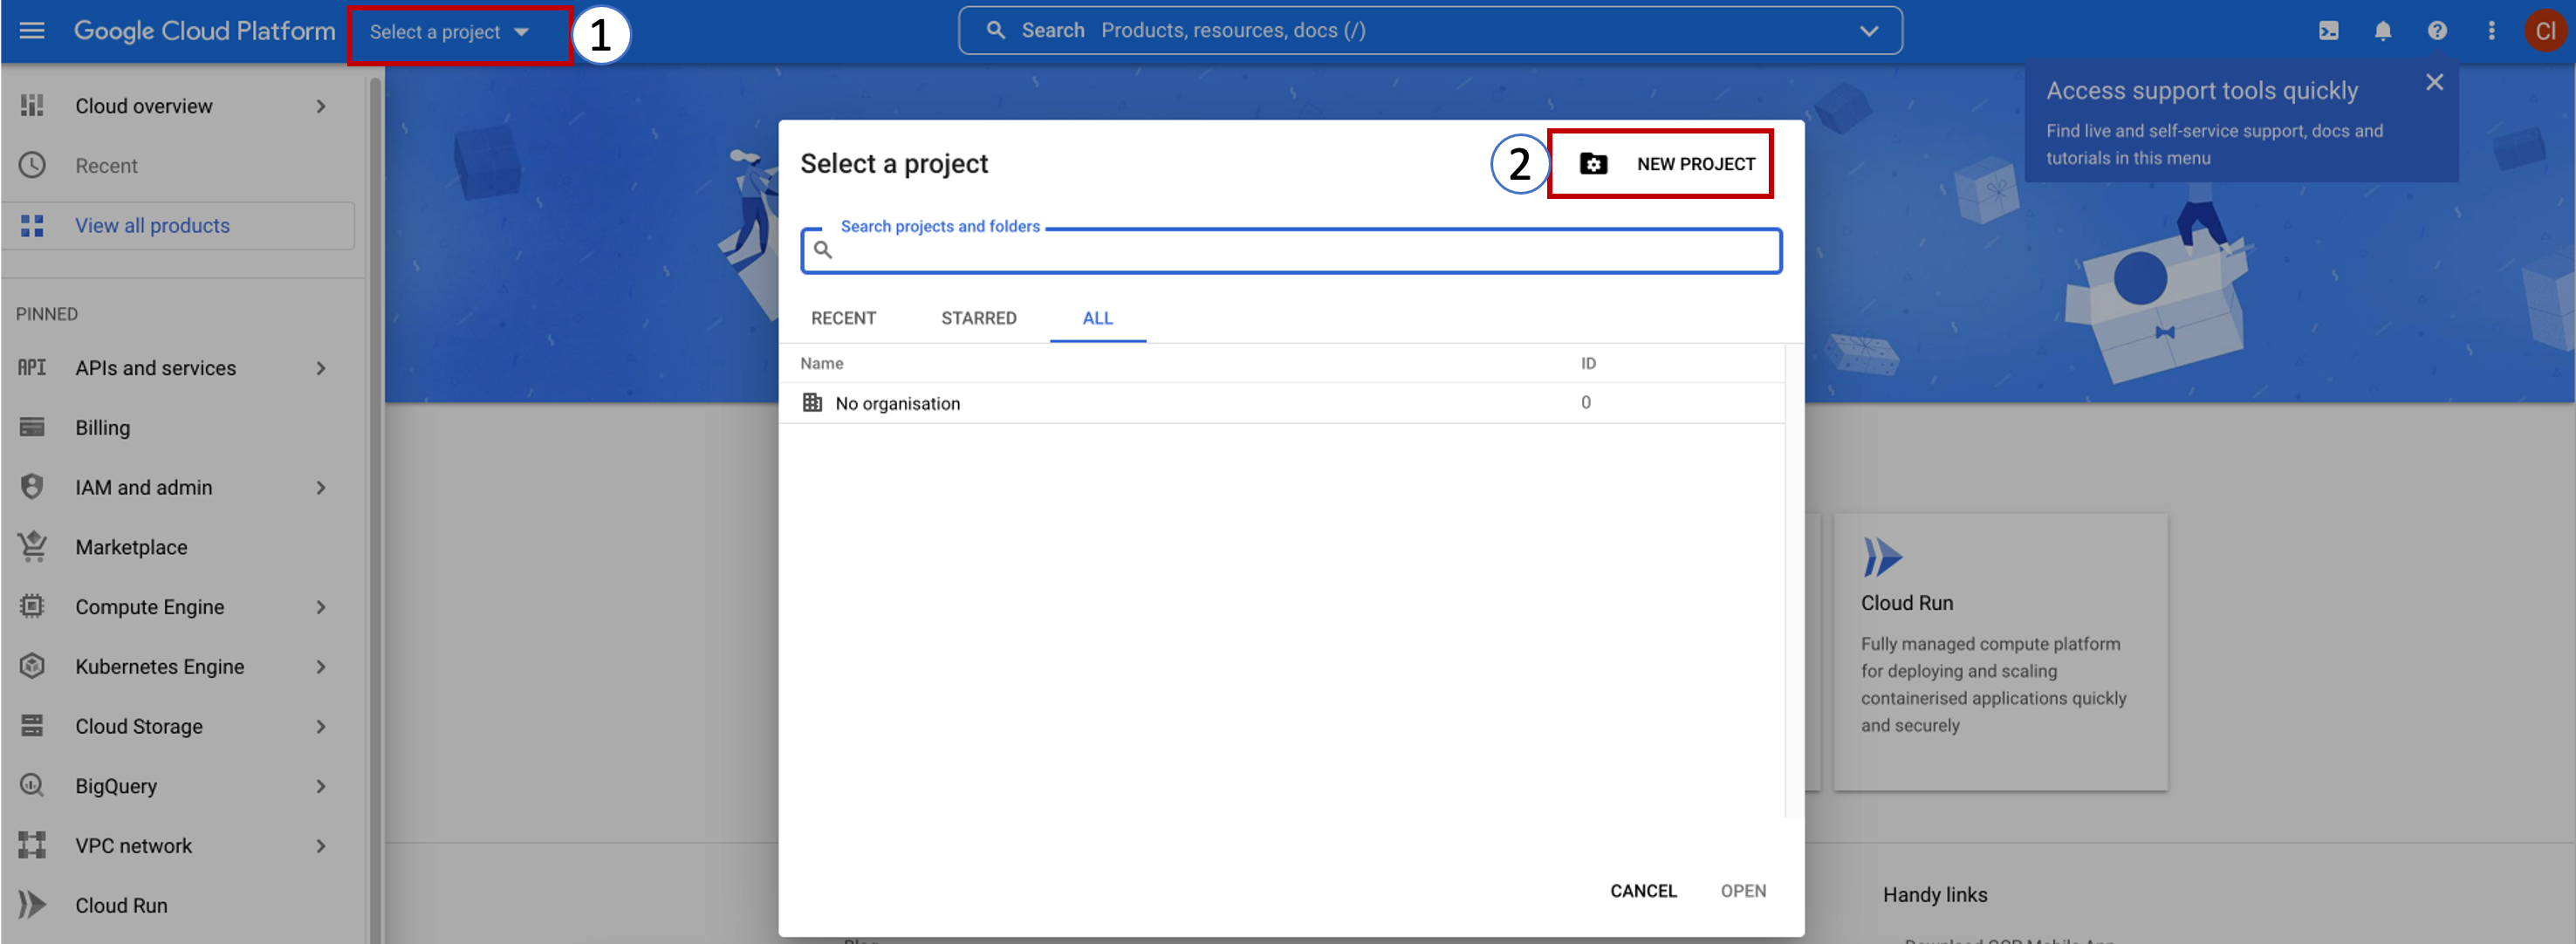
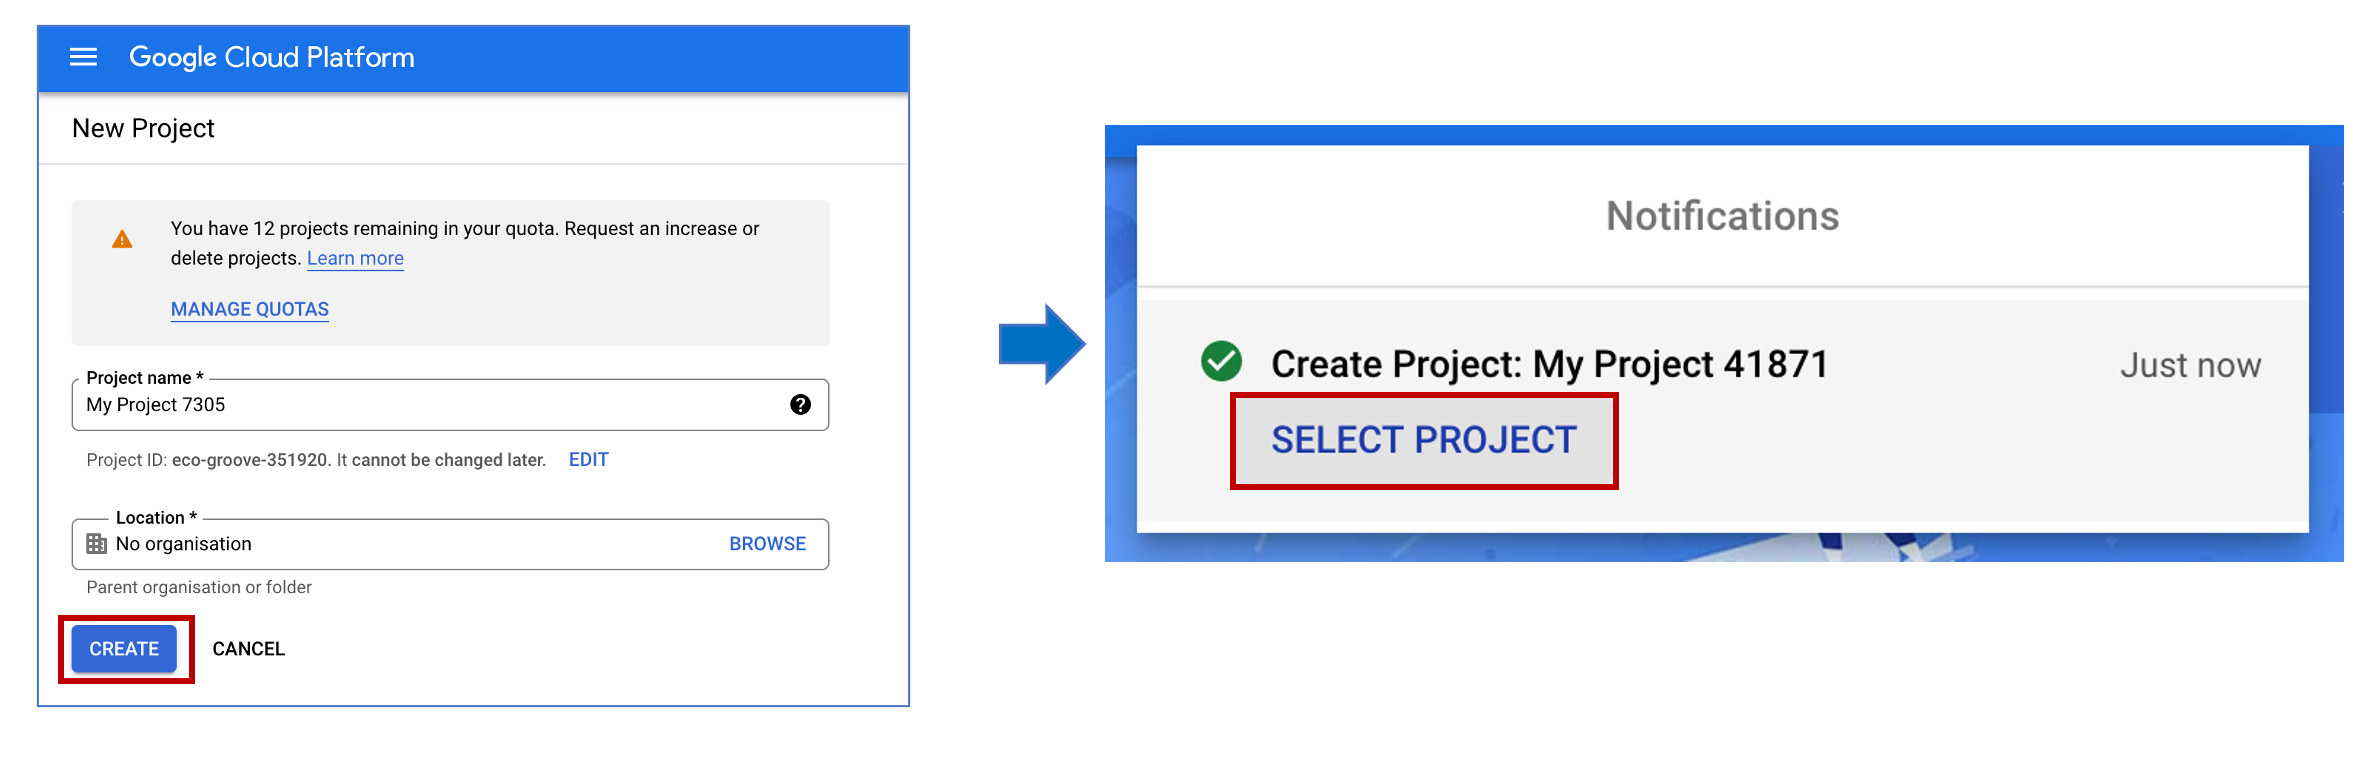
You will have to agree with the Terms of Service and pick their Country of residence. Then click Select a project and create a NEW PROJECT.
- Keep the default project’s name and press Create at the bottom. Make sure that now you have selected this project.
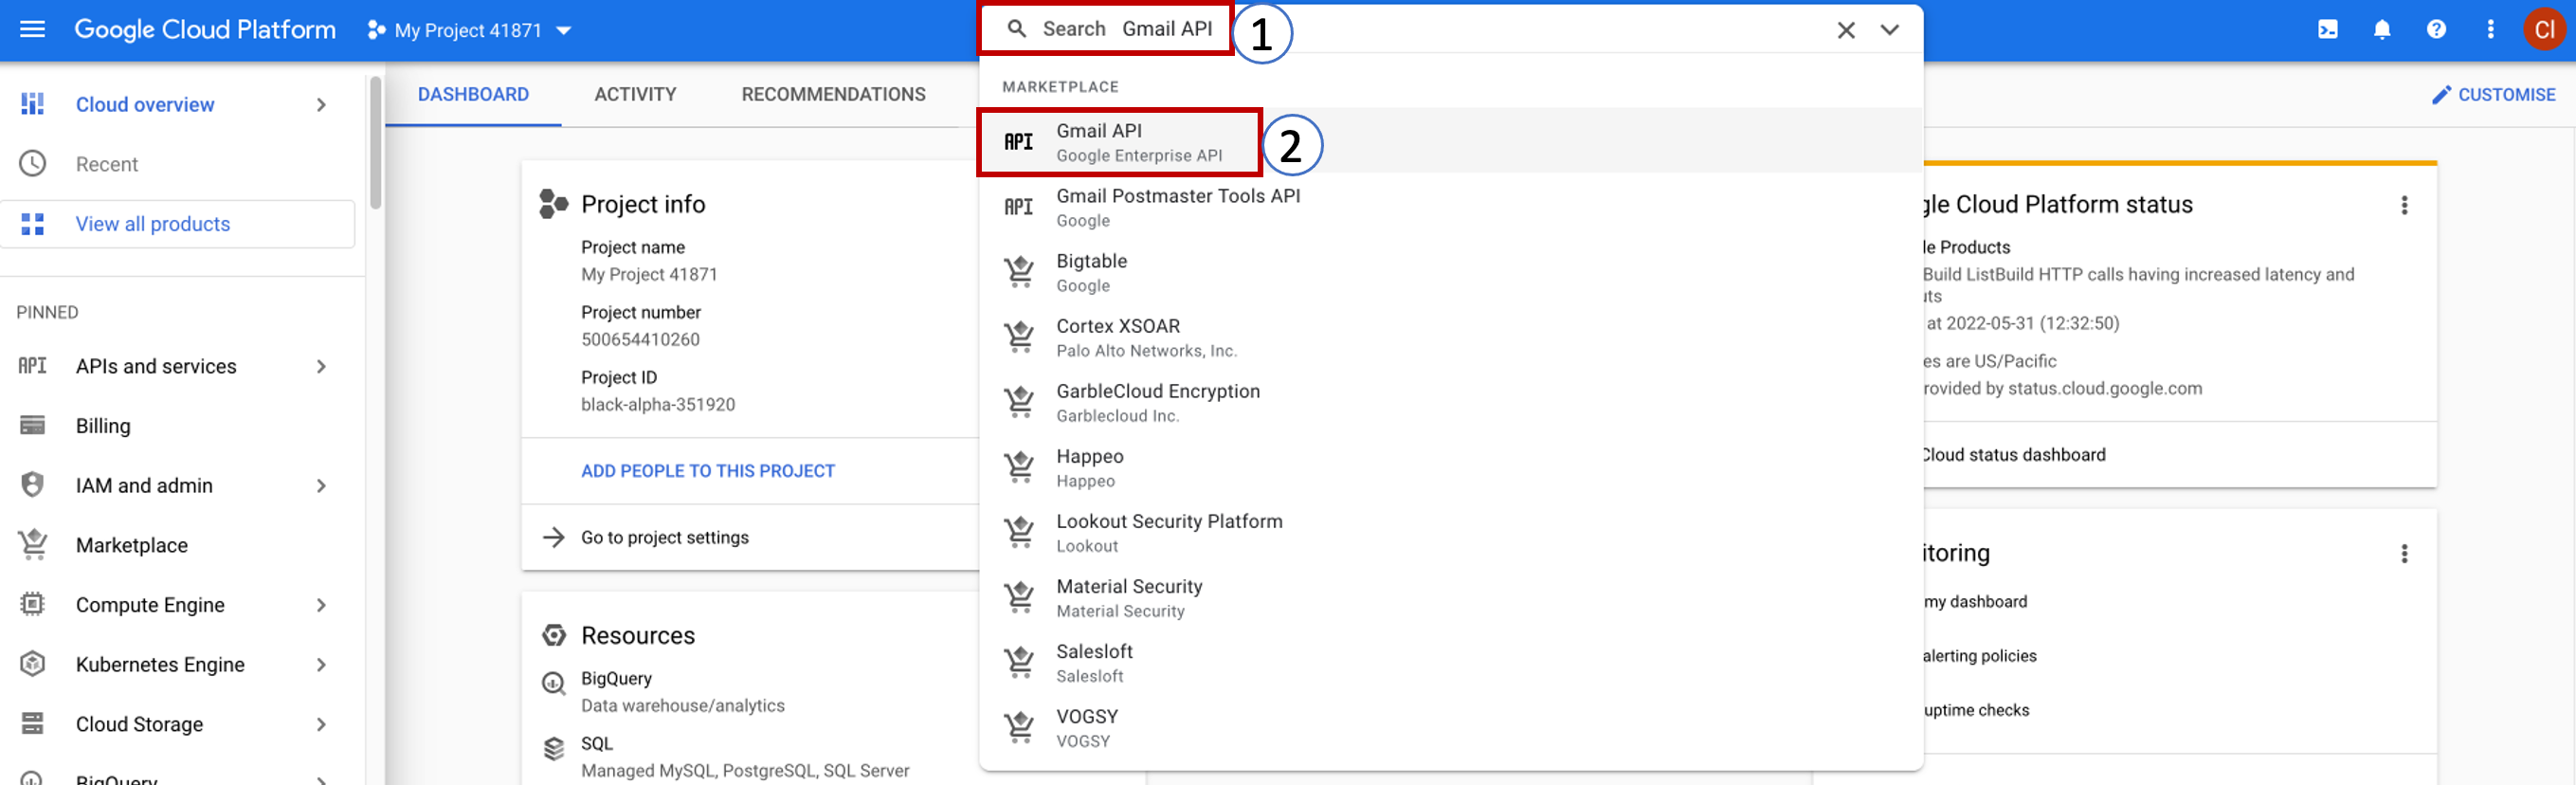
3. Enable Gmail API (for outgoing emails)
- Enter
Gmail APIin the search bar and click on it once found.
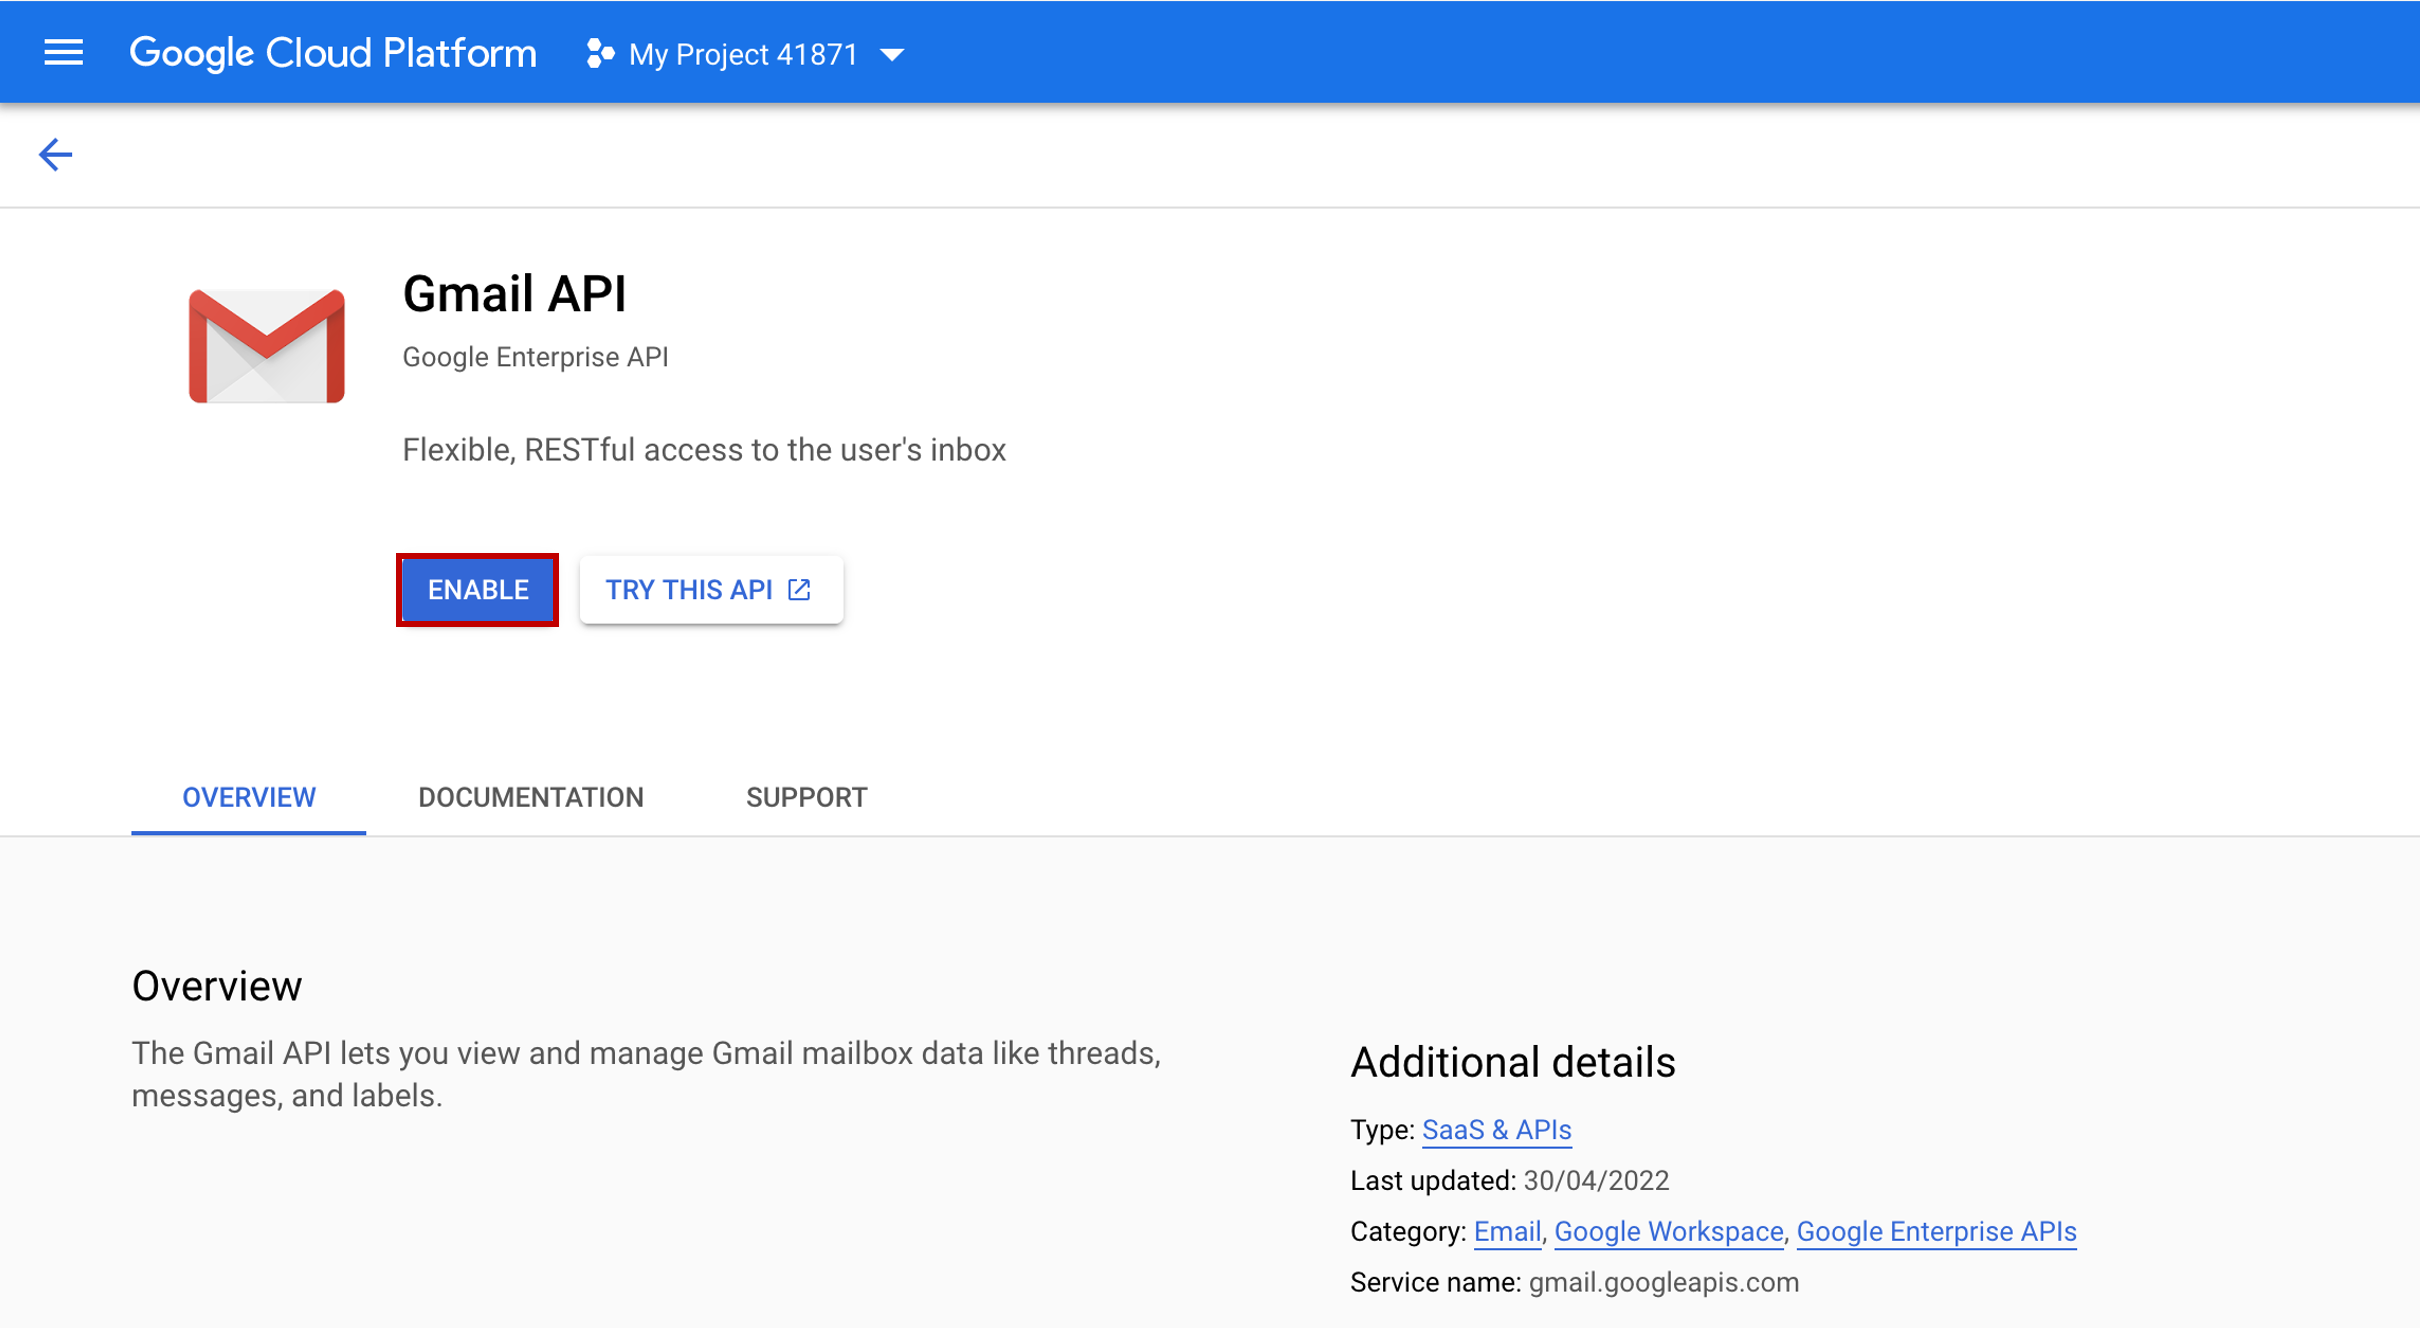
- You need to enable the API for your project by clickin ENABLE button.
4. Configure OAuth Consent Screen and Scopes
- Once the API is enabled, you’ll be taken to a nice dashboard that says,
"To use this API, you may need credentials".
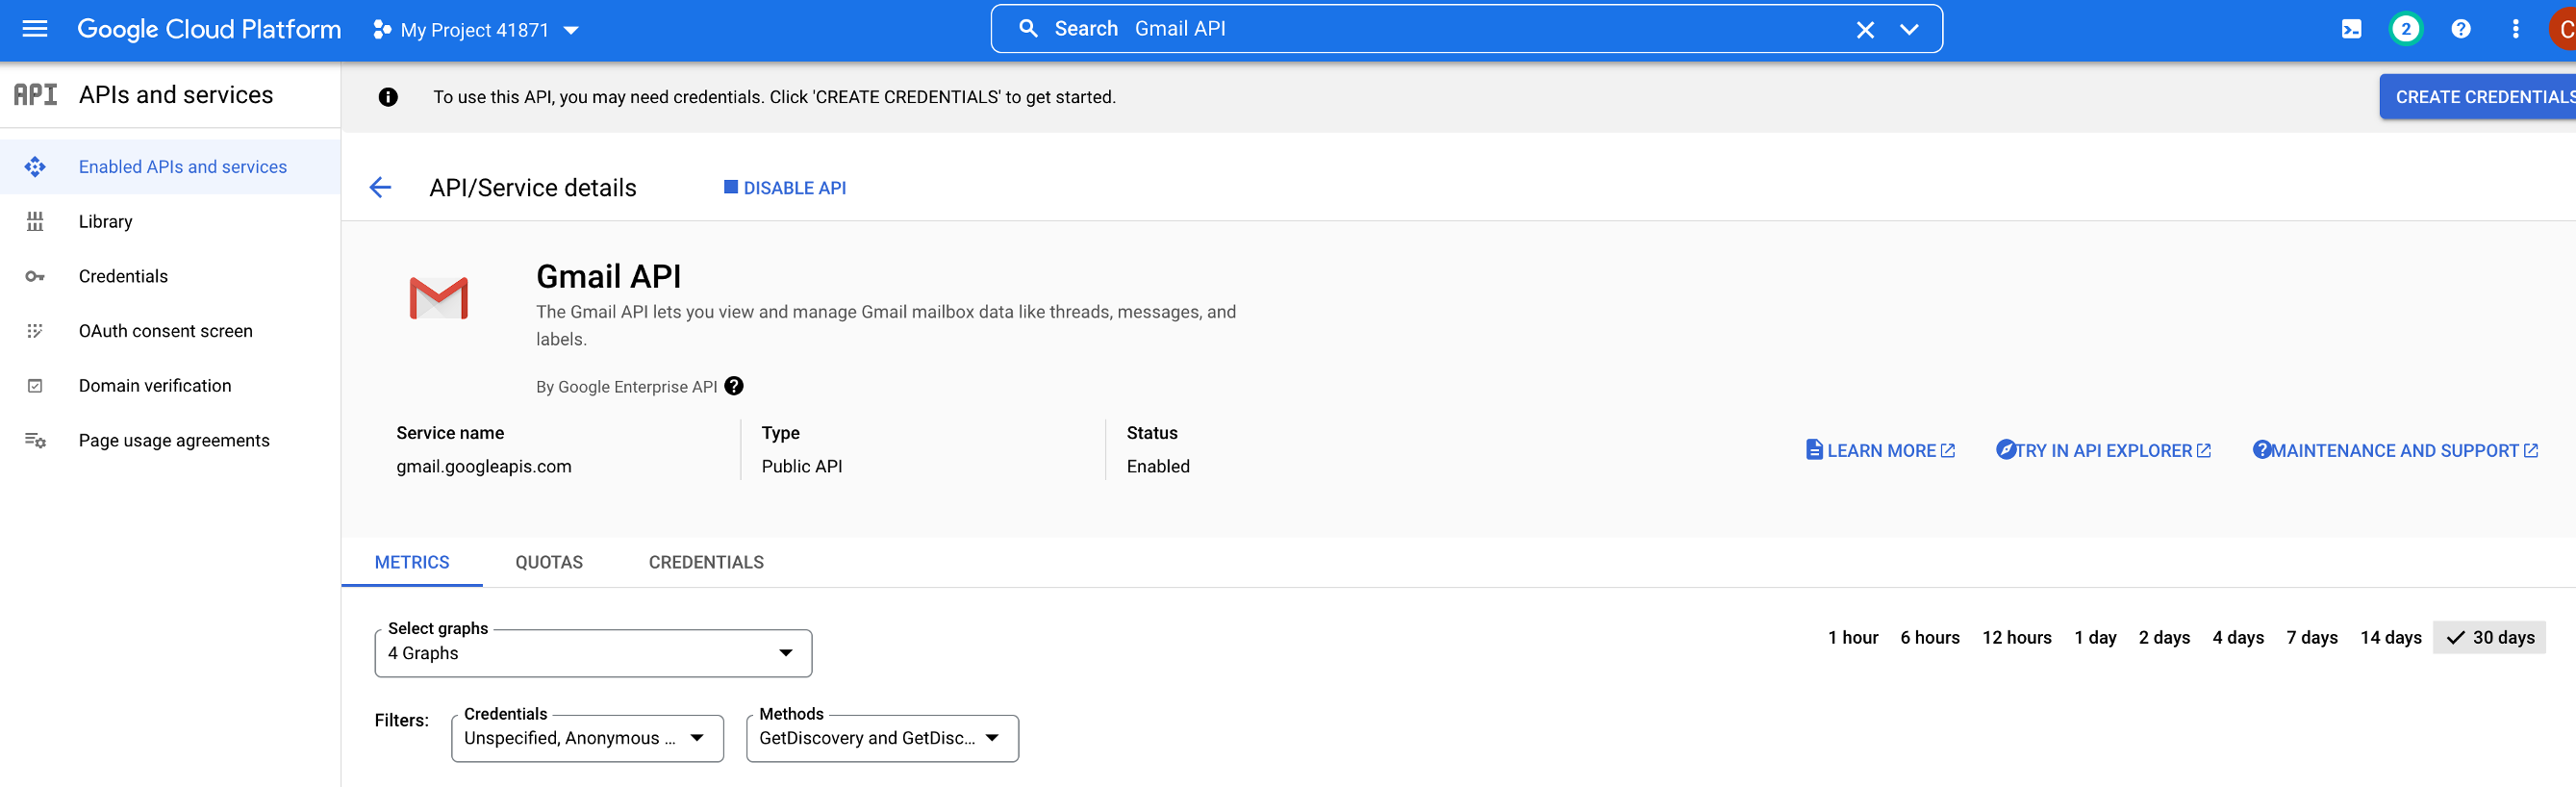
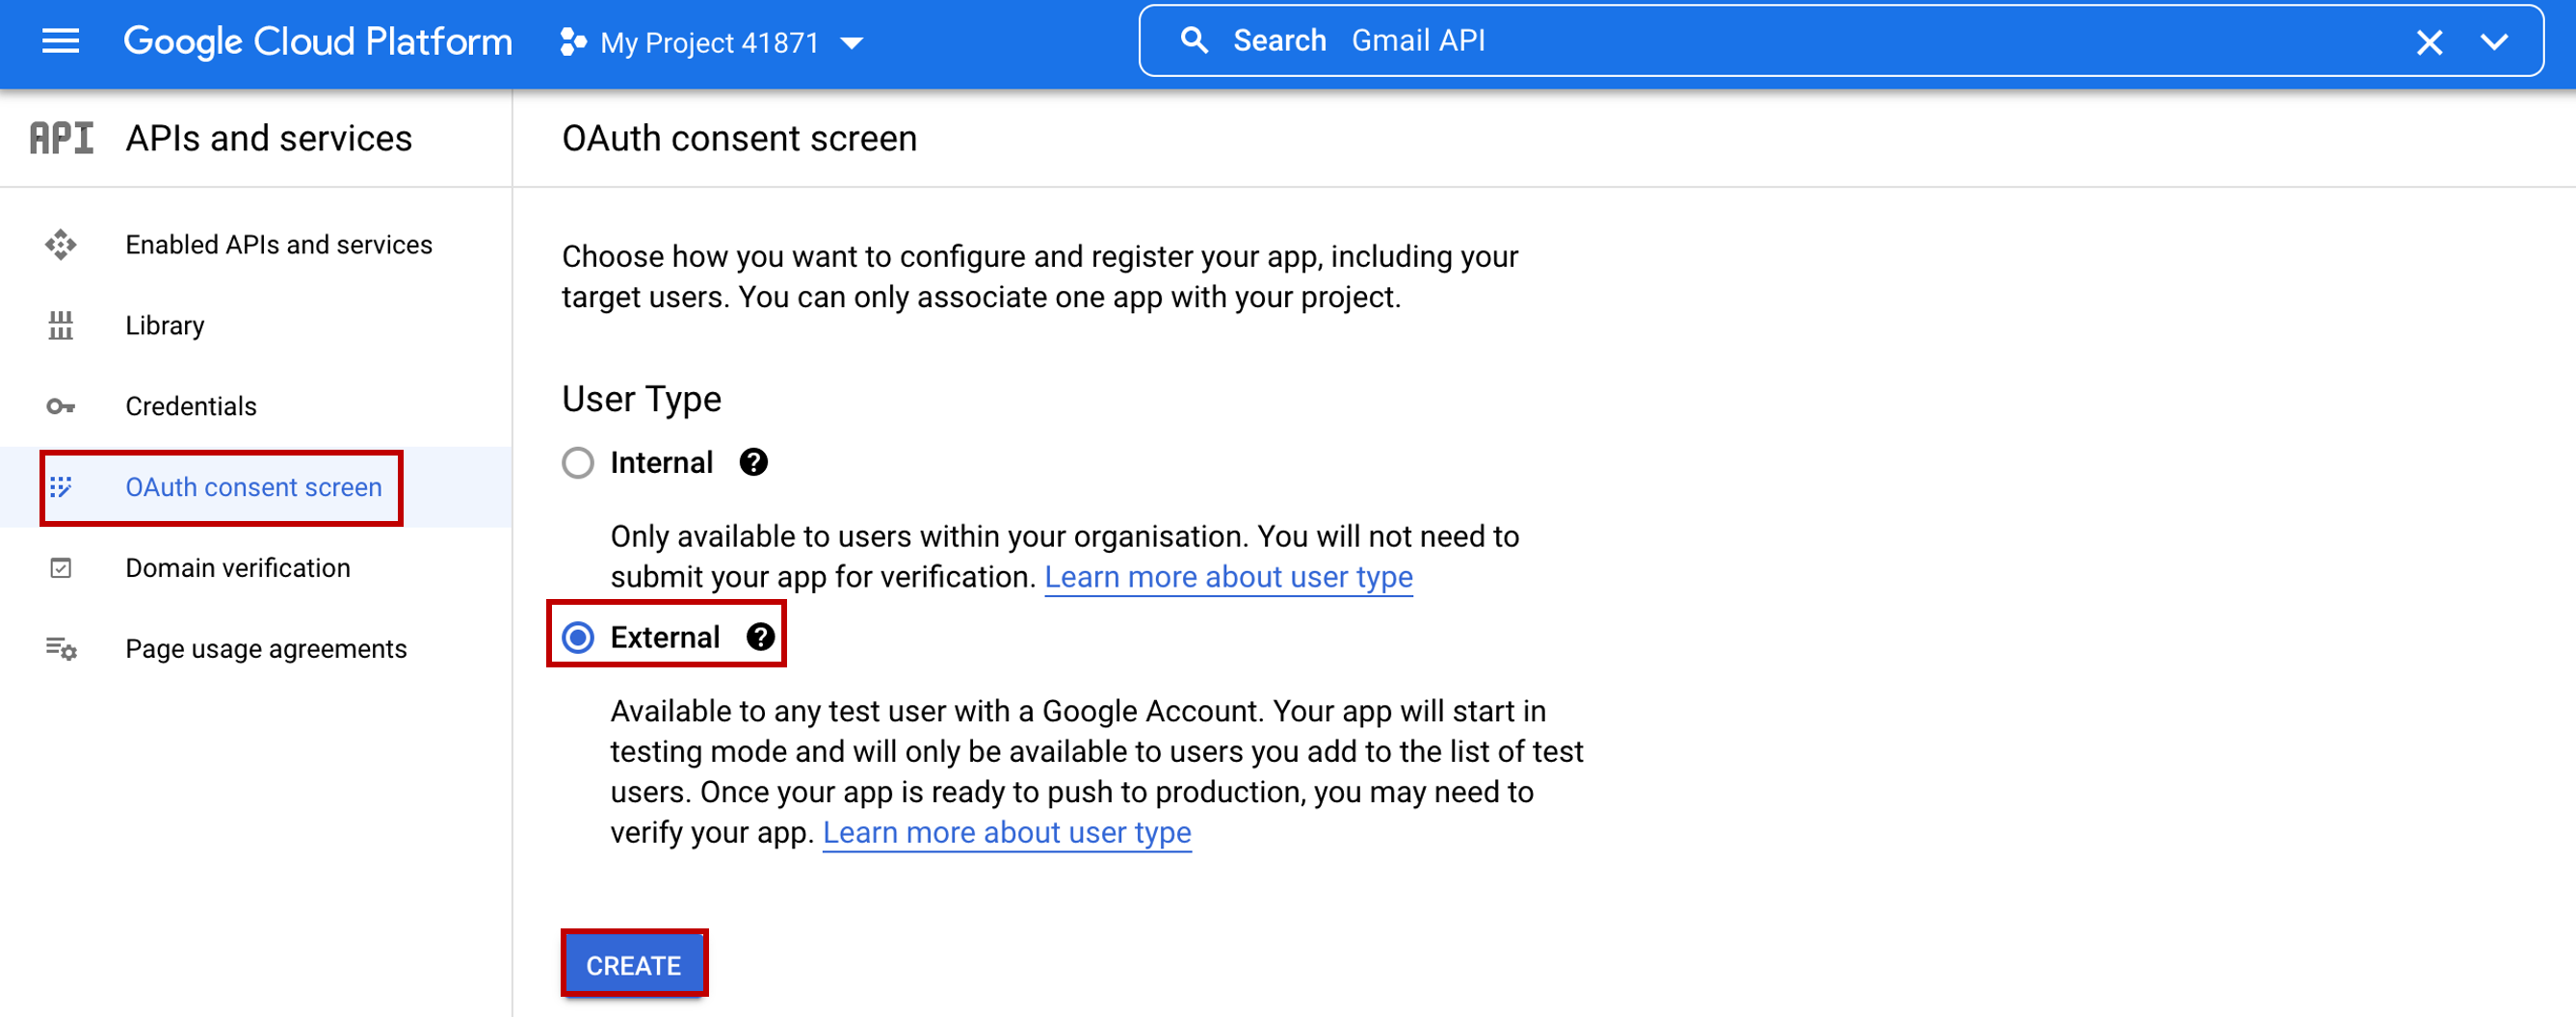
- To create an OAuth client ID, you must first configure your consent screen. Under the APIs and Services section, click on OAuth Consent Screen, set the user type as
Externaland click CREATE button.
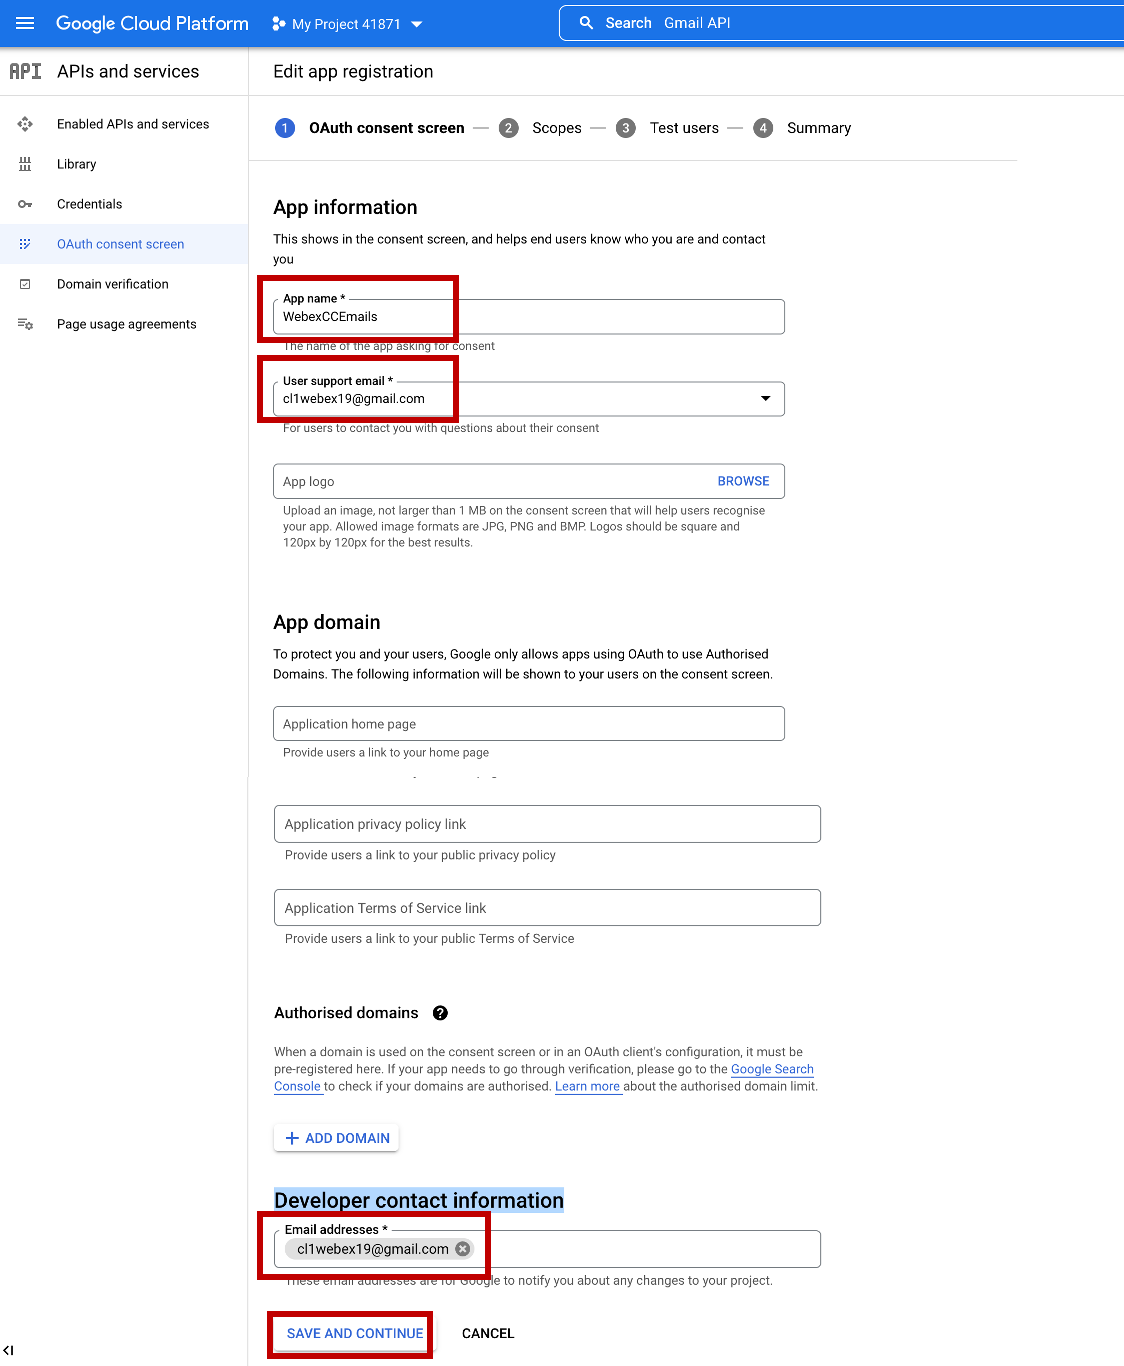
- It will bring you to a page with many fields. Just enter the App name as
WebexApp, choose your User support email and enter the same email in the Developer contact information. In the end press SAVE AND CONTINUE.
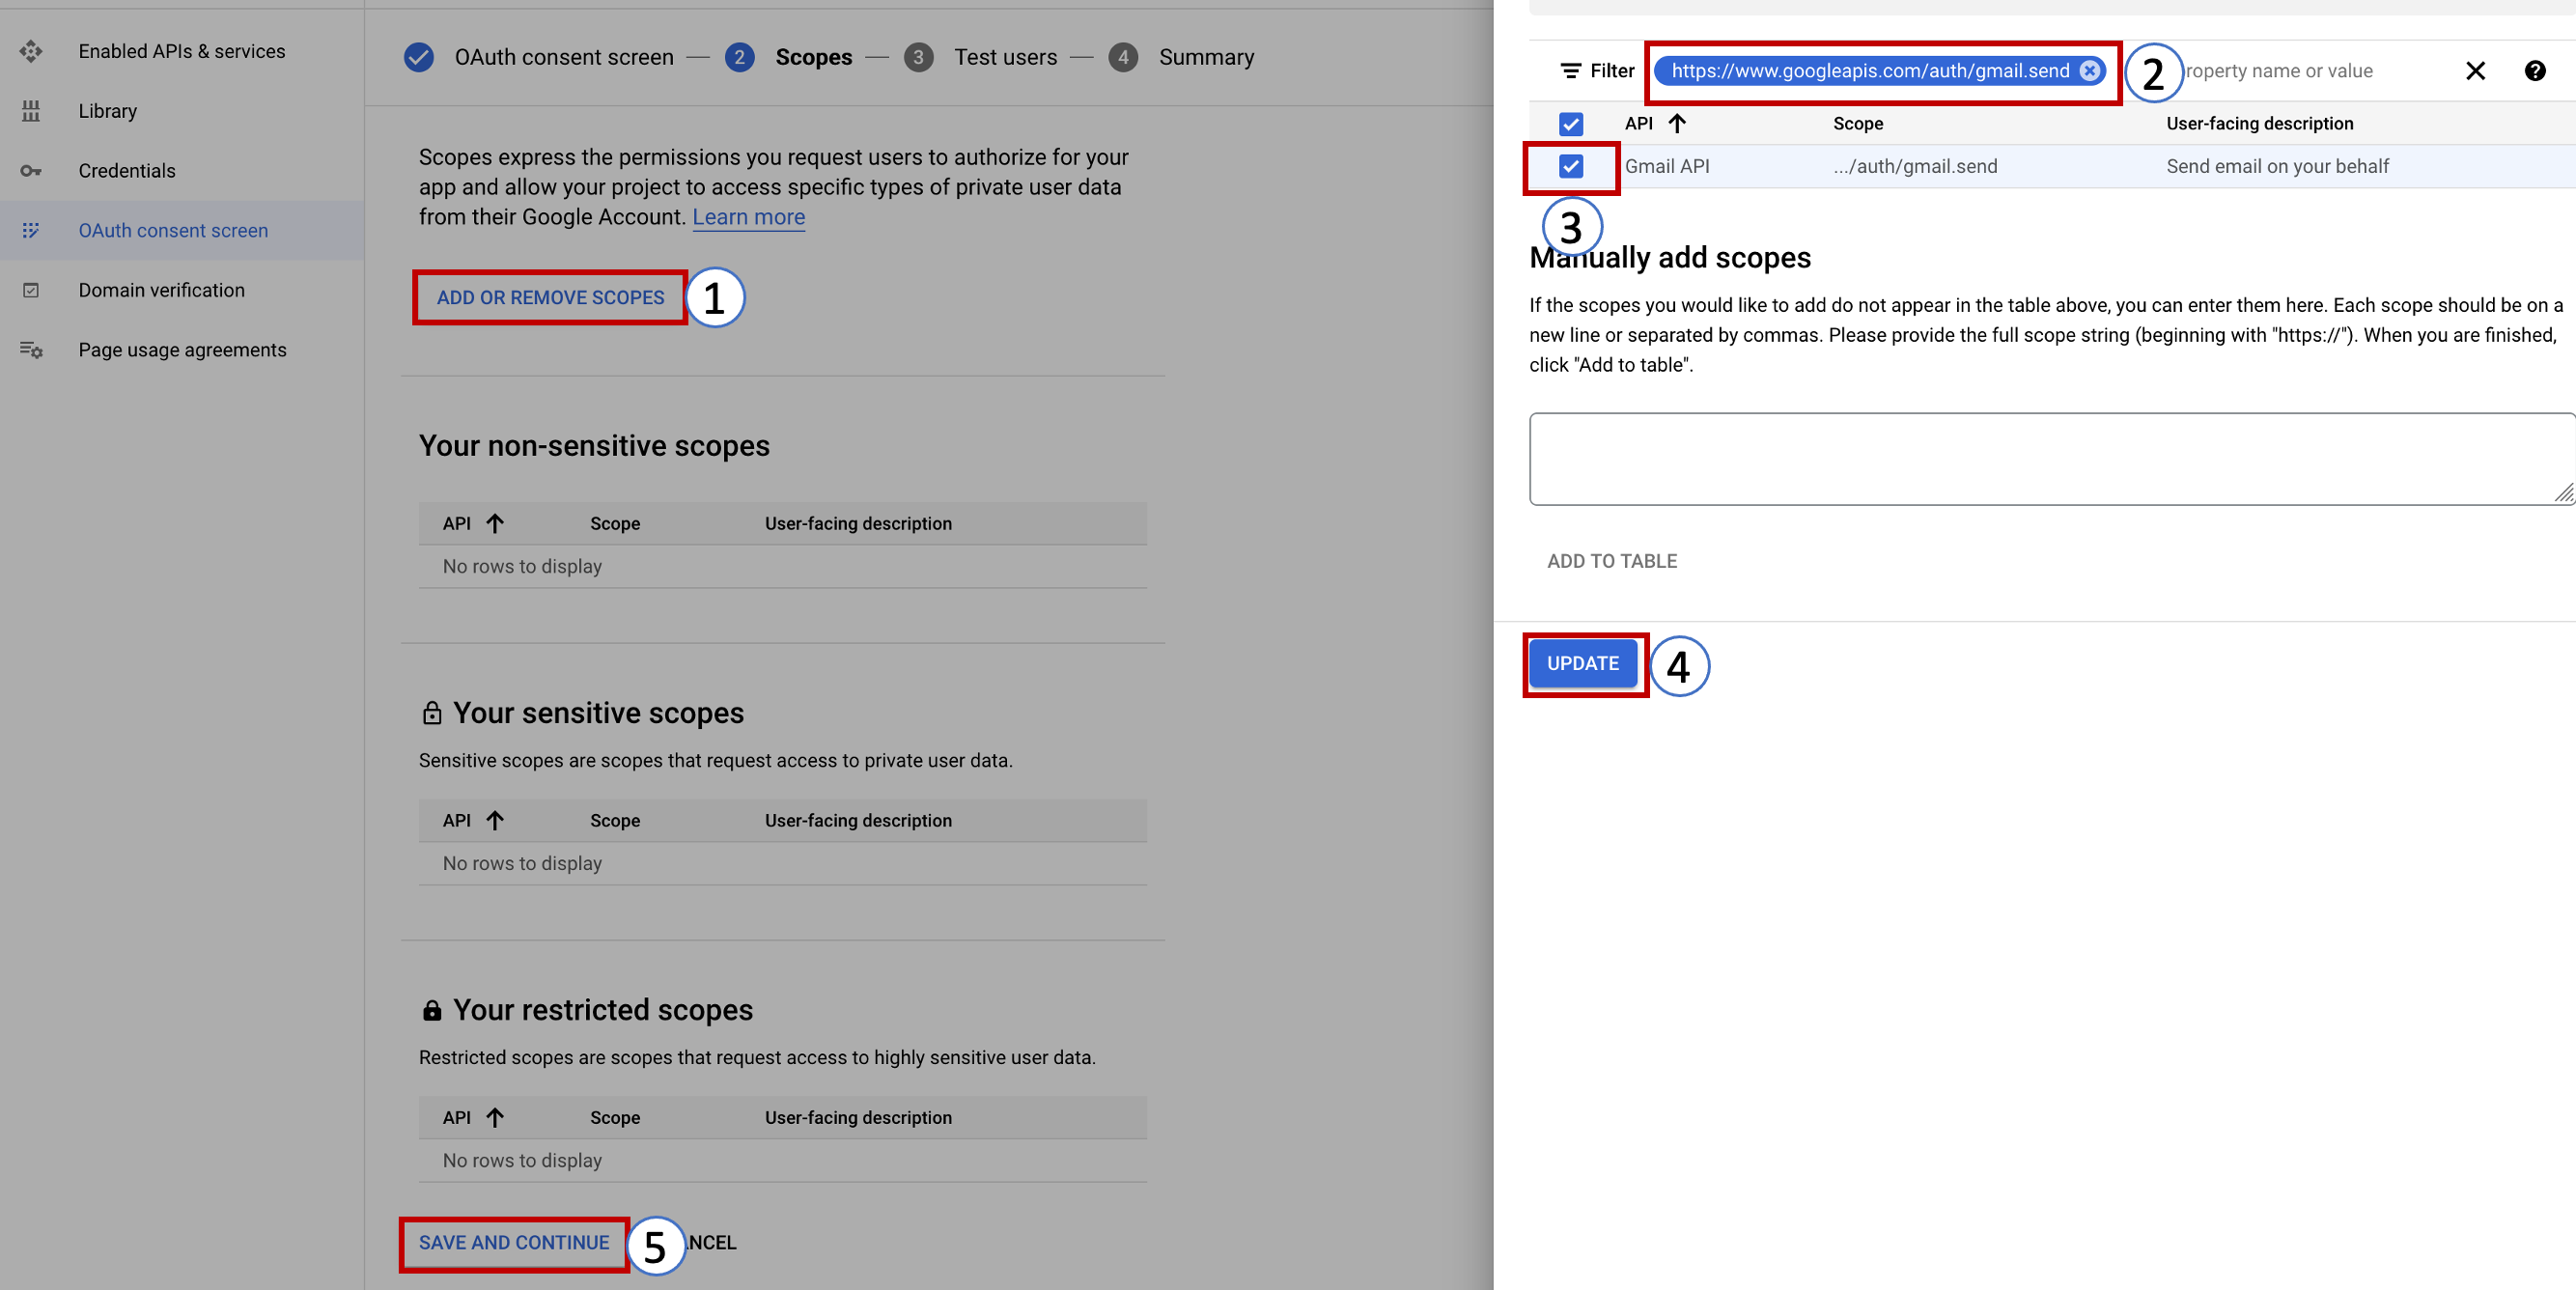
- On the next screen, you need to provide Auth 2.0 Scopes for Google APIs. Click the Add Or Remove Scopes button and add https://www.googleapis.com/auth/gmail.send to the list of scopes since we only want to send emails from Gmail and not read any user data. Click SAVE AND CONTINUE.
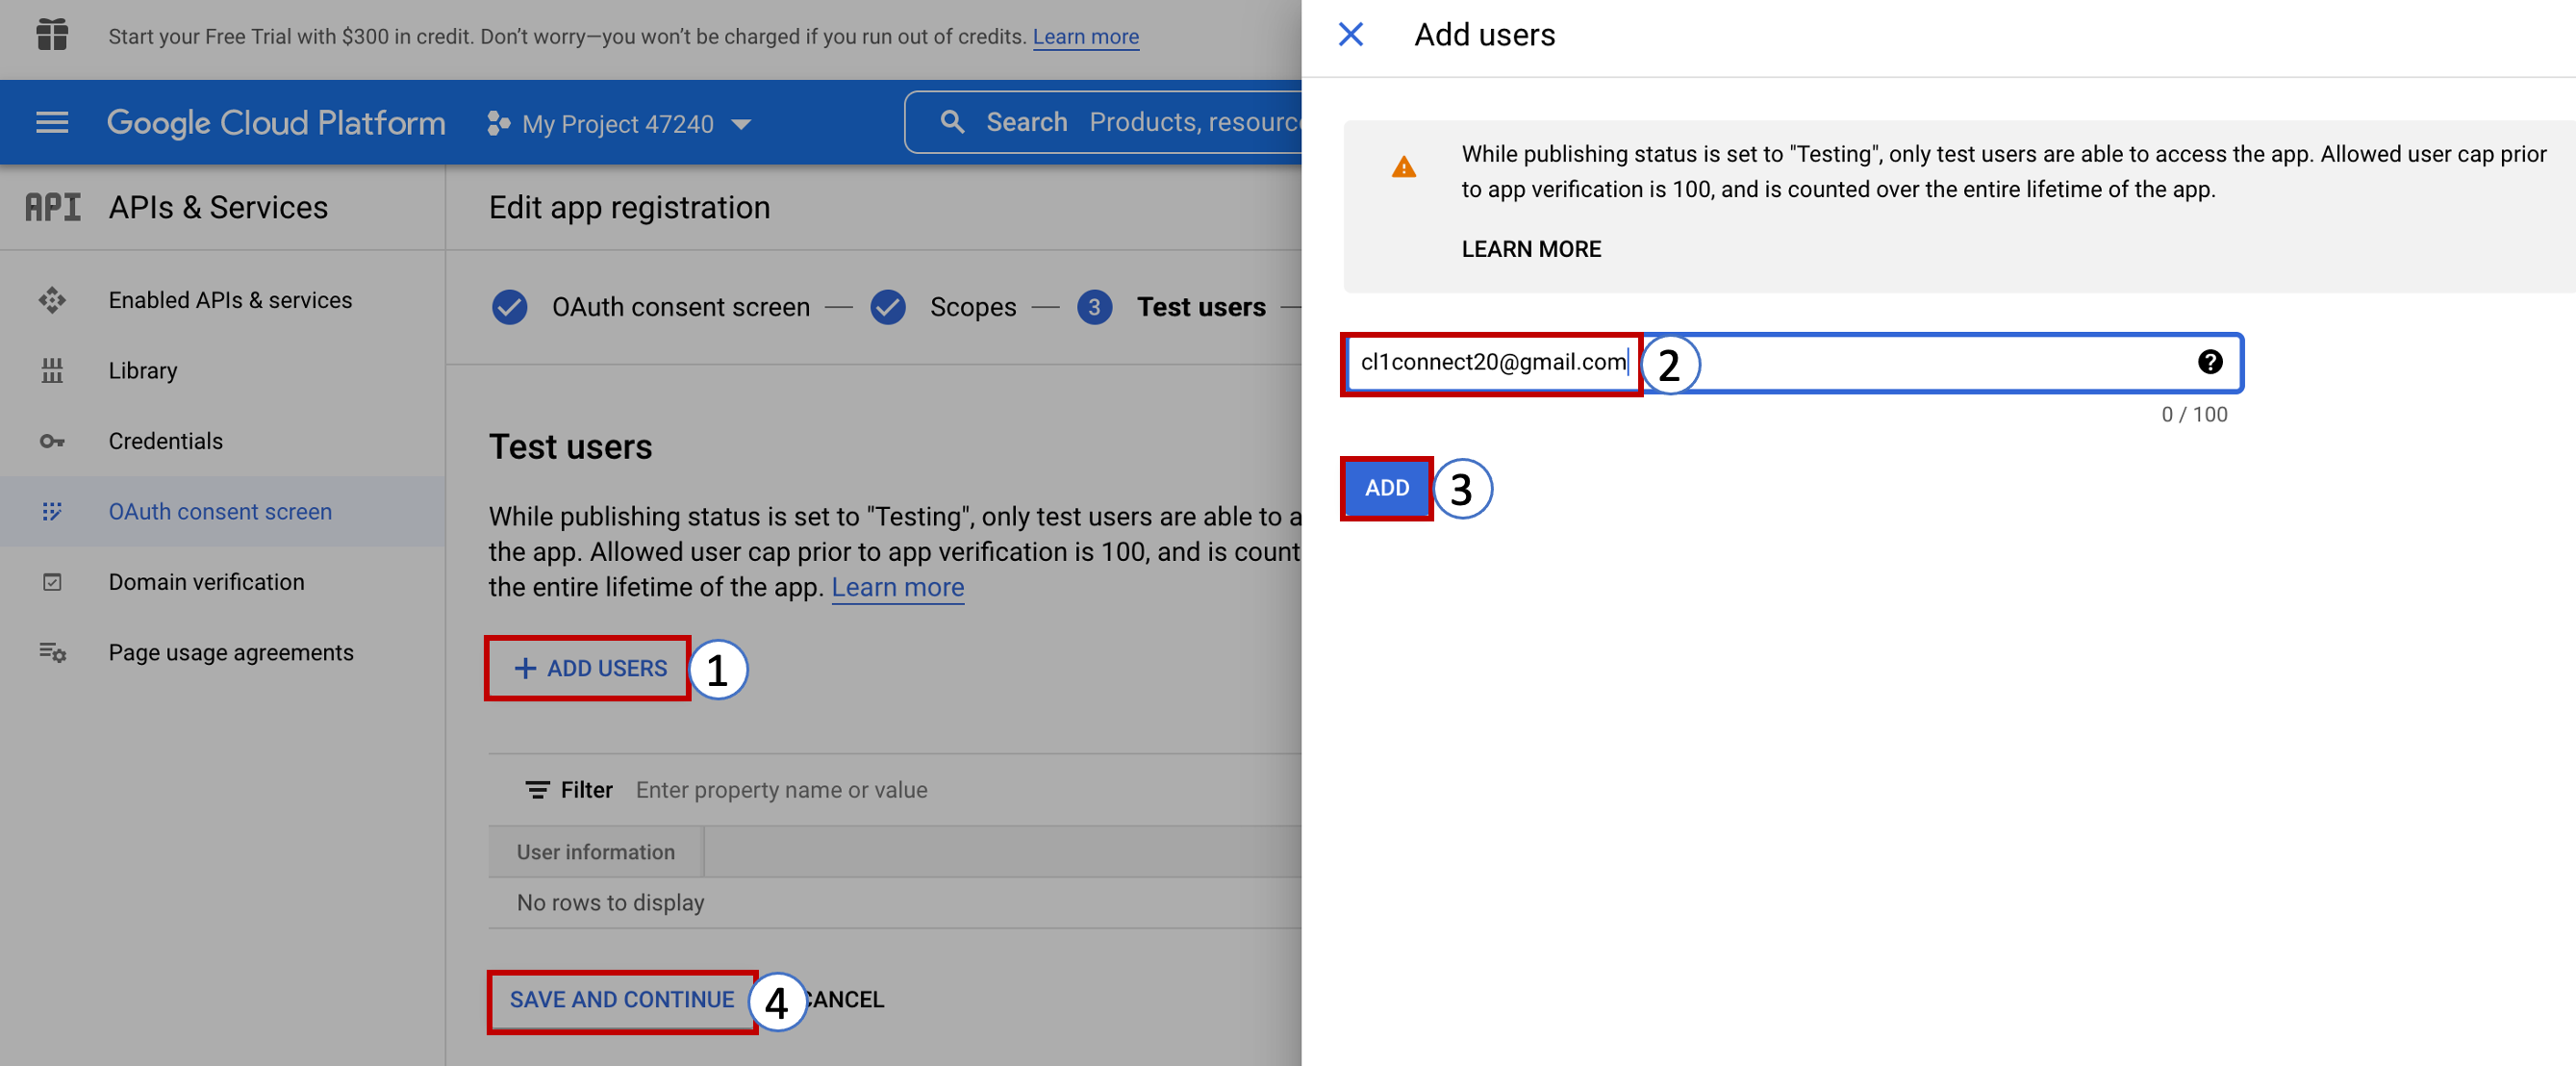
- On the test user page, click ADD USERS and enter your gmail address. Click Save and Continue.
5. Credentials and authentication with OAuth 2.0
Now create a new client ID that will be used to identify your application to Google’s OAuth servers.
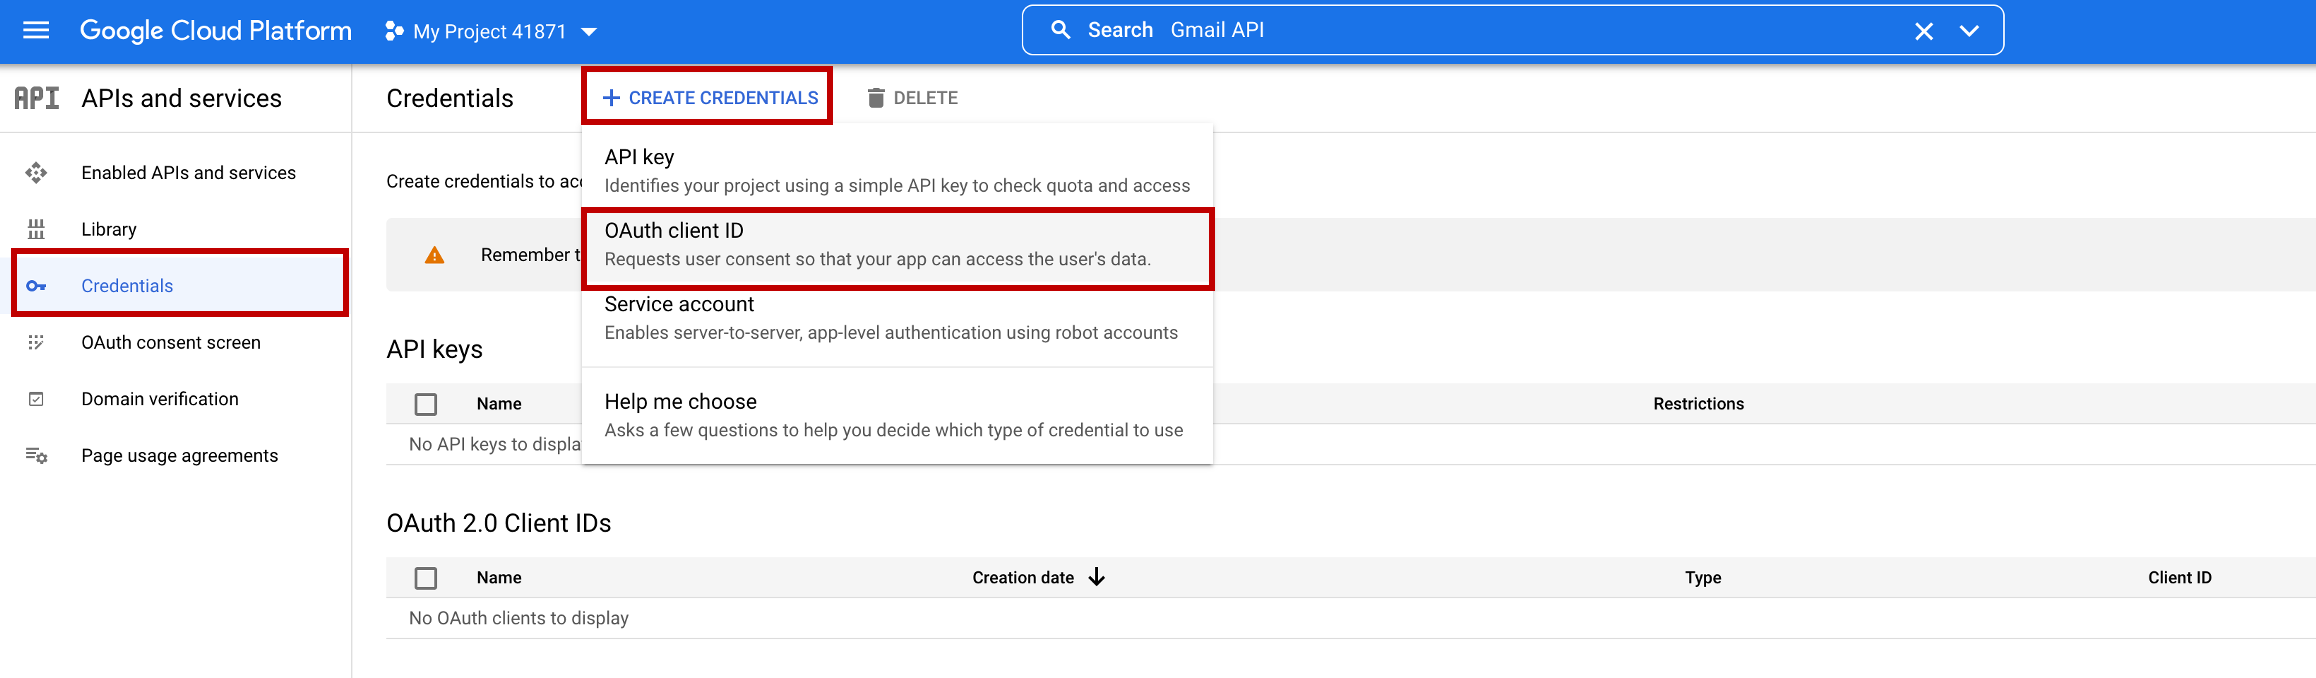
- In the APIs & Services section, click on Credentials and then pick OAuth client ID from the drop-down list of the CREATE CREDENTIALS button.
-
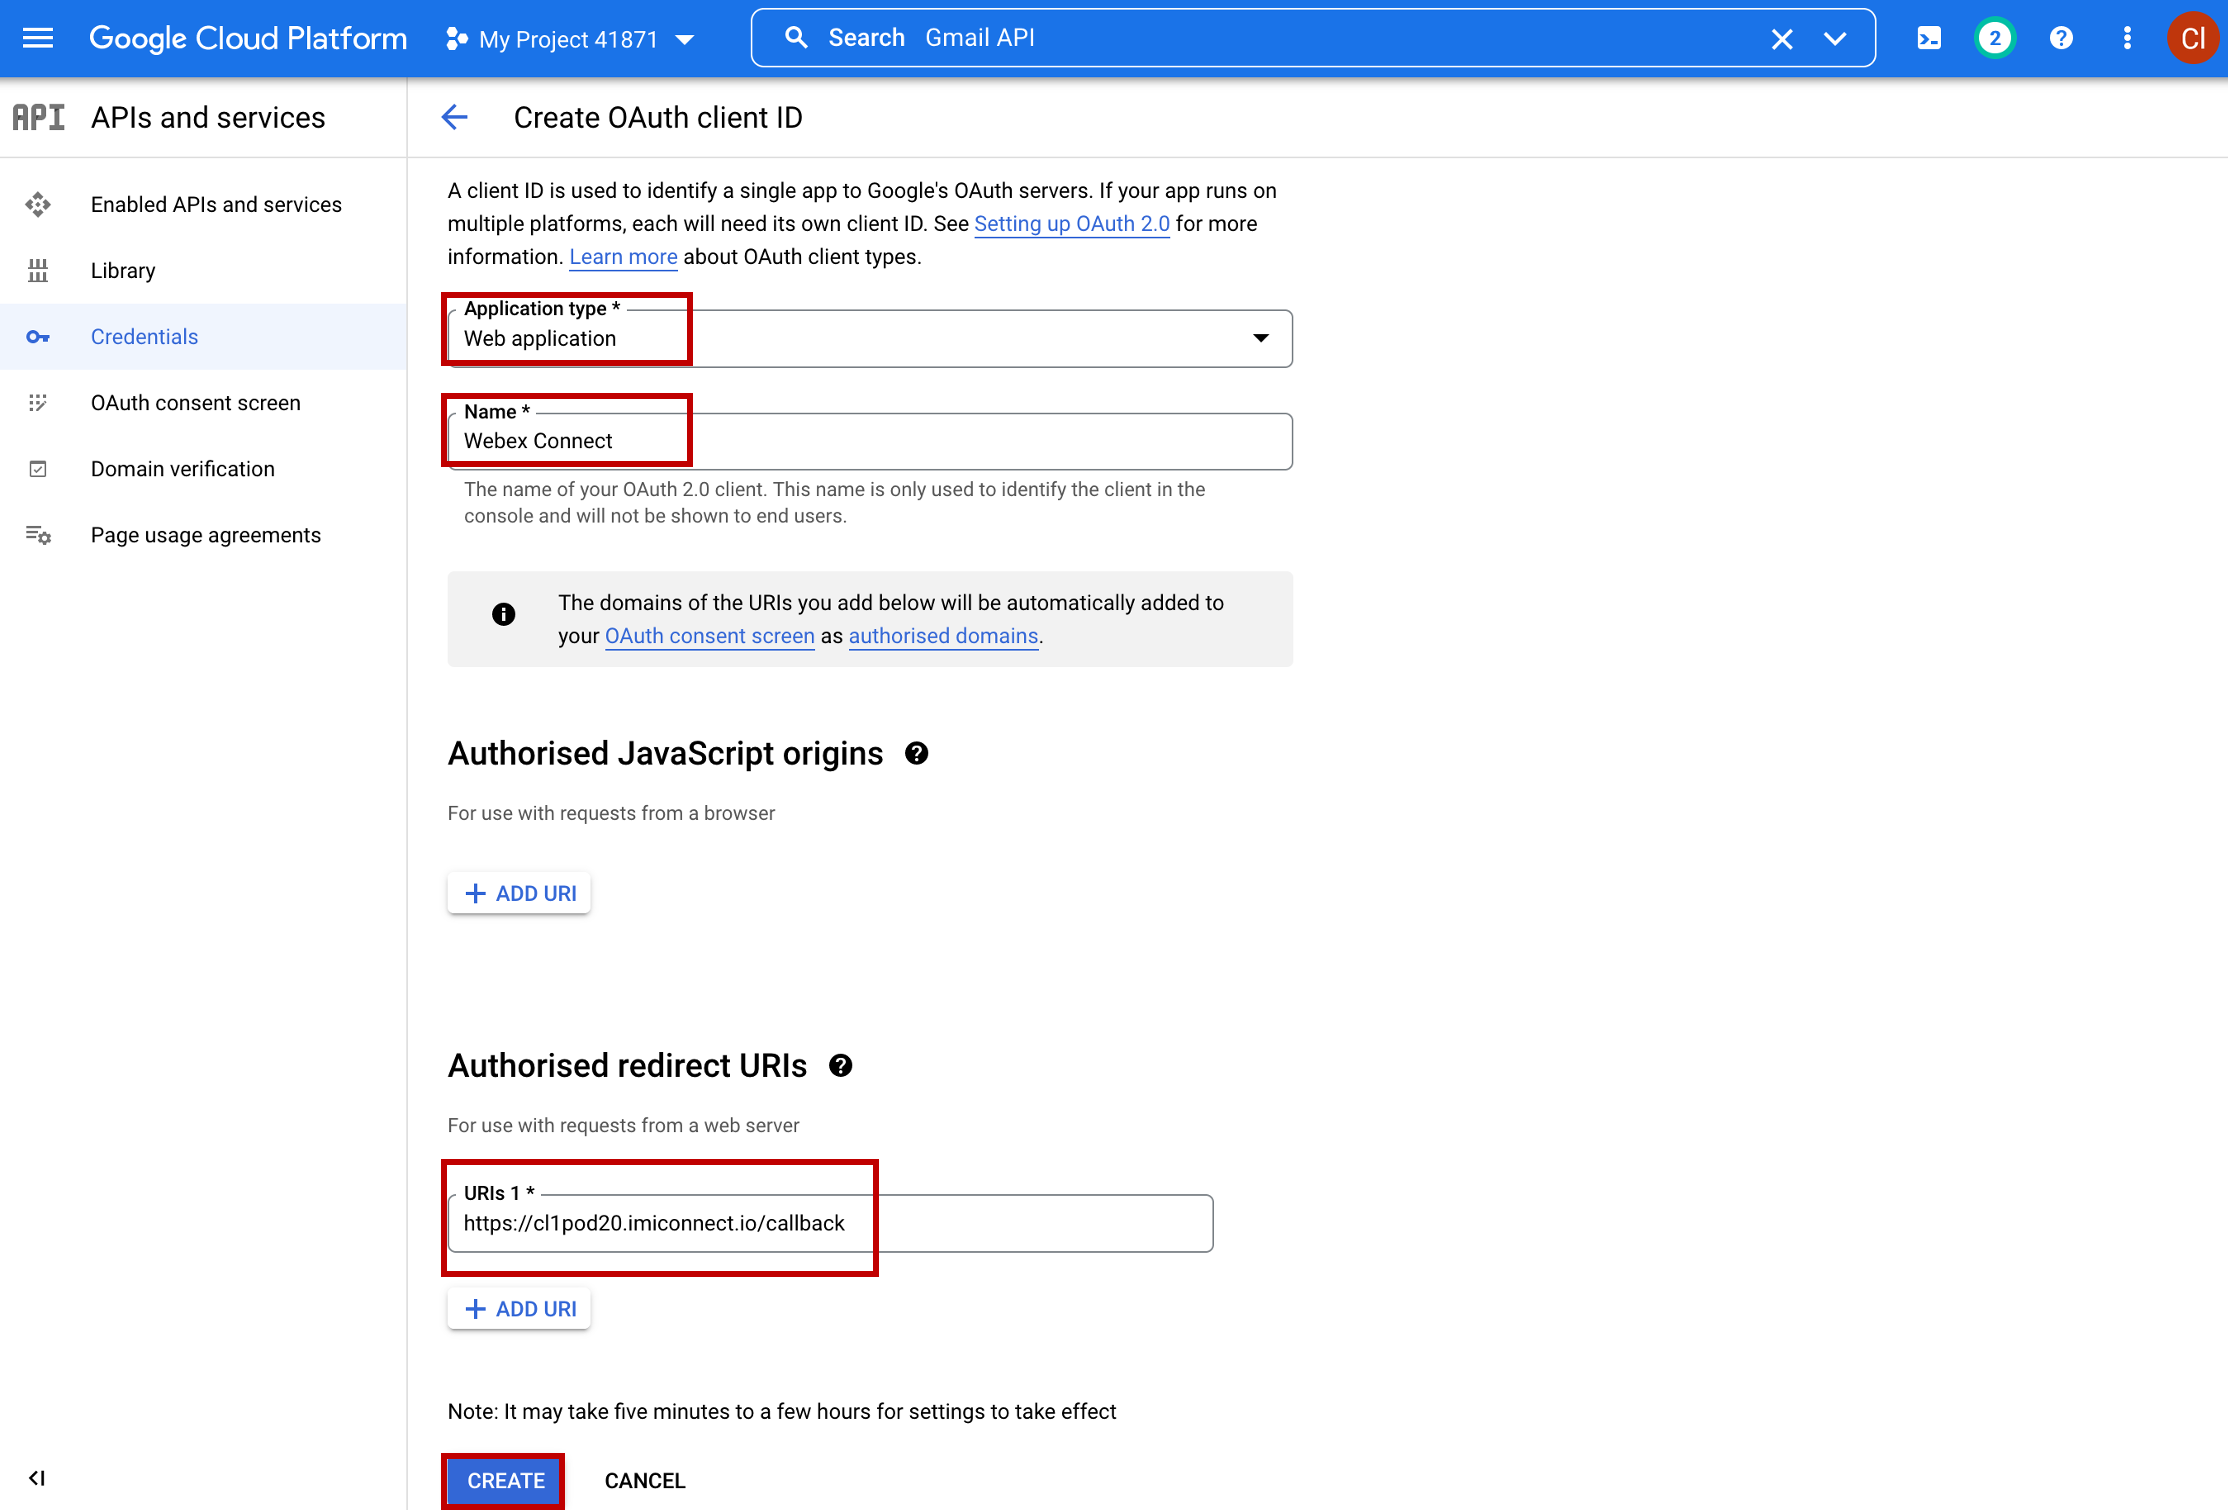
Select
Web applicationin the Application type -
You can leave the default name. The name of your OAuth 2.0 client is only used to identify the client in the Google Cloud console and will not be shown to application users.
-
In the Authorized redirect URIs section click ADD URL button and set
https://cl1pod\<ID\>.imiconnect.io/callbackwhere <ID> is your tenant number. Click CREATE button in the end.
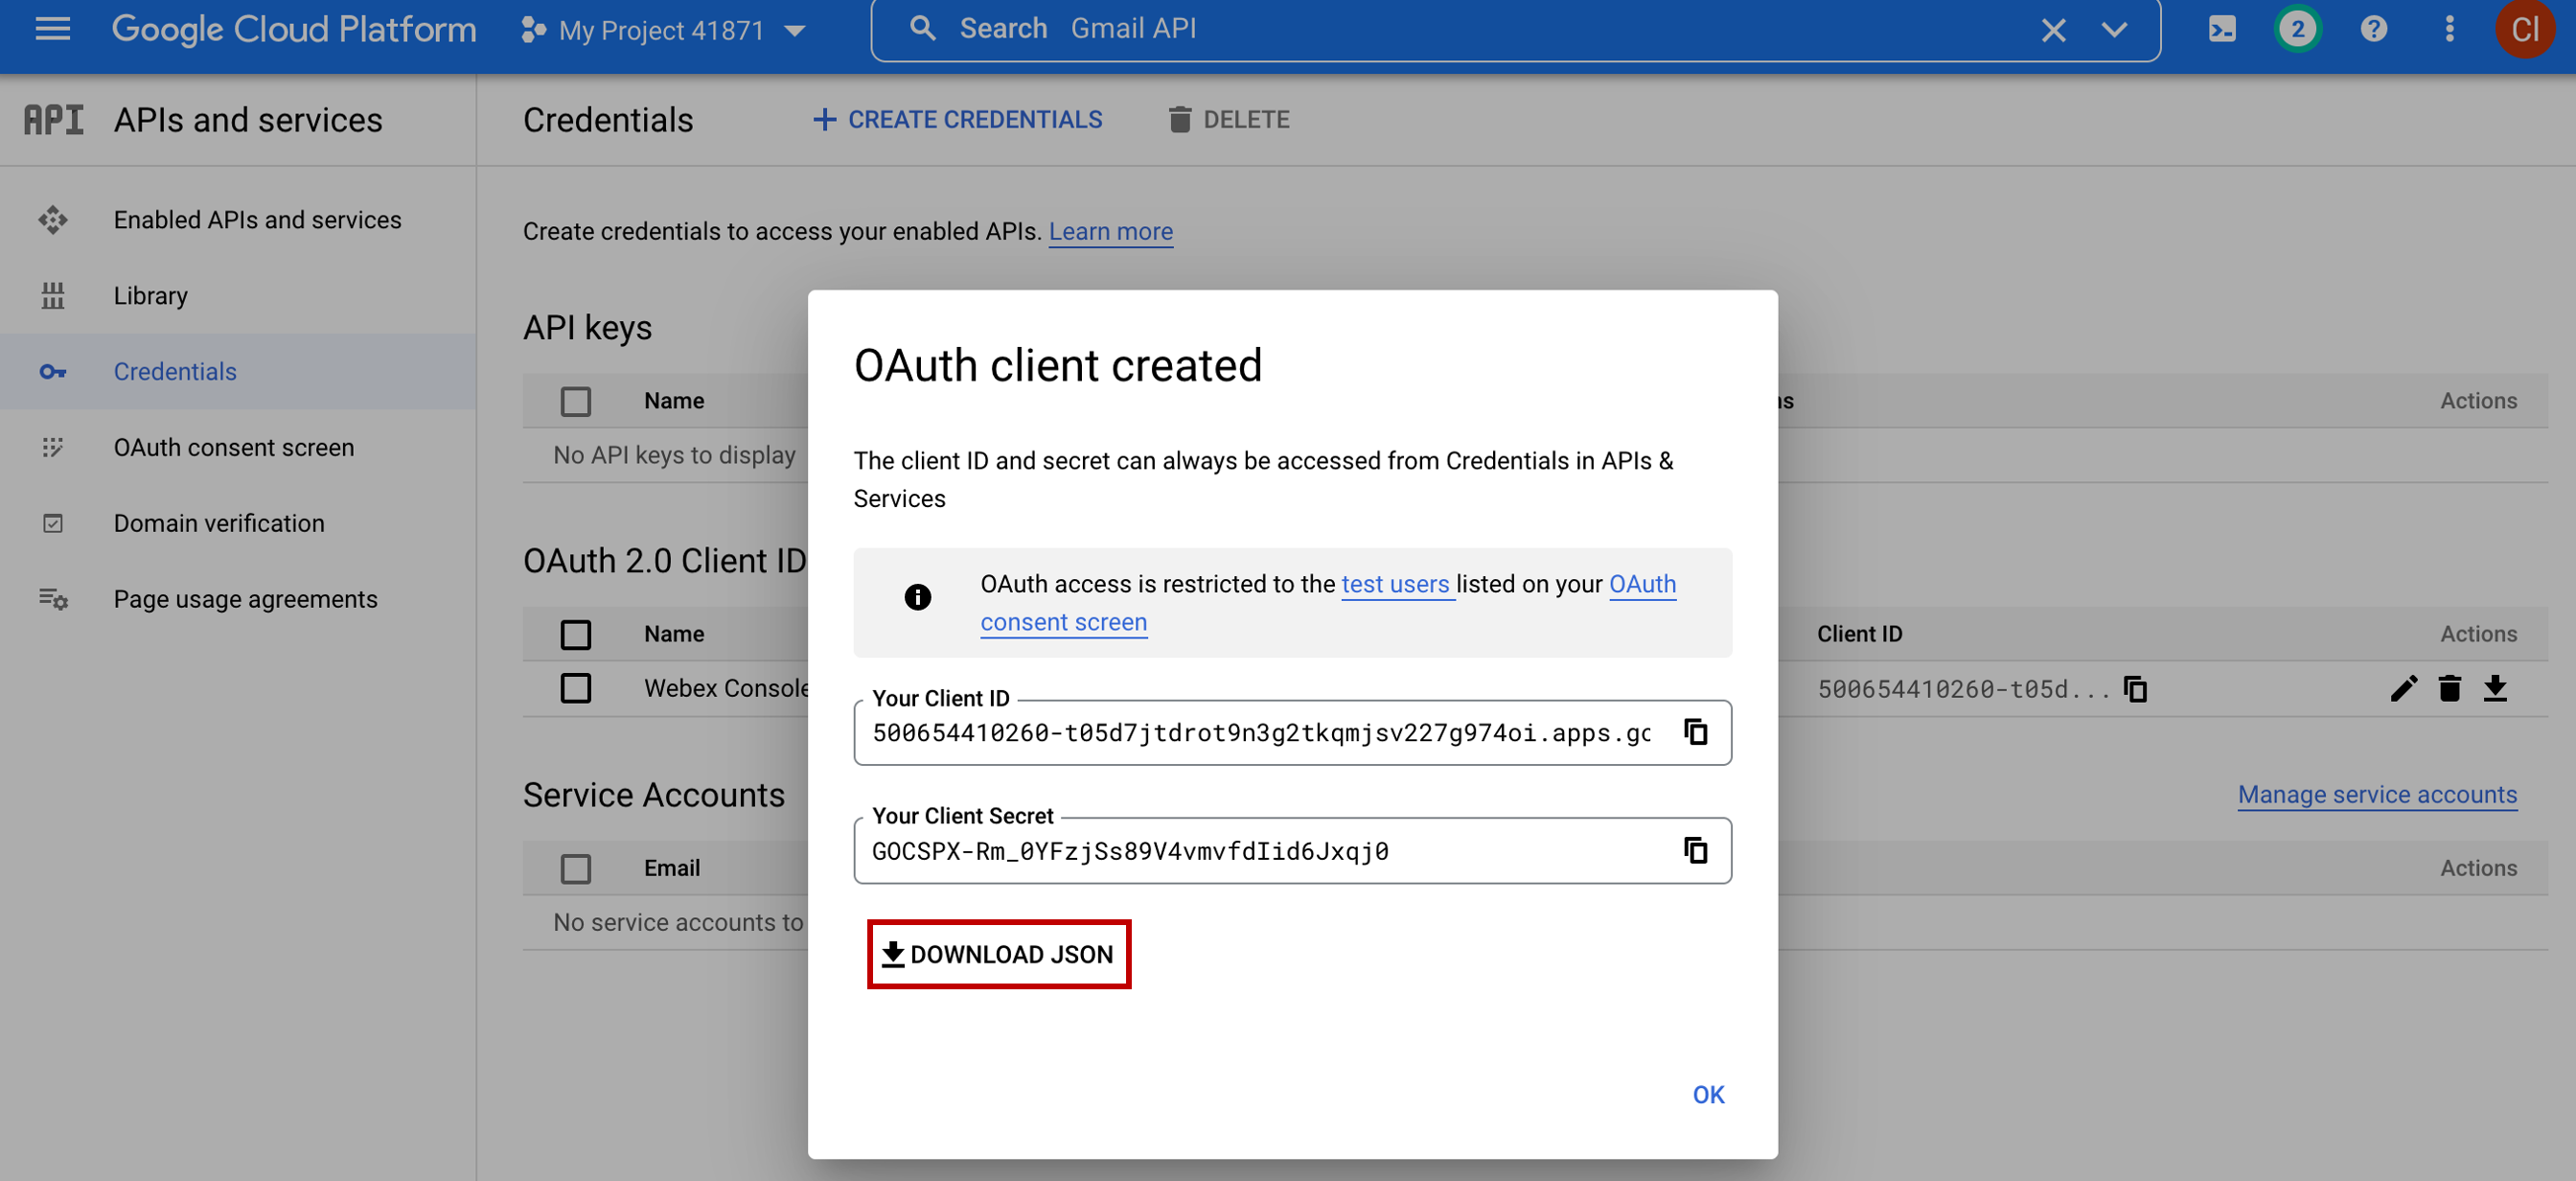
- Download a JSON file with your credentials – you’ll need it later.
Step 2. Create Email Asset and Register to WebexCC
1. Create Email Assest
-
As an admin, login to Webex Connect UI using the provided URL https://cl1pod<ID>.imiconnect.io/ (where <ID> is your POD number).
-
Select Assets -> Apps -> CONFIGURE NEW APP -> Email.
- Set the settings according to the table below:
| Entity | Name |
|---|---|
| Asset Name | EmailAsset |
| Email ID | cl1webex<ID>@gmail.com |
| Authentication Type | OAuth 2.0 |
| SMTP Server | smtp.gmail.com |
| Username | cl1webex<ID>@gmail.com |
| Port | 465 |
| Security | SSL |
| Client ID | <client_id from JSON file> |
| client Secret | <client_secret from JSON file> |
| Authorization URL | https://accounts.google.com/o/oauth2/auth |
| Scope | https://mail.google.com/ https://www.googleapis.com/auth/gmail.send |
| Access Token URL | https://oauth2.googleapis.com/token |
| Refresh Token URL | https://accounts.google.com/o/oauth2/auth |
where <ID> is your POD ID

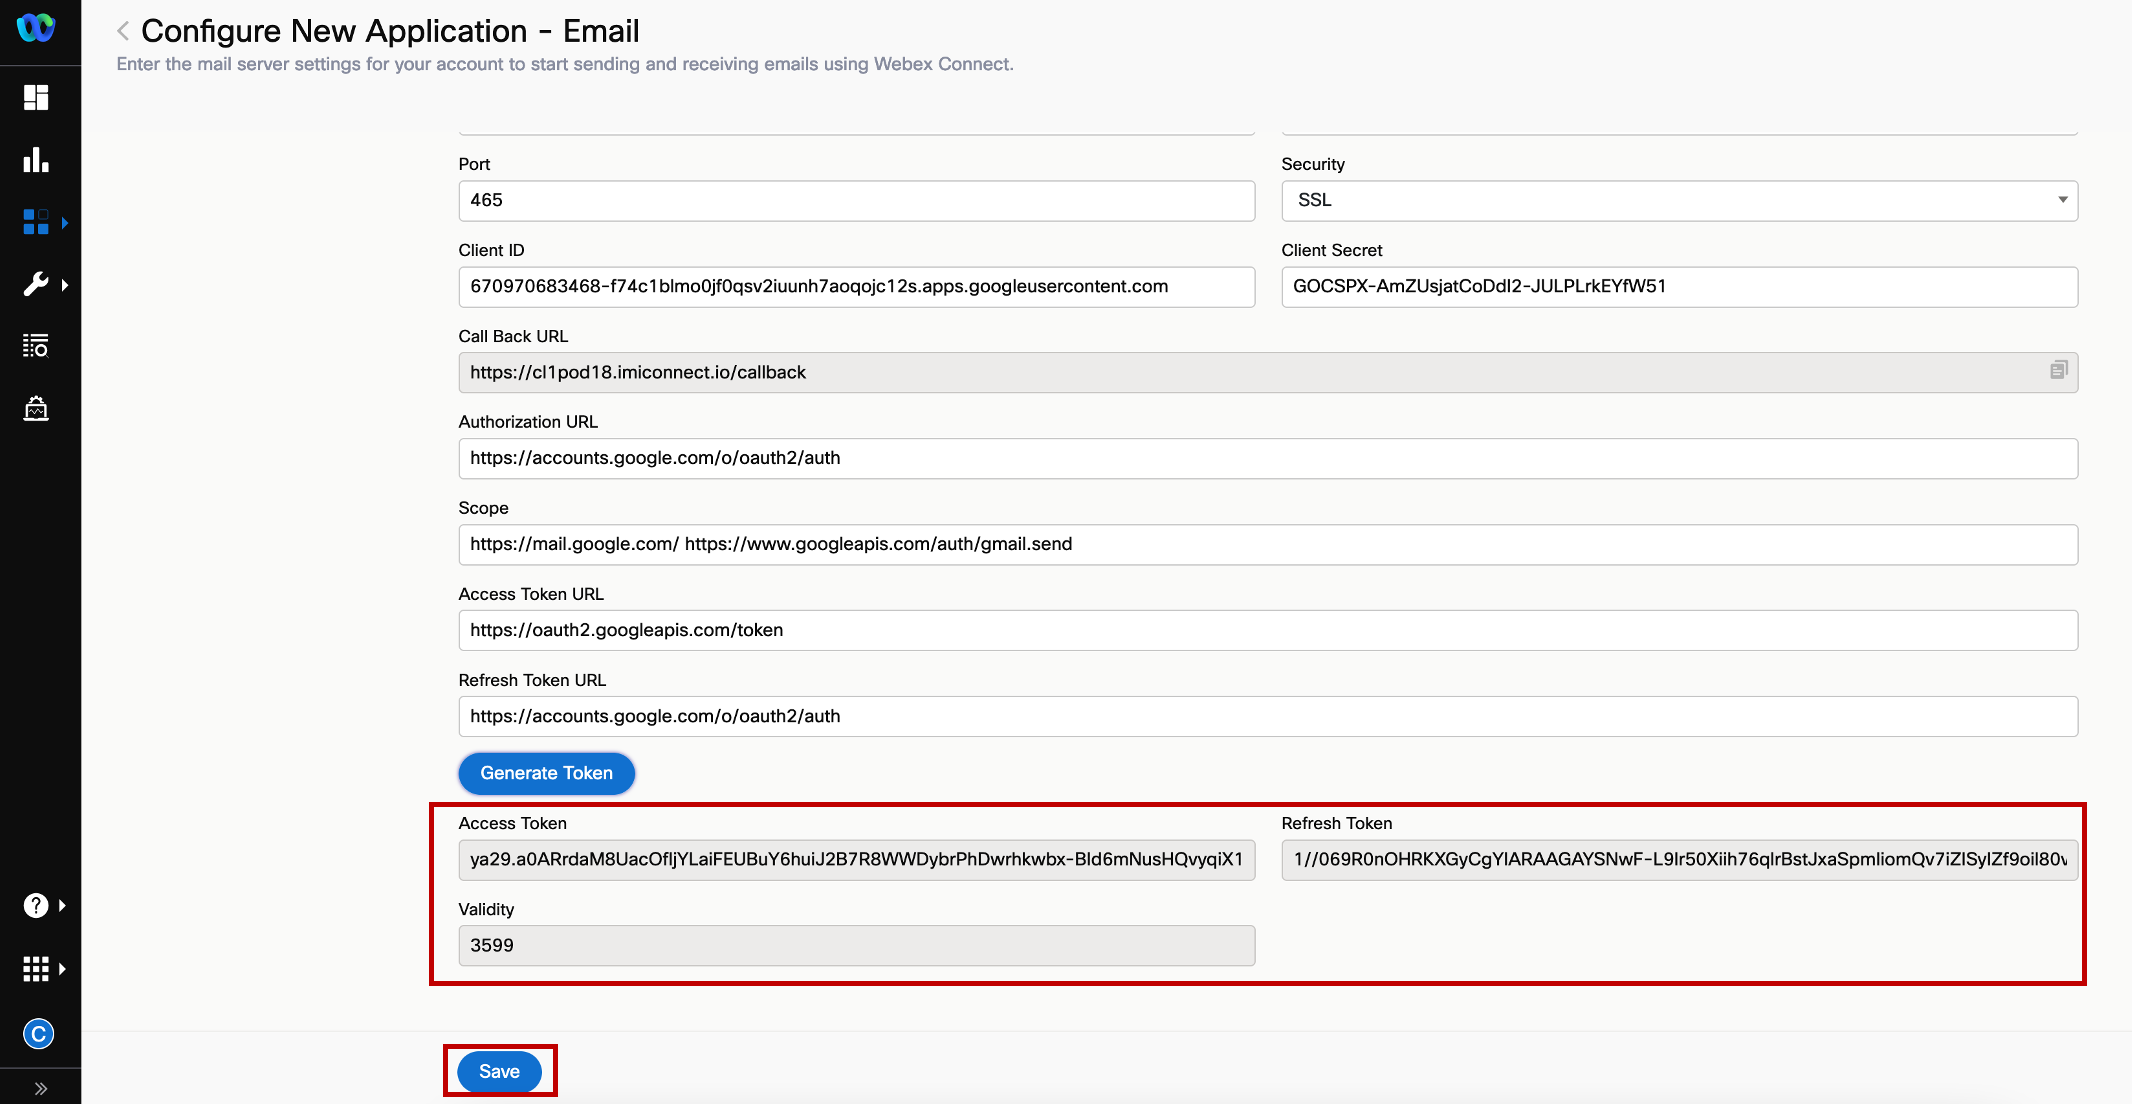
- Click GENERATE TOKEN and follow the step on the screenshot:
- Verify that the ACCESS TOKEN and REFRESH TOKEN are generated and click SAVE.
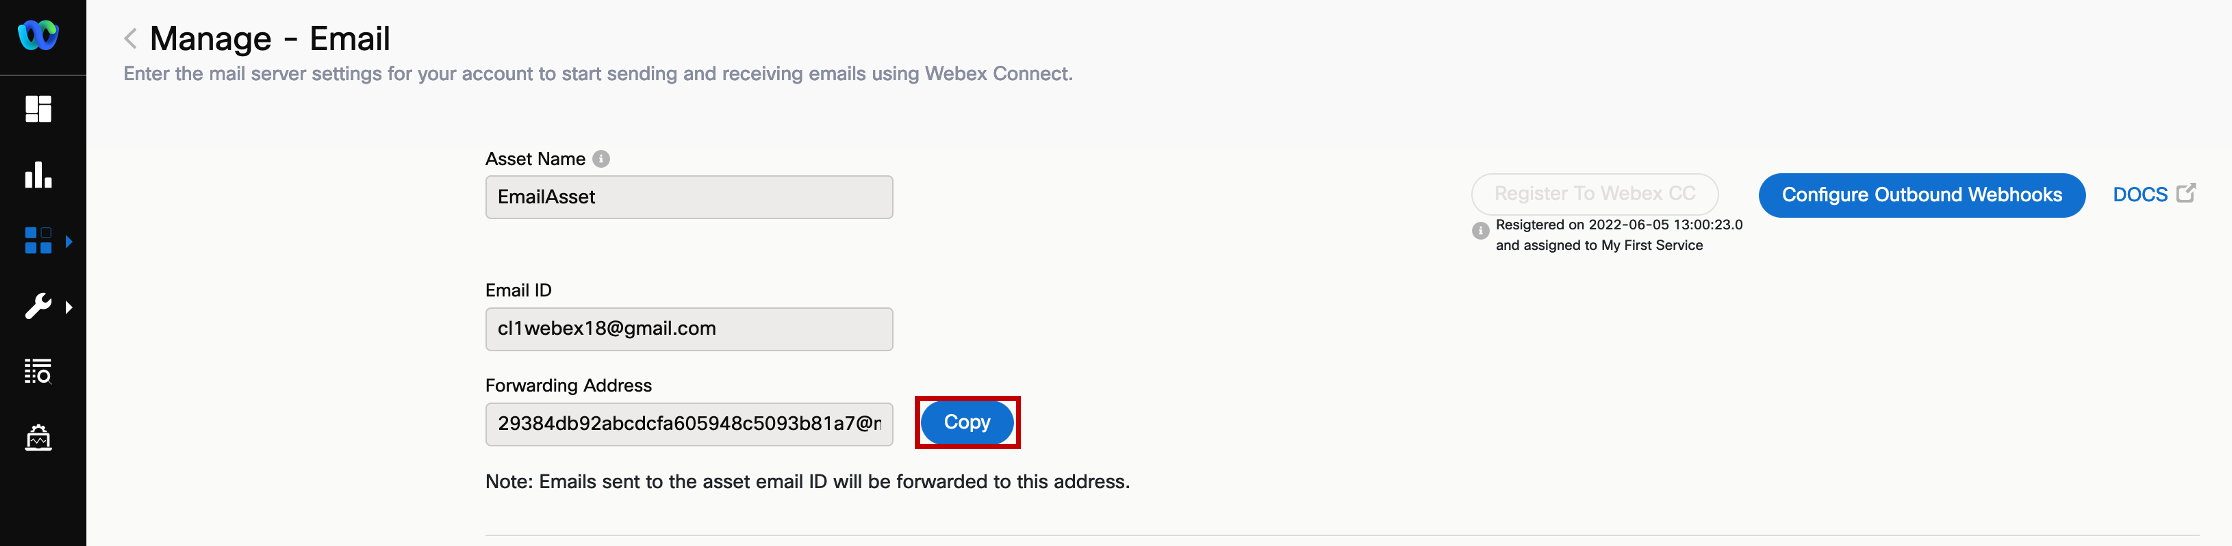
- Click on REGISTER TO WEBEX CC and Select the service My First Service. In the end click REGISTER.
2. Add forwarding Address
- Copy the forwarding address from the created asset in previous step and in Gmail account.
- Go back to the Gmail account and click on settings icon on top right corner -> Select See all settings.
- Click on Forwarding and POP/IMAP -> click on Add a forwarding address -> Paste the copied forwarding address from the created asset. Then click on Next. In a new pop up tab click Proceed and then click OK when it prompts.
-
Go back to Webex Connect and click on Tools -> Export Logs.
-
Under Inbound logs, Select the App that was created -> Select Channel Event as
Incoming Email-> Select the period asToday. Wait until status is changed to Ready for download and click Download icon.
- Once a log file is downloaded, open the log file, under the Subject column, copy the confirmation code.

- Go back to the Gmail account, paste the code in the email account verification section and click verify.
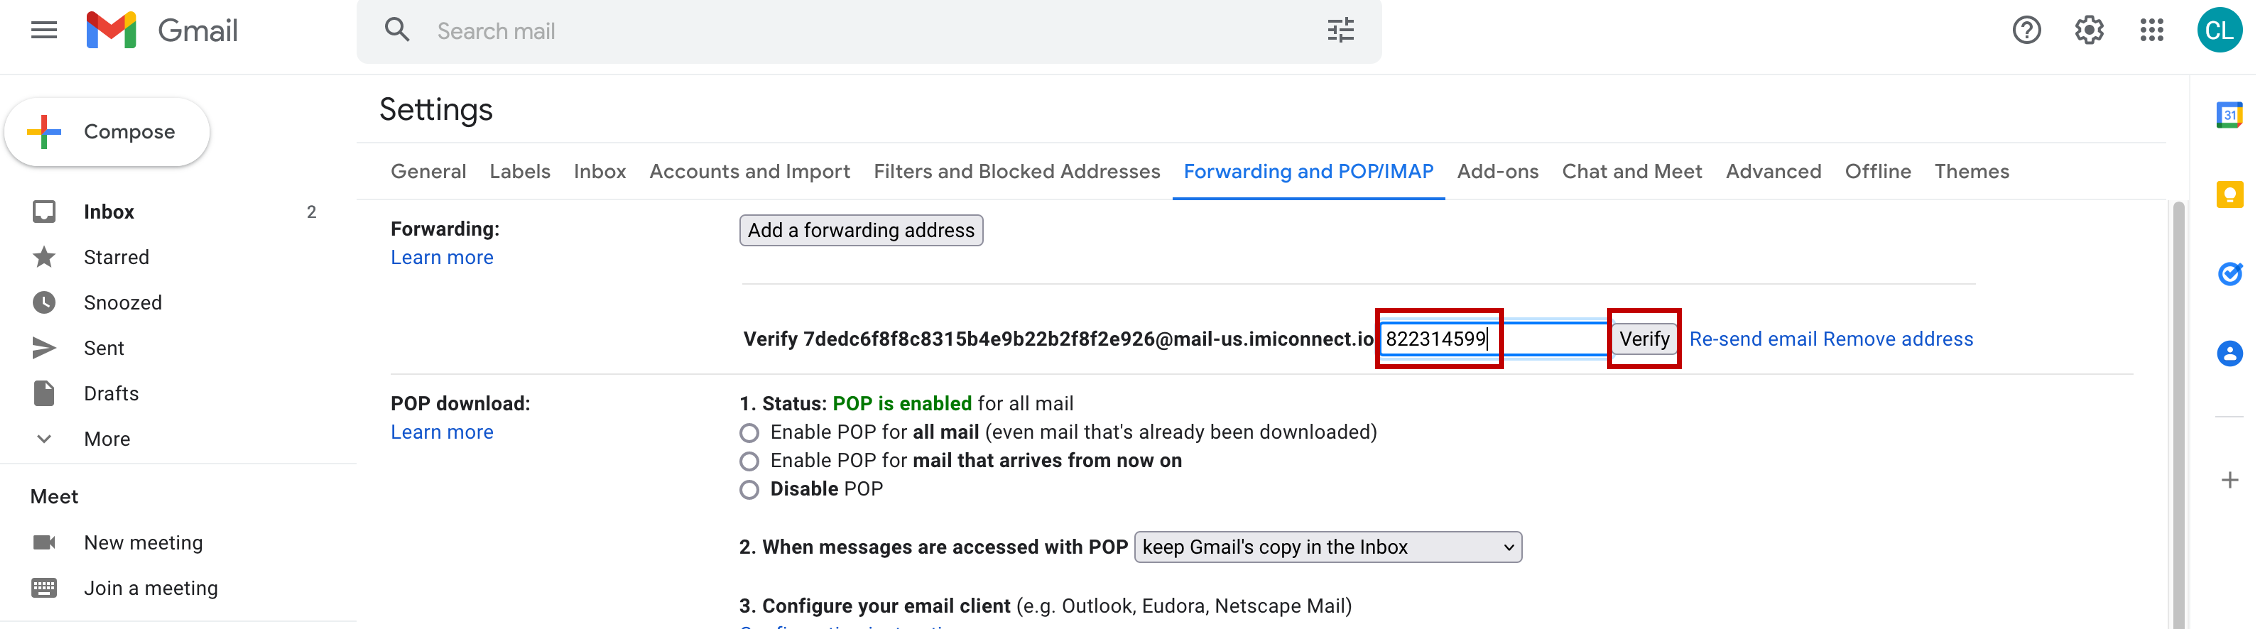
- Select Forward a copy of incoming mail to the verified address and click Save Changes.

Step 3. Email Entry Point and Queue creation
1. Create Entry Point in Management Portal
-
Click on Provisioning and select Entry Points/Queues > Entry Point.
-
Click on
New Entry Point. -
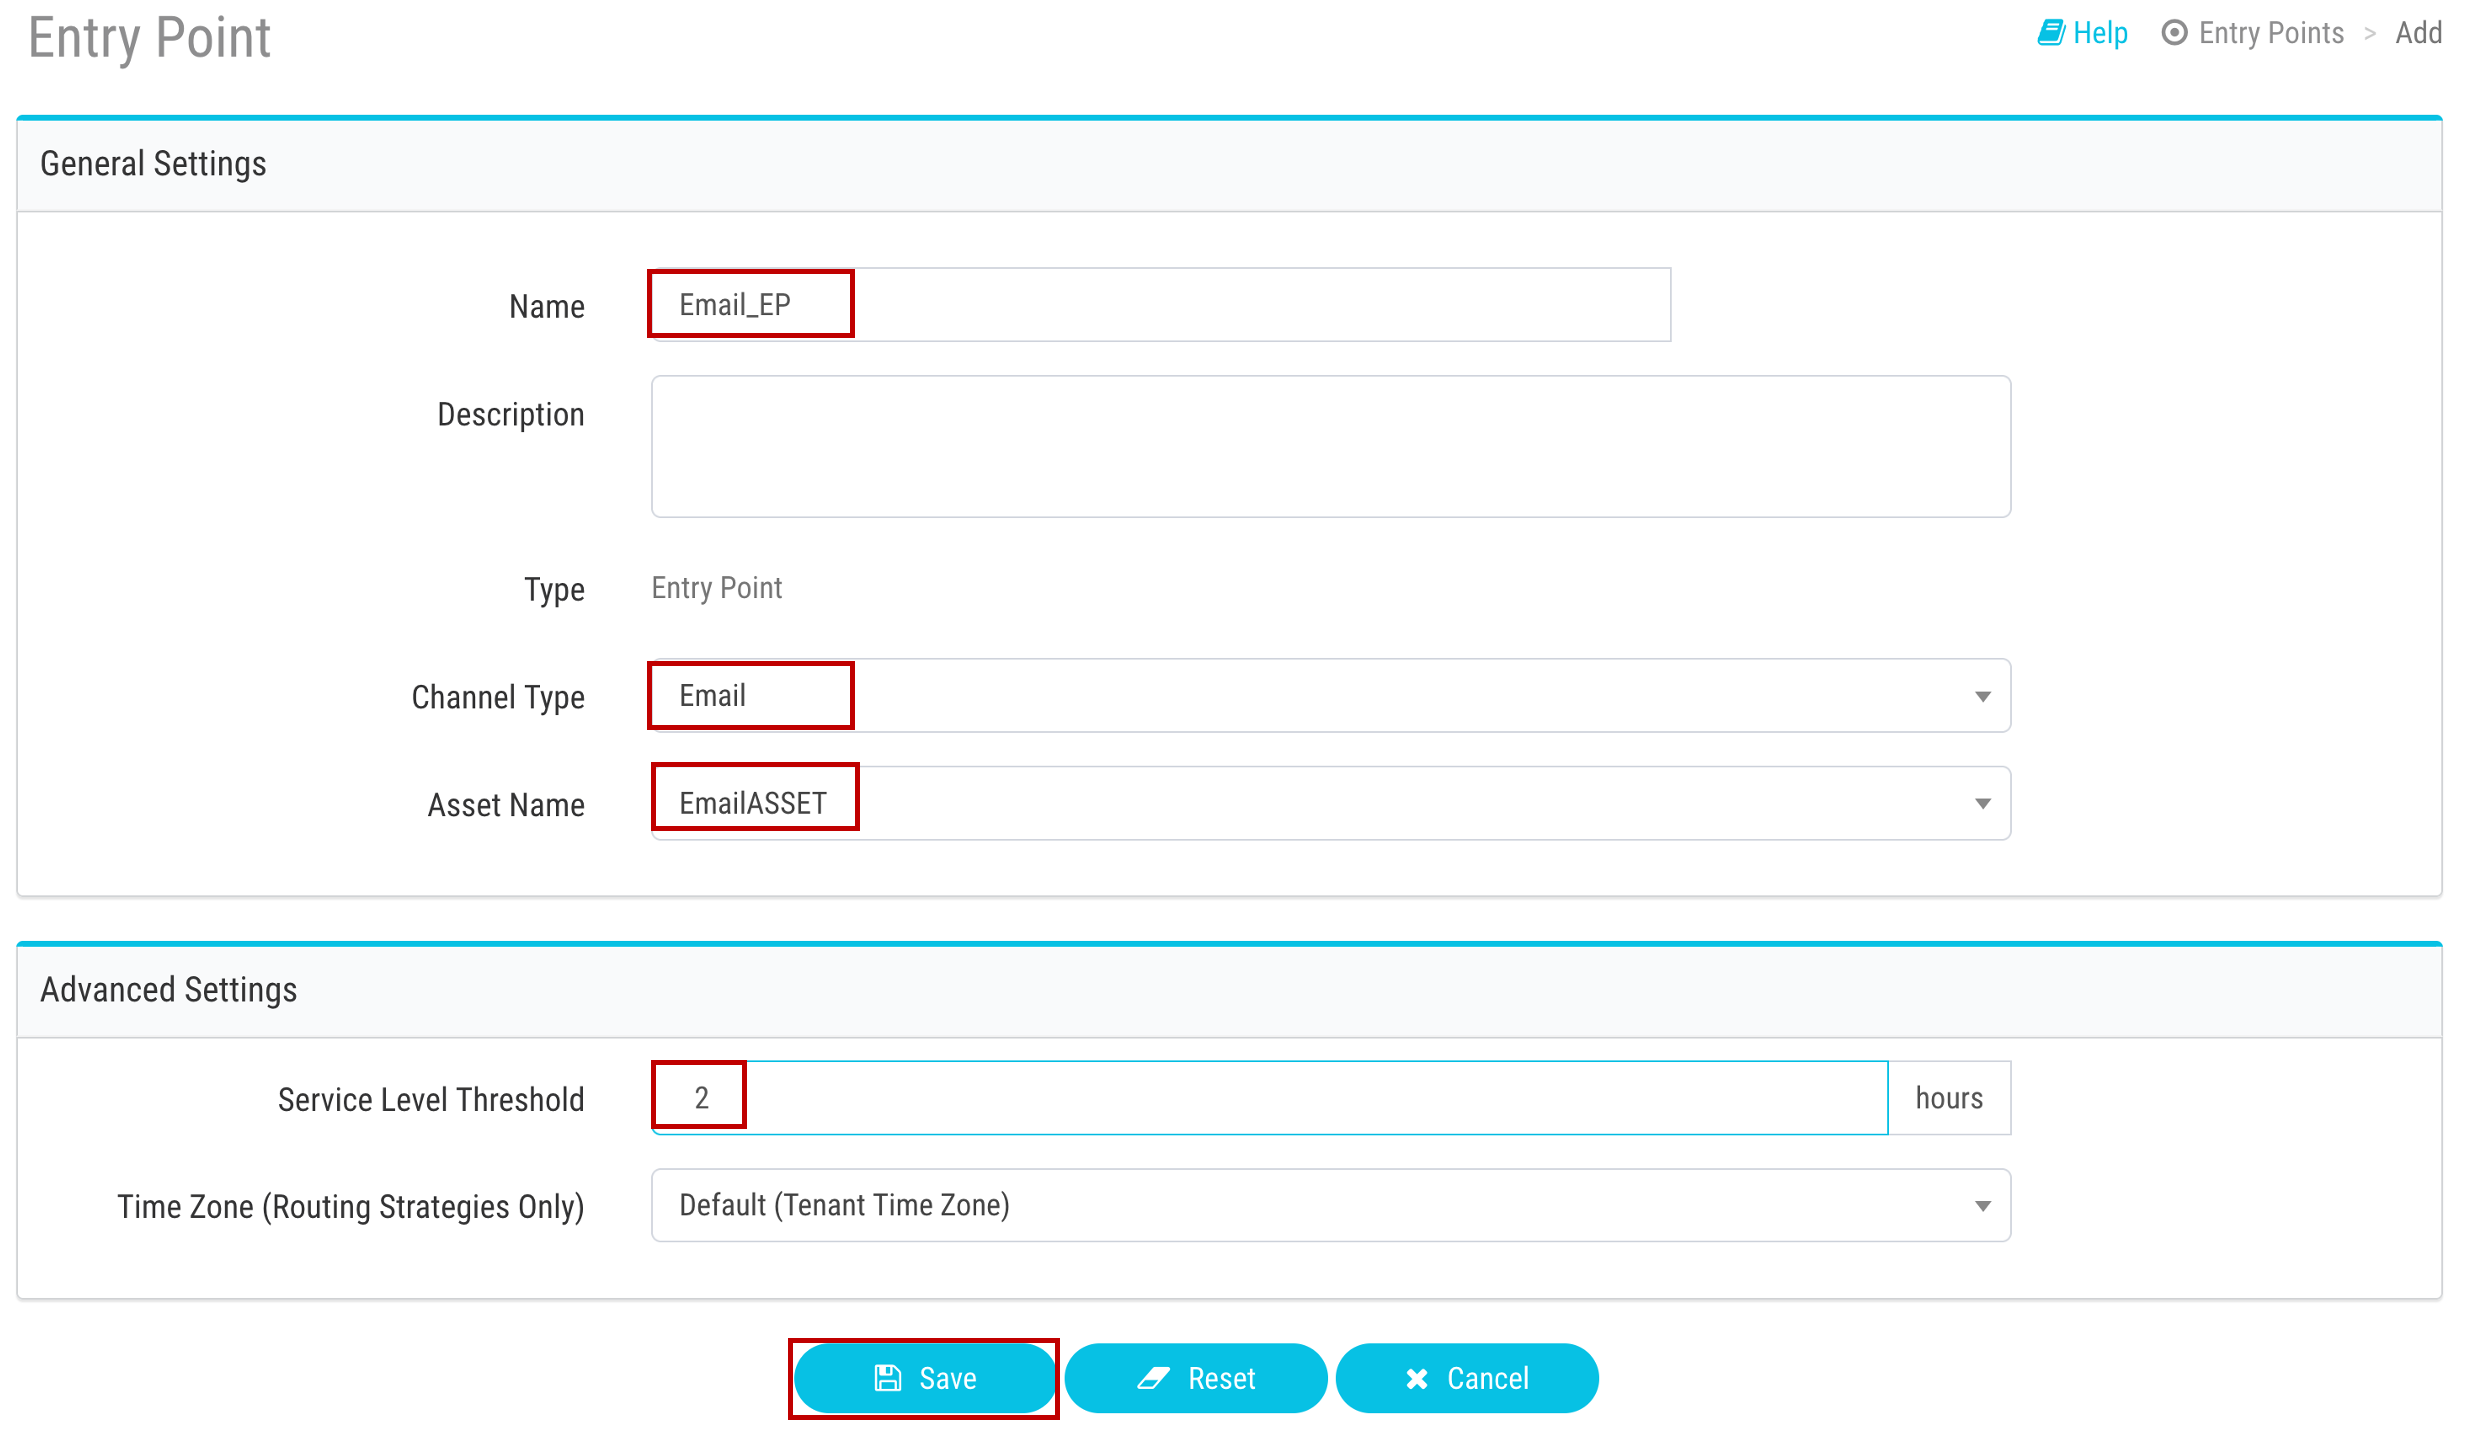
Input Name as
Email_EP. -
Select
Emailin the Channel Type section. -
Leave the Asset Name as appered value
EmailASSET. -
Set Service Level Threshold as
2hours. -
The Time Zone can stay as default value.
-
Click on Save after comparing your values with the screenshot below.
2. Create 2 Queues in Management Portal
-
Click on Provisioning and select Entry Points/Queues > Queue.
-
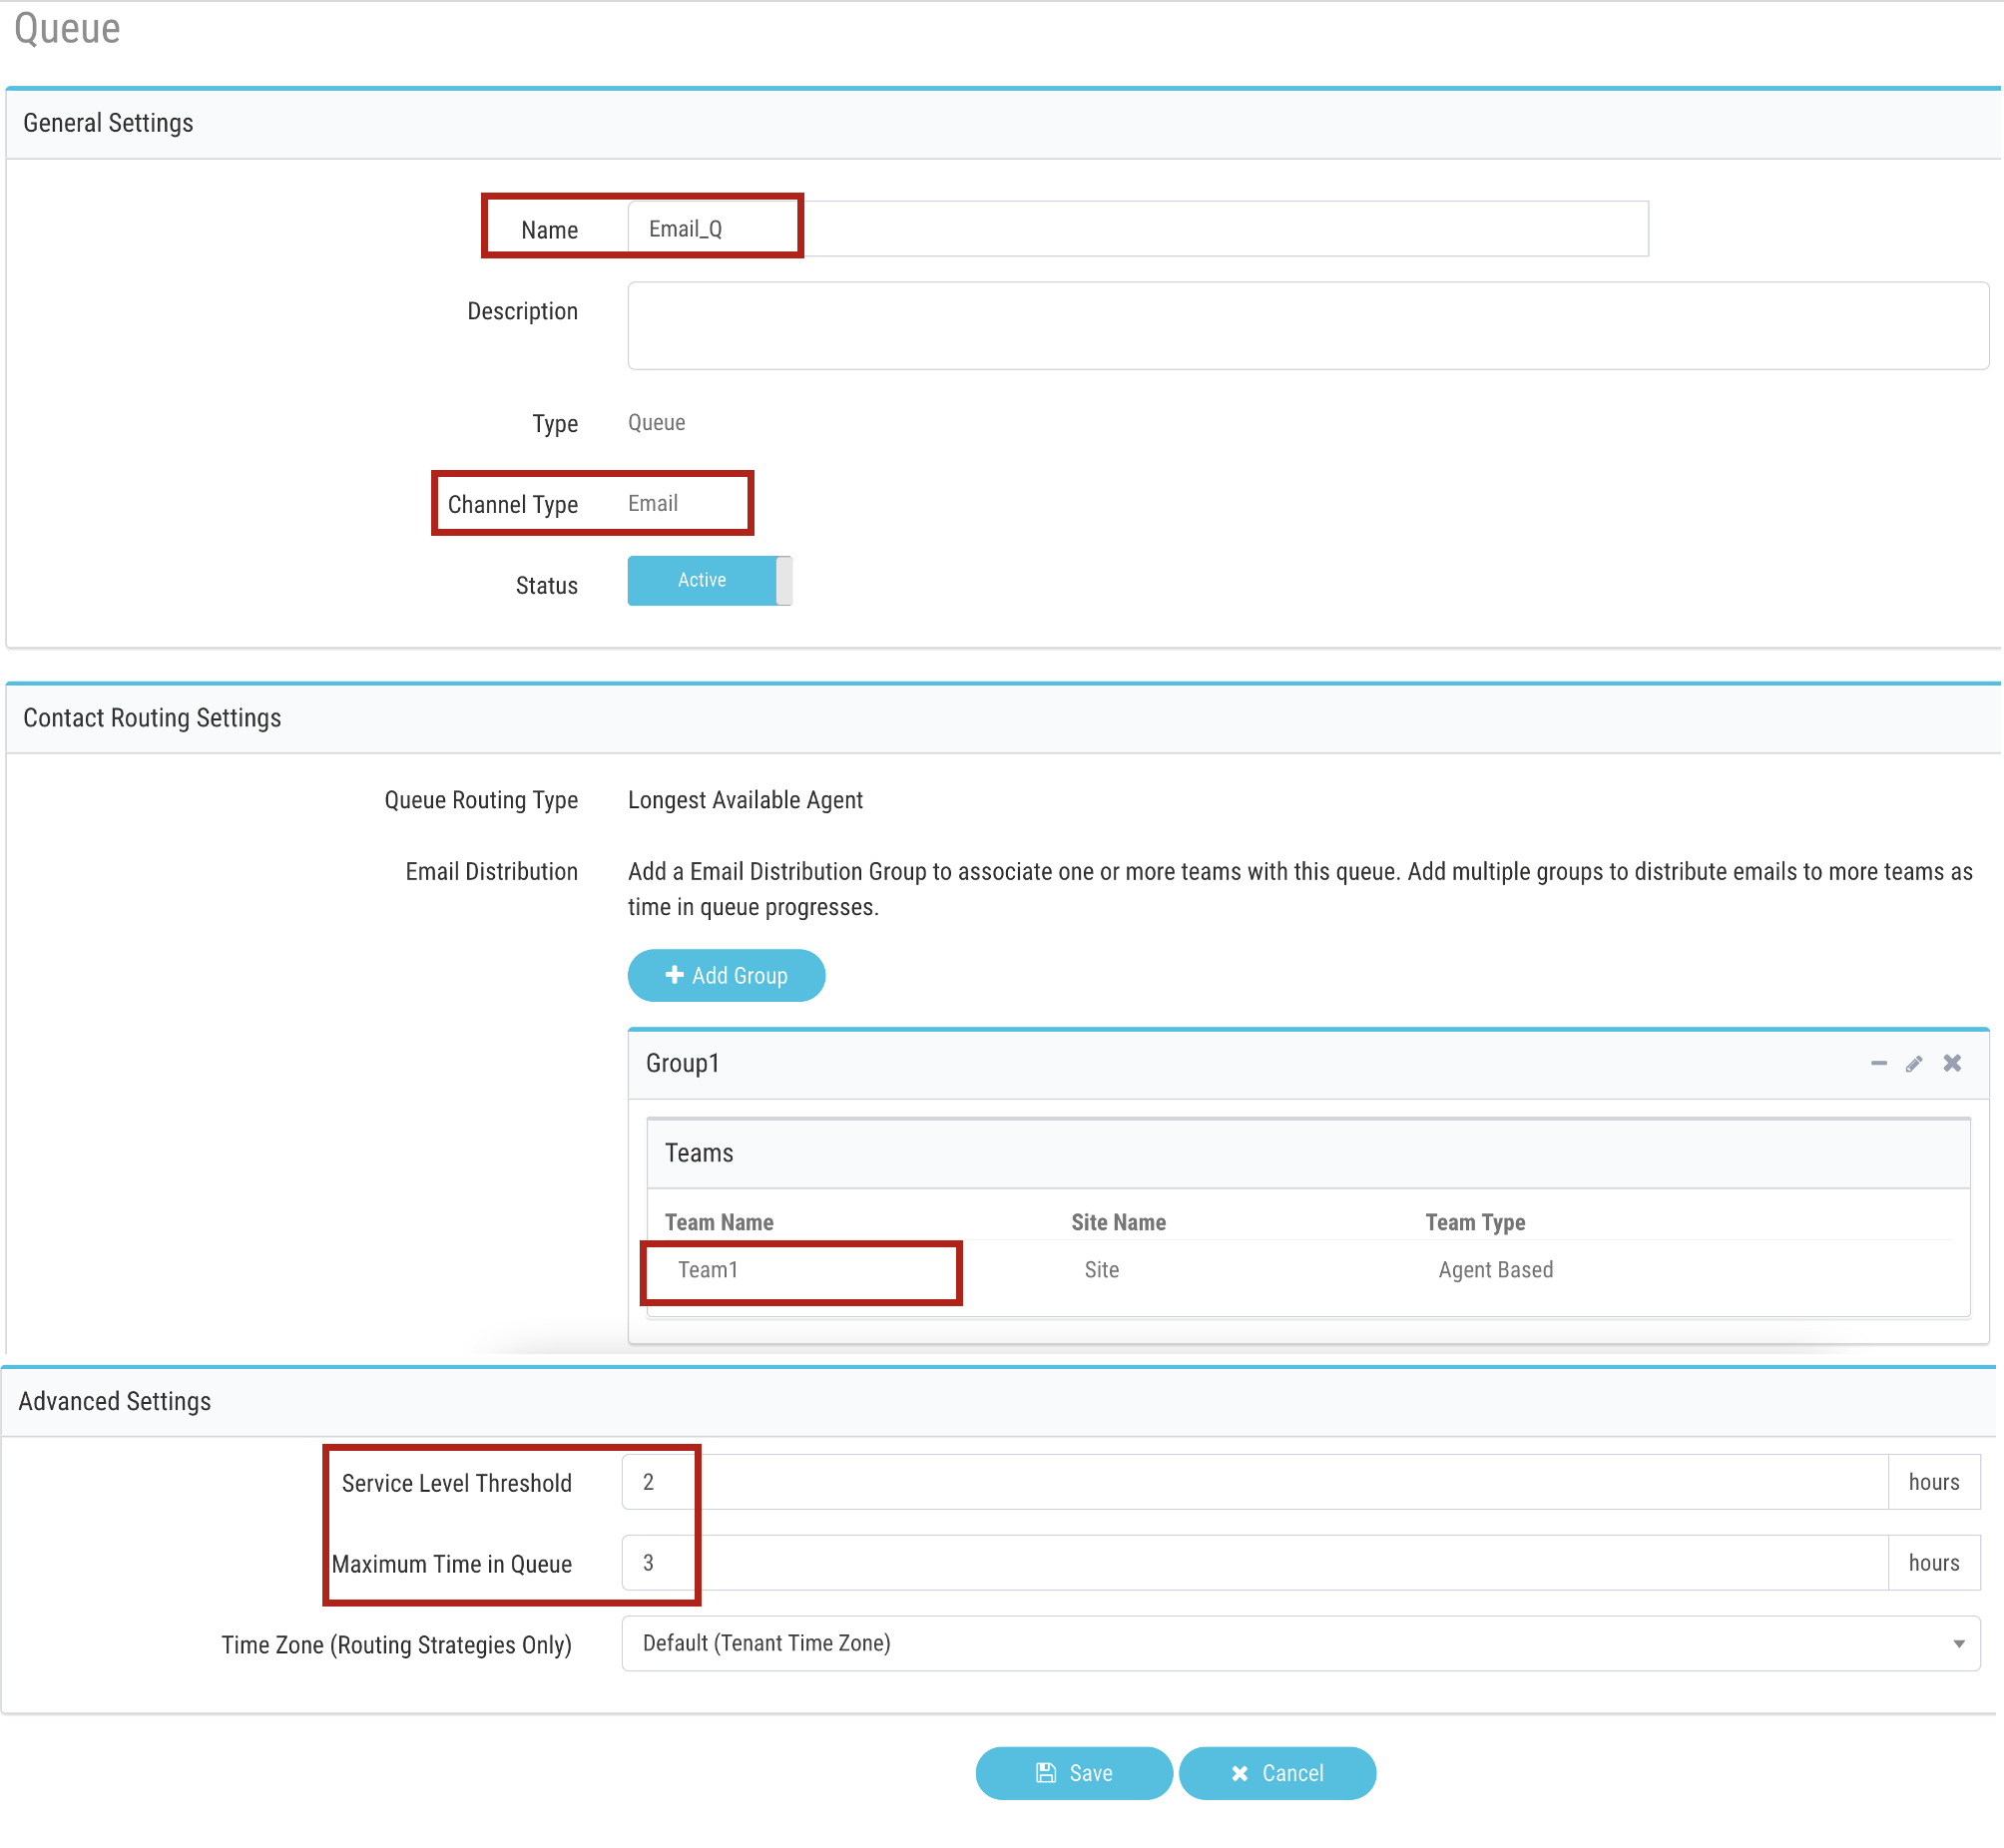
Click on
New Queue. -
Input Name as
Email_Q. -
Select
Emailin the Channel Type section. -
Leave the Queue Routing Type as default value
Longest Available Agent. -
In the the Chat Distribution click on Add Group and select
Team1. -
Set Service Level Threshold as
2hours. -
Set Maximum Time in Queue as
3hours. -
The Time Zone can stay as default value.
-
Click on Save after comparing your values with the screenshot below.
-
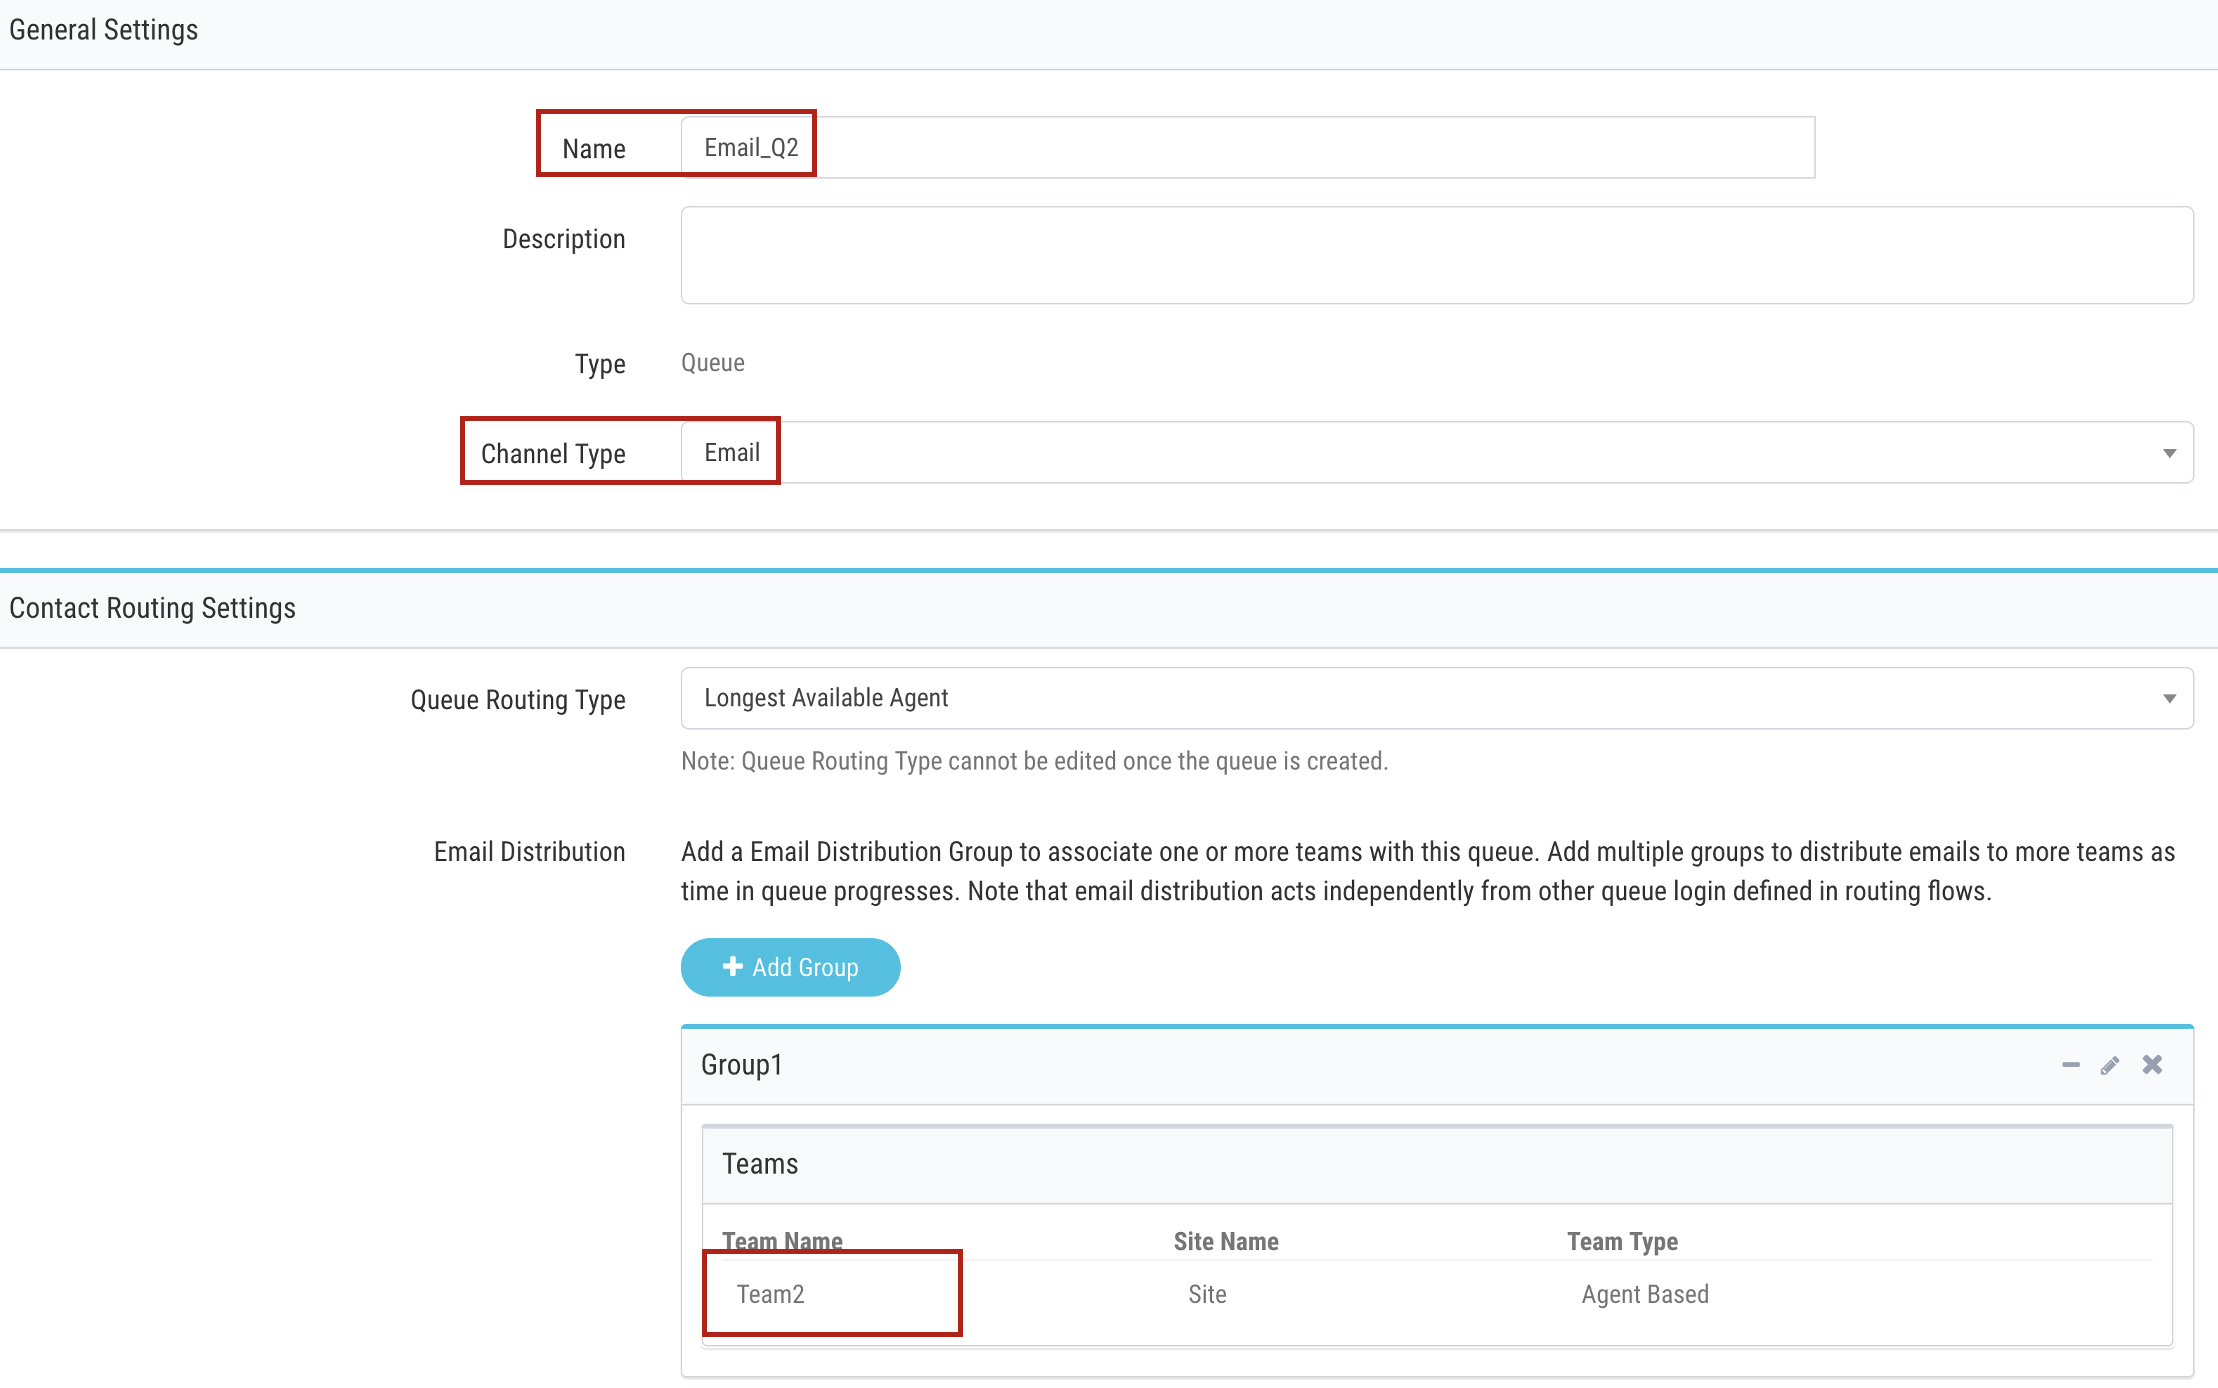
Create a second queue by repeating the same steps as above.
-
Input Name as
Email_Q2. -
Select
Emailin the Channel Type section. -
In the the Chat Distribution click on Add Group and select
Team2.
Step 4. Create/Upload Email flow
-
Download the email flow from the GitHub page.
-
Navigate to Webex Connect Flows -> v2.1 -> Email Inbound Flow.workflow.zip, select the zip file and click download.
-
Unzip the downloaded file.
-
Go to Webex Connect, click on Services and select the service in which the Asset is created in step 2. It should be My First Service
-
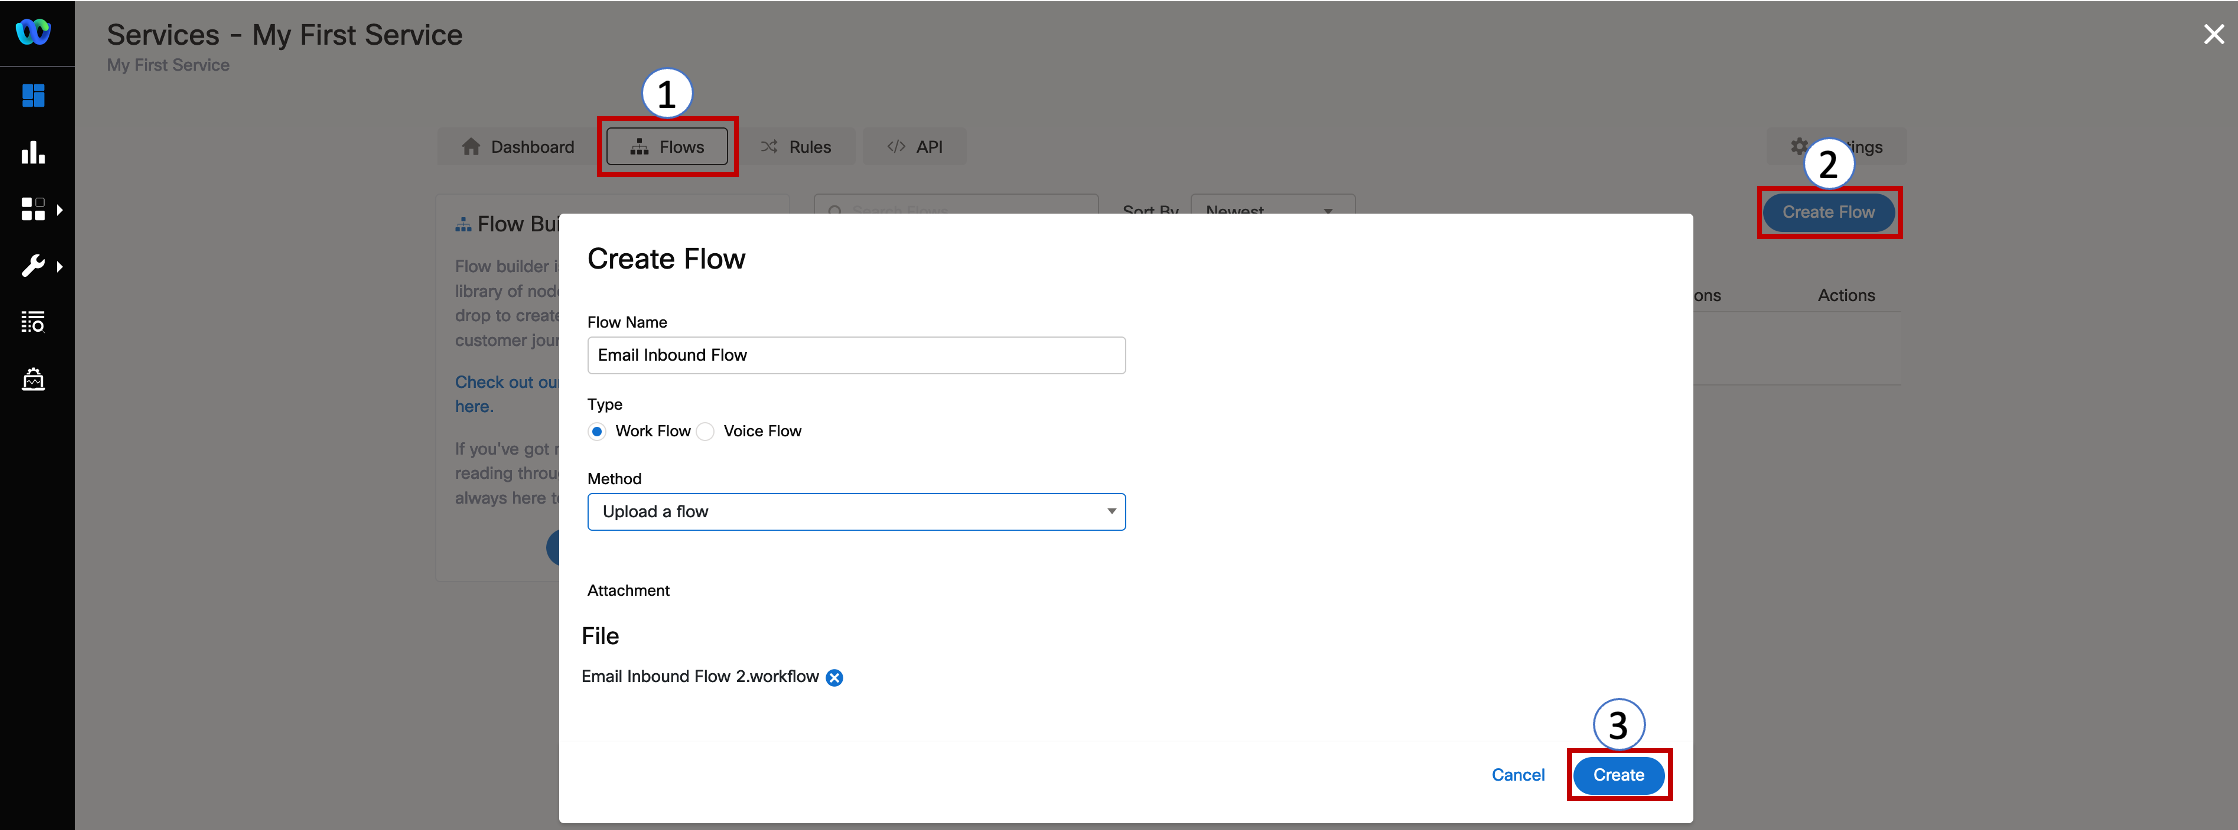
In the service click on FLOWS -> CREATE FLOW .
-
Enter the FLOW NAME as Email Inbound Flow, select the TYPE as Work Flow and under METHOD select Upload a flow.
-
Drag and drop the Email Inbound Flow.workflow flow that is downloaded in zip file, click CREATE and then click SAVE.
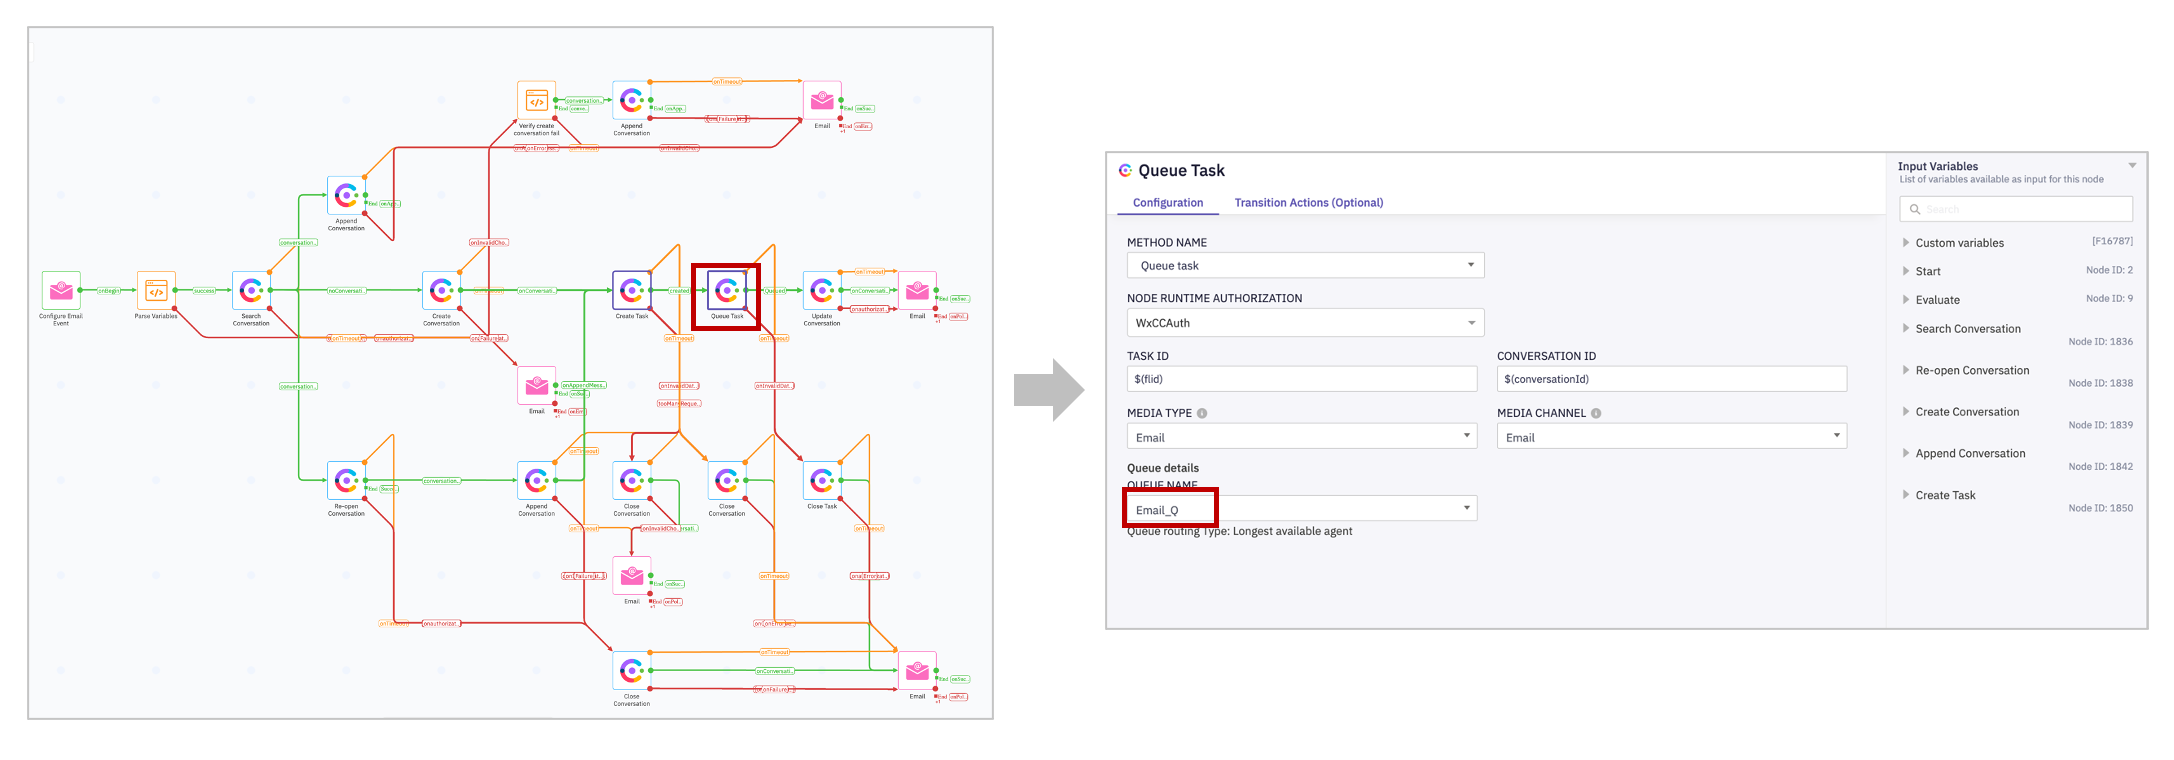
- Click Save and in the created workflow find the Queue Task, click twice, select the QUEUE NAME as Email_Q and click on SAVE.
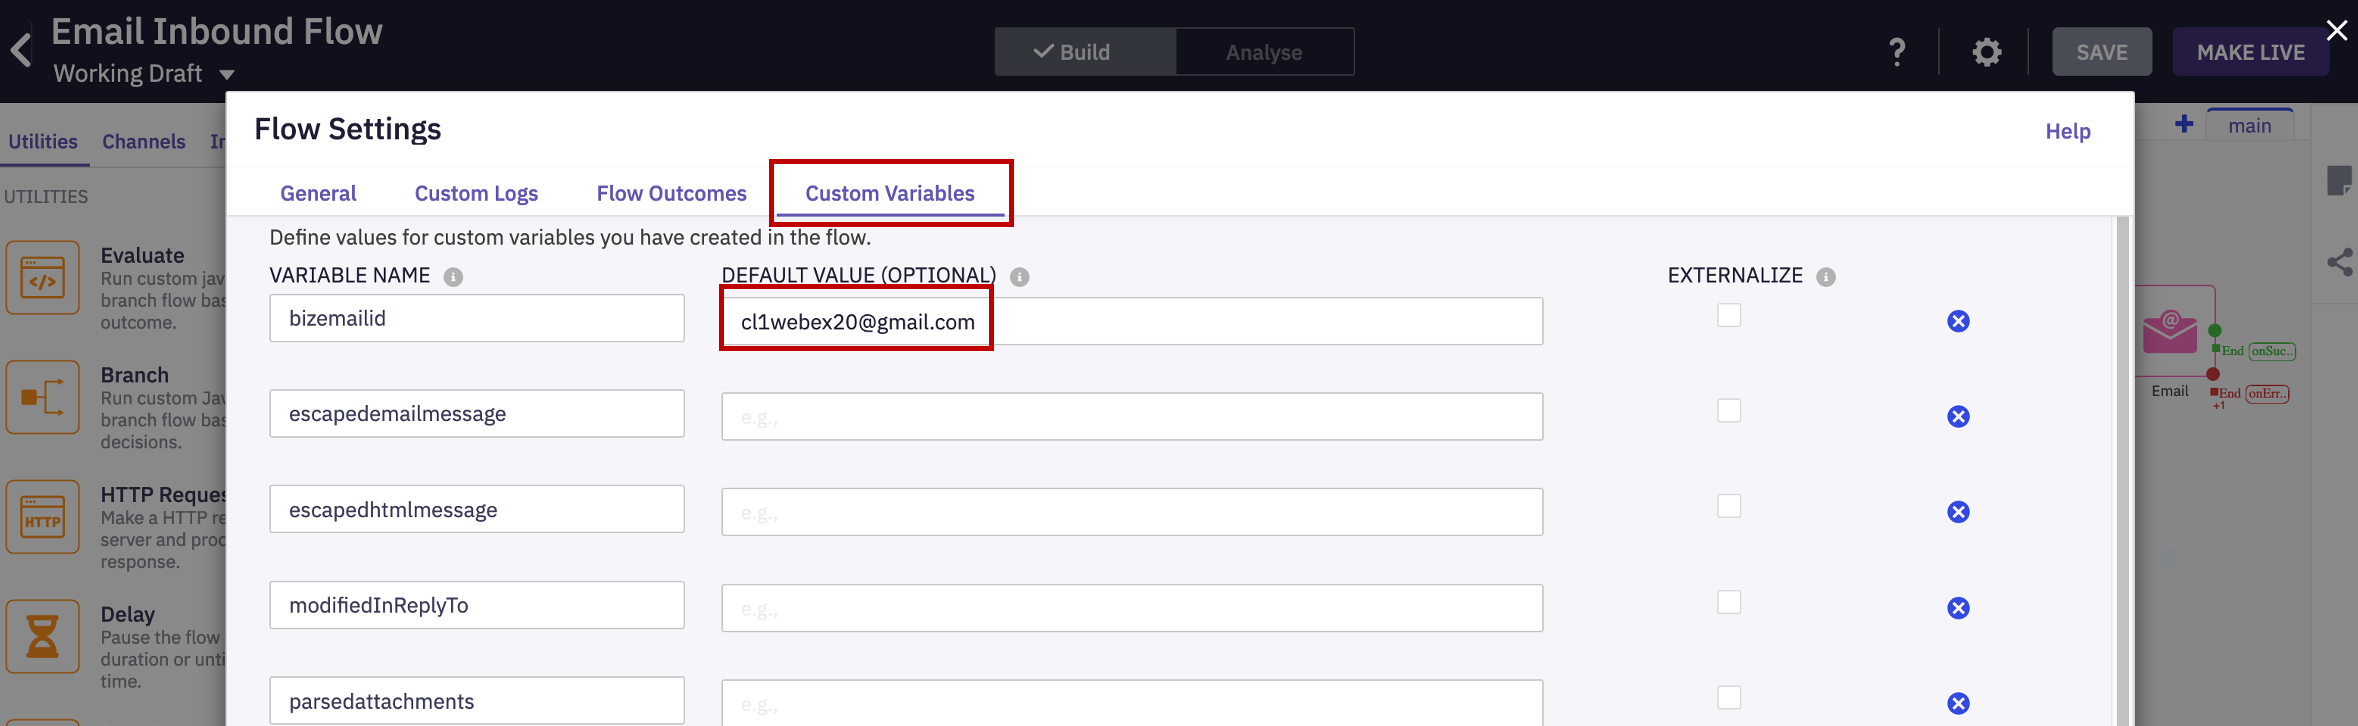
- Click Settings on top right corner and switch to Custom variables tab. Here in the bizemailid row, update the default value with your email address of the Gmail account. Click SAVE.
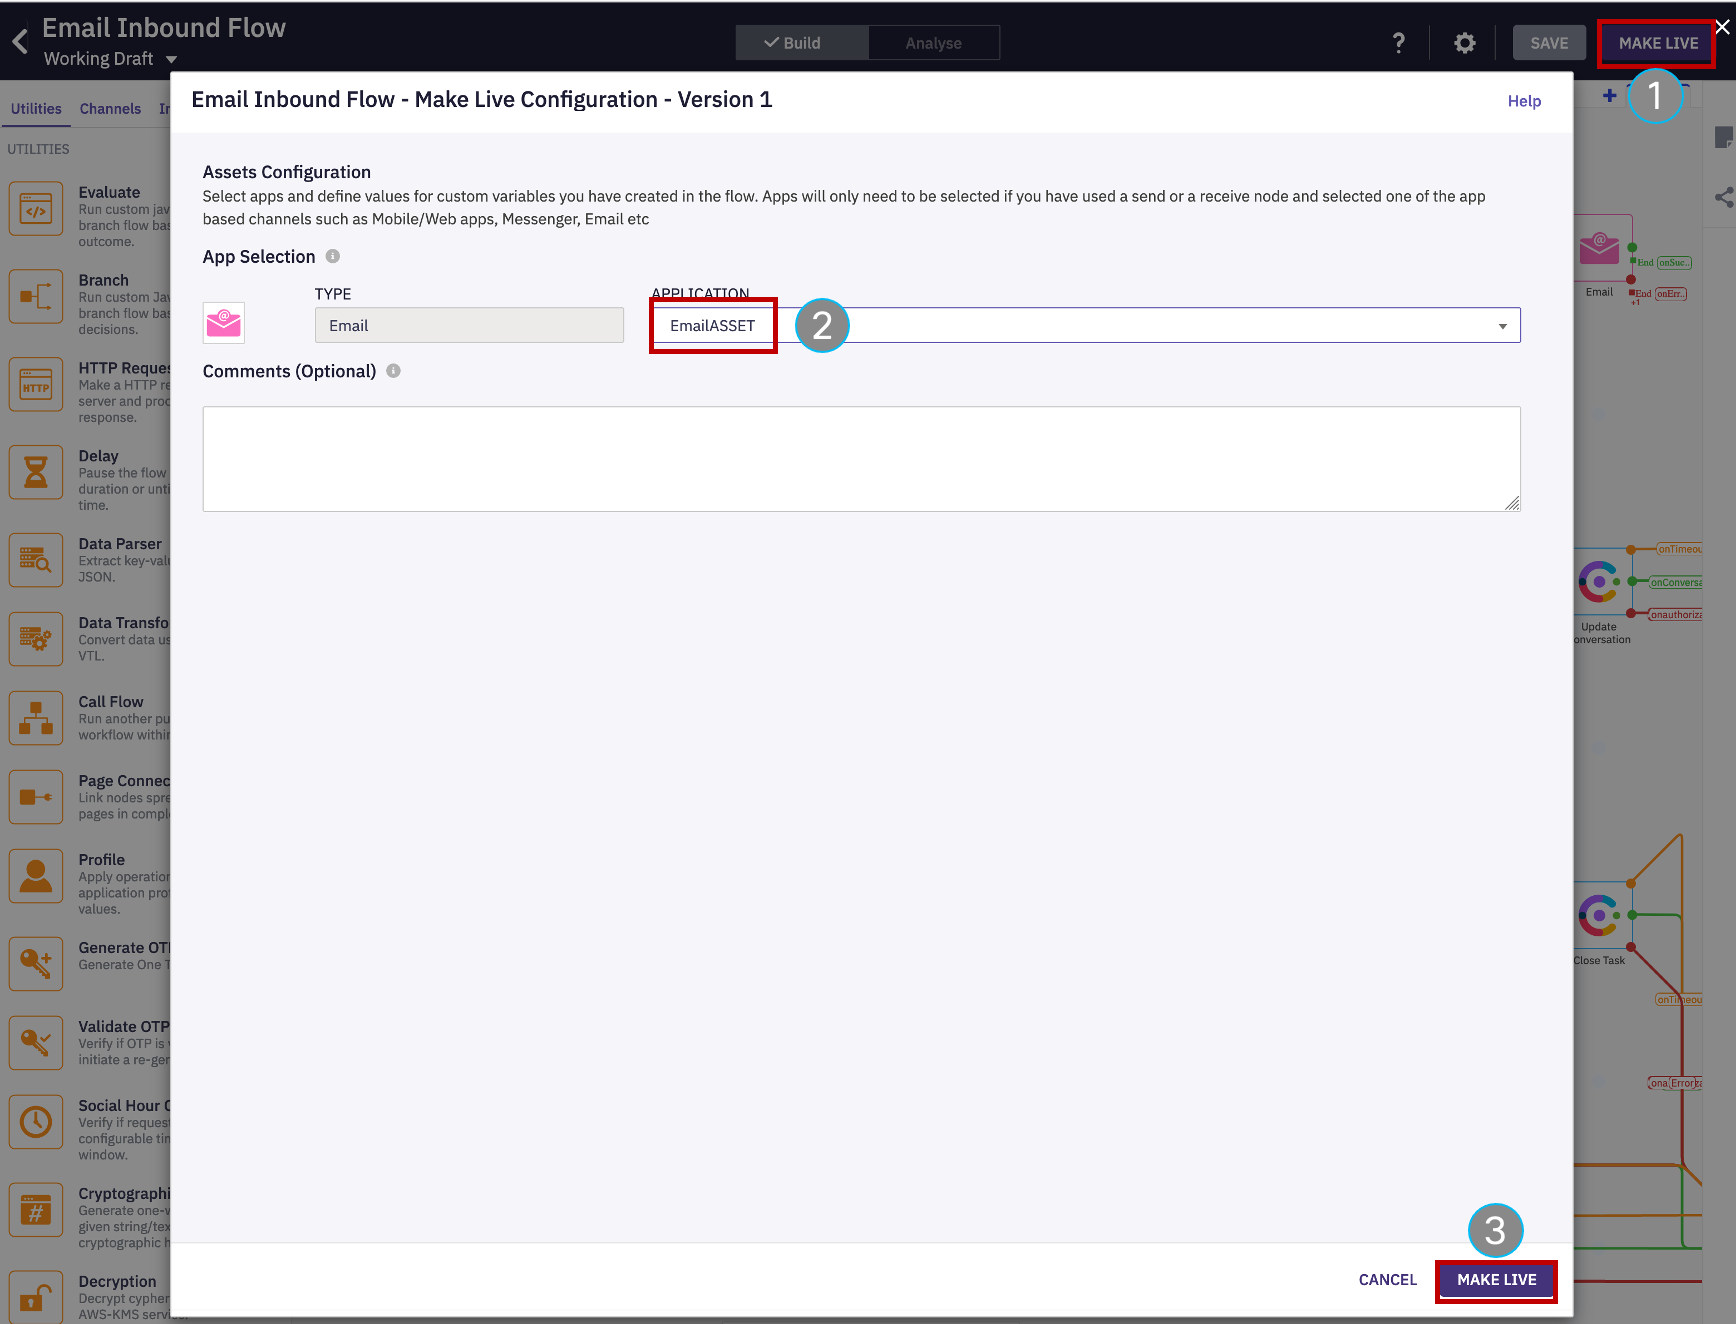
- Finally click on Make Live on top right corner -> Select the Application/Asset that we have created and click Make Live.
Verification: Send an Email and accept the task
-
Go to personal email account and send an email to the support email address that was initially configured in the Email Asset.
-
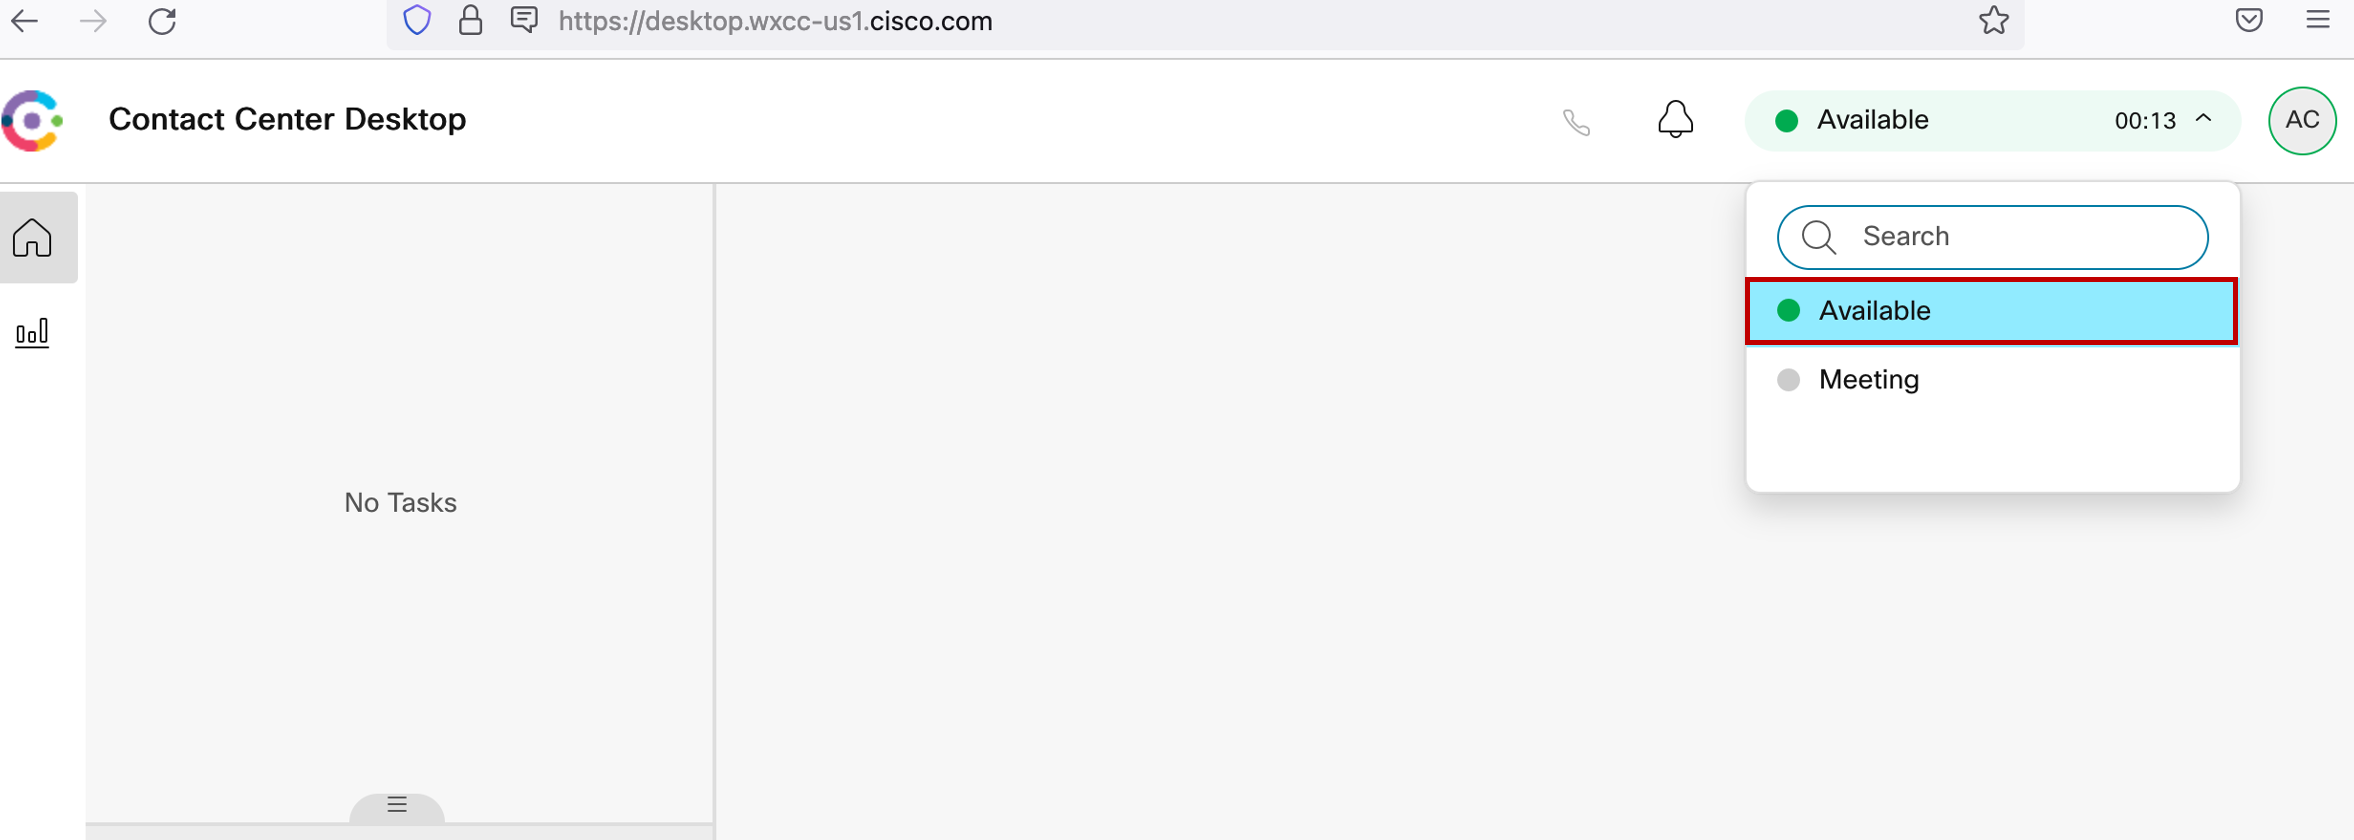
Go to the Agent Desktop and make the agent Available.
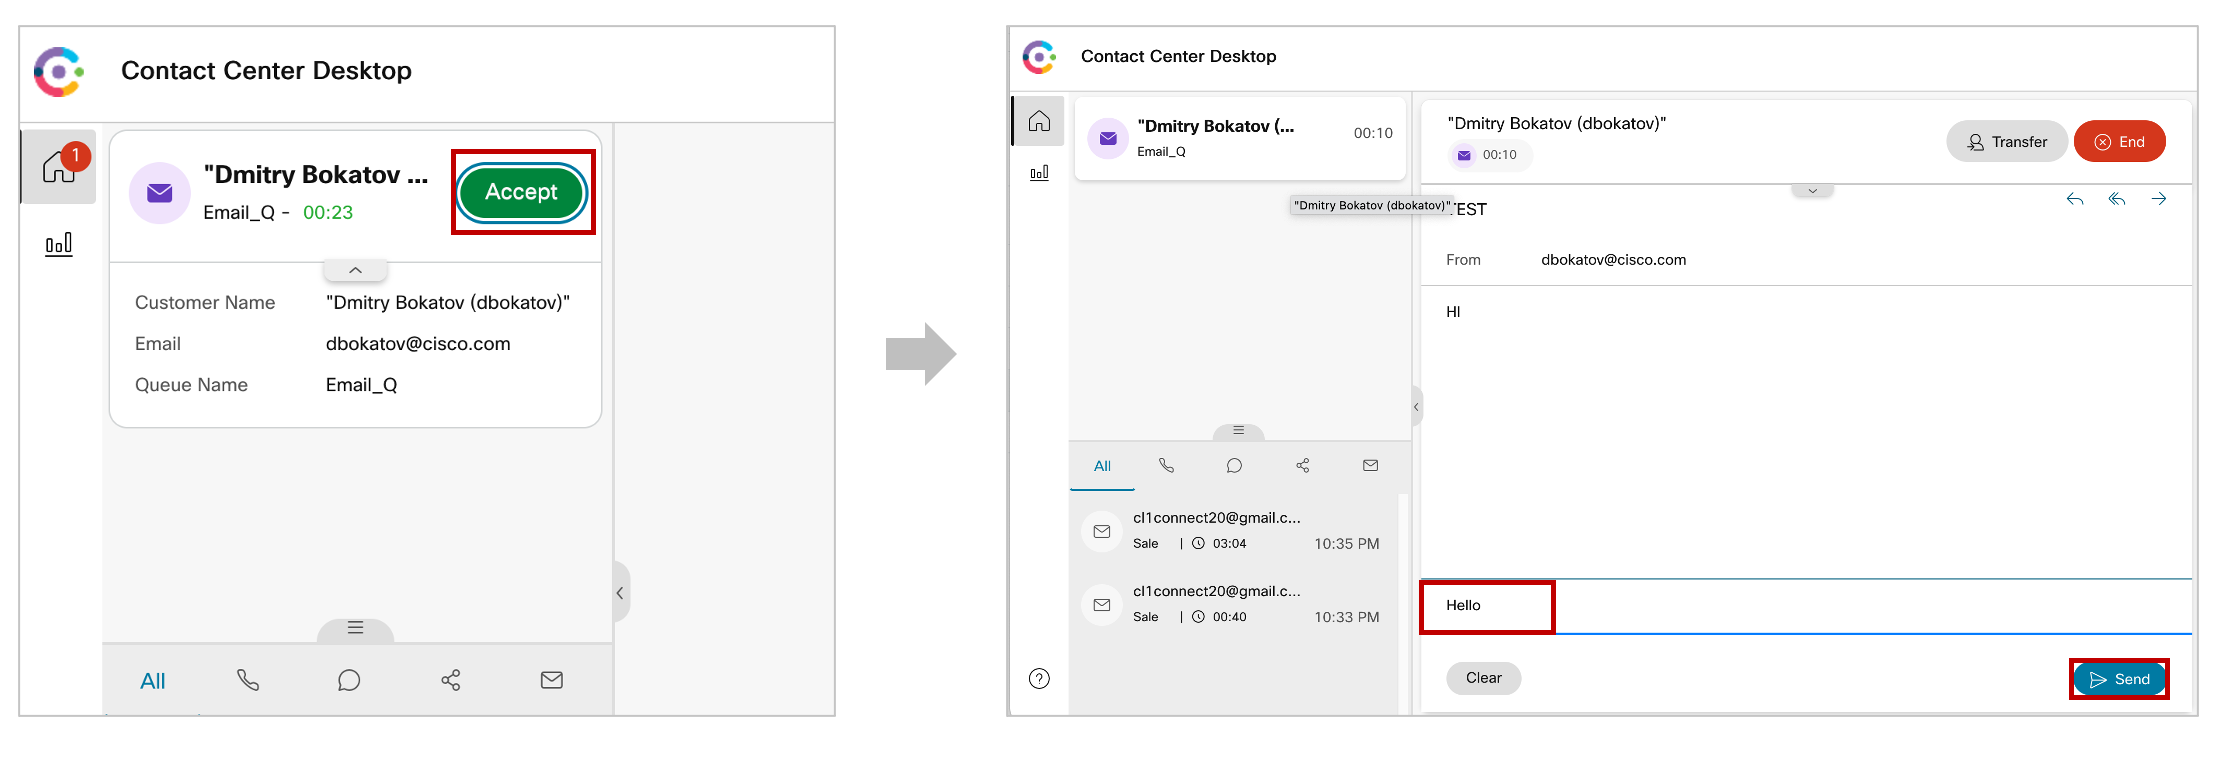
- The Email will be offered to the agent. Click Accept to handle the email. Click “Reply” or Reply All” to the email and hit send button.
- Add wrap up and close the task.