Lab 7: Advanced Email Configuration
Table of Contents
- Step 1. Email Workflow Overview
- Step 2. Position In Queue Configuration
- Step 3. Autoreply Configuration
- Step 4. Enhancing Routing based on a Subject
- Step 5. Integration with Smartsheet using smartsheet APIs
- BONUS TASK - Integration with Webex Teams (Alarm notification)
Introduction
Lab Objective
This lab will give you a detailed understanding of the workflow logic. With that, you will be able to improve the script and do a more advanced configuration. This lab includes multiple script customizations and shows how to create an HTTP Request which is needed for integration with external HTTP services (as an example it uses smartsheet and Webex APIs).
Pre-requisite
You have successfully compleated the Lab1 and Lab2 (Email Configuration).
Quick Links
Portal: https://portal.wxcc-us1.cisco.com/portal
Agent Desktop: https://desktop.wxcc-us1.cisco.com
Smartsheet Table: smartsheet table
Connect: https://cl1pod<ID>.imiconnect.io/ (where <ID> is your POD number)
Lab Section
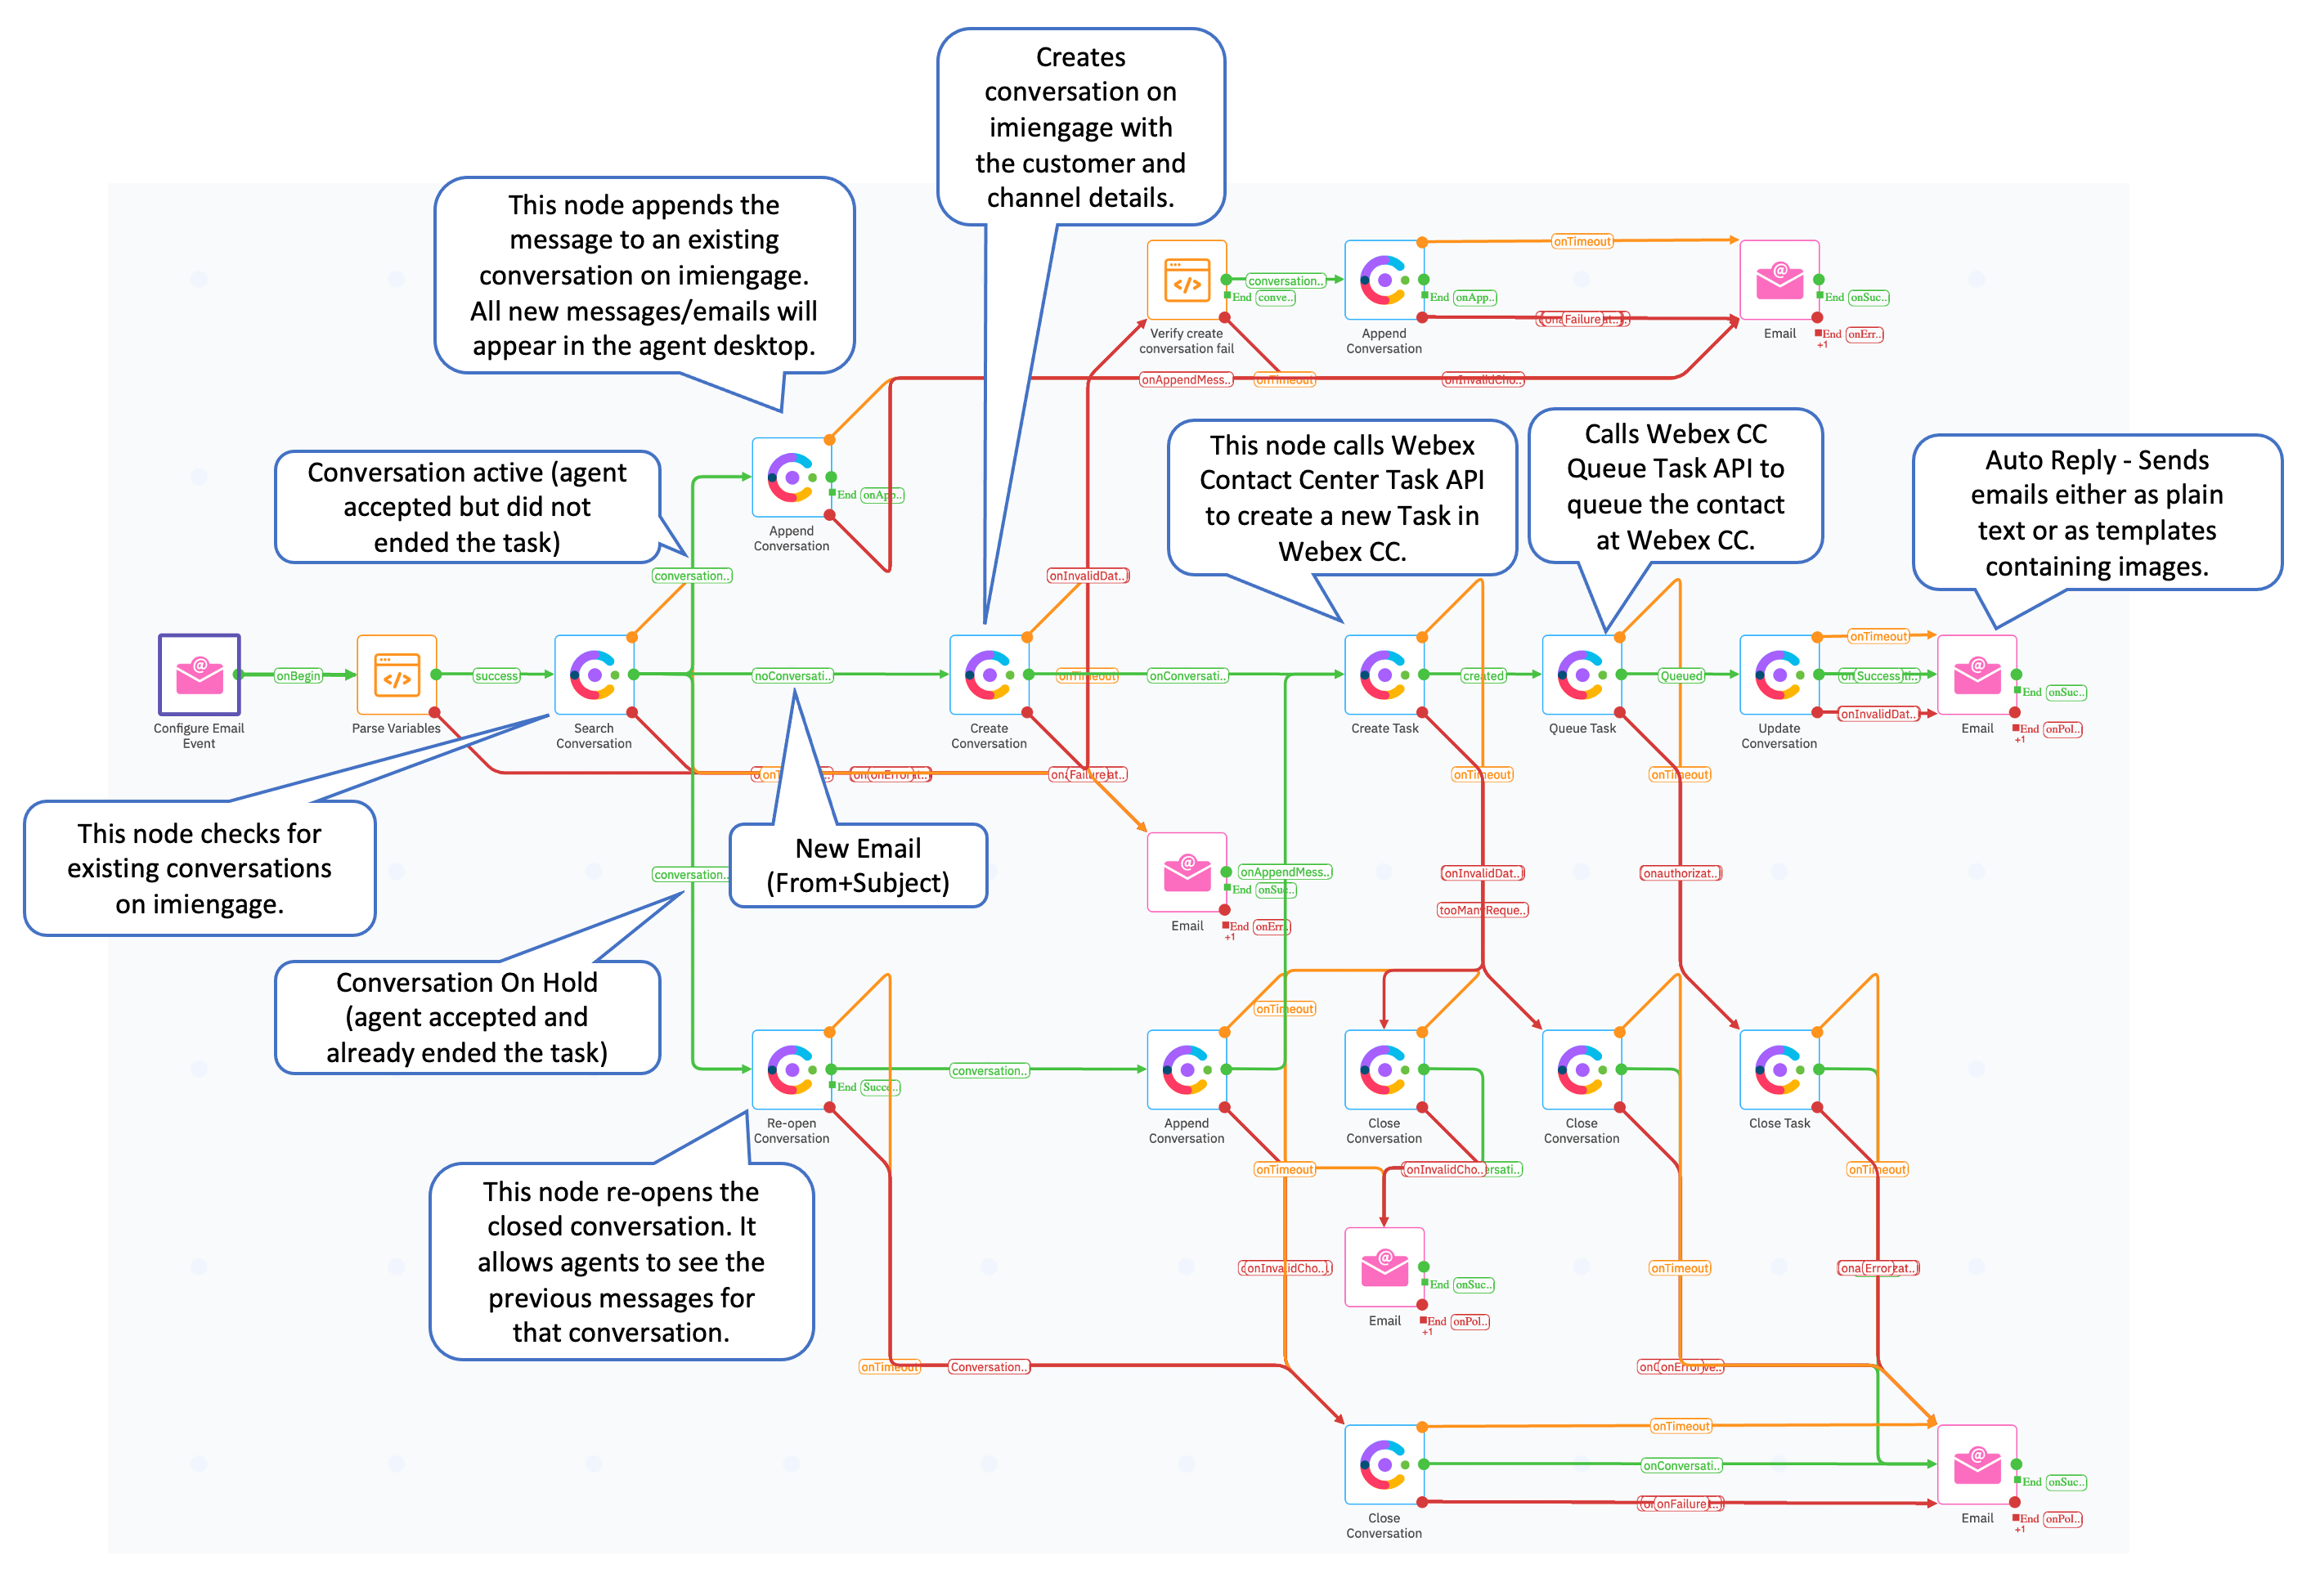
Step 1. Email Workflow Overview
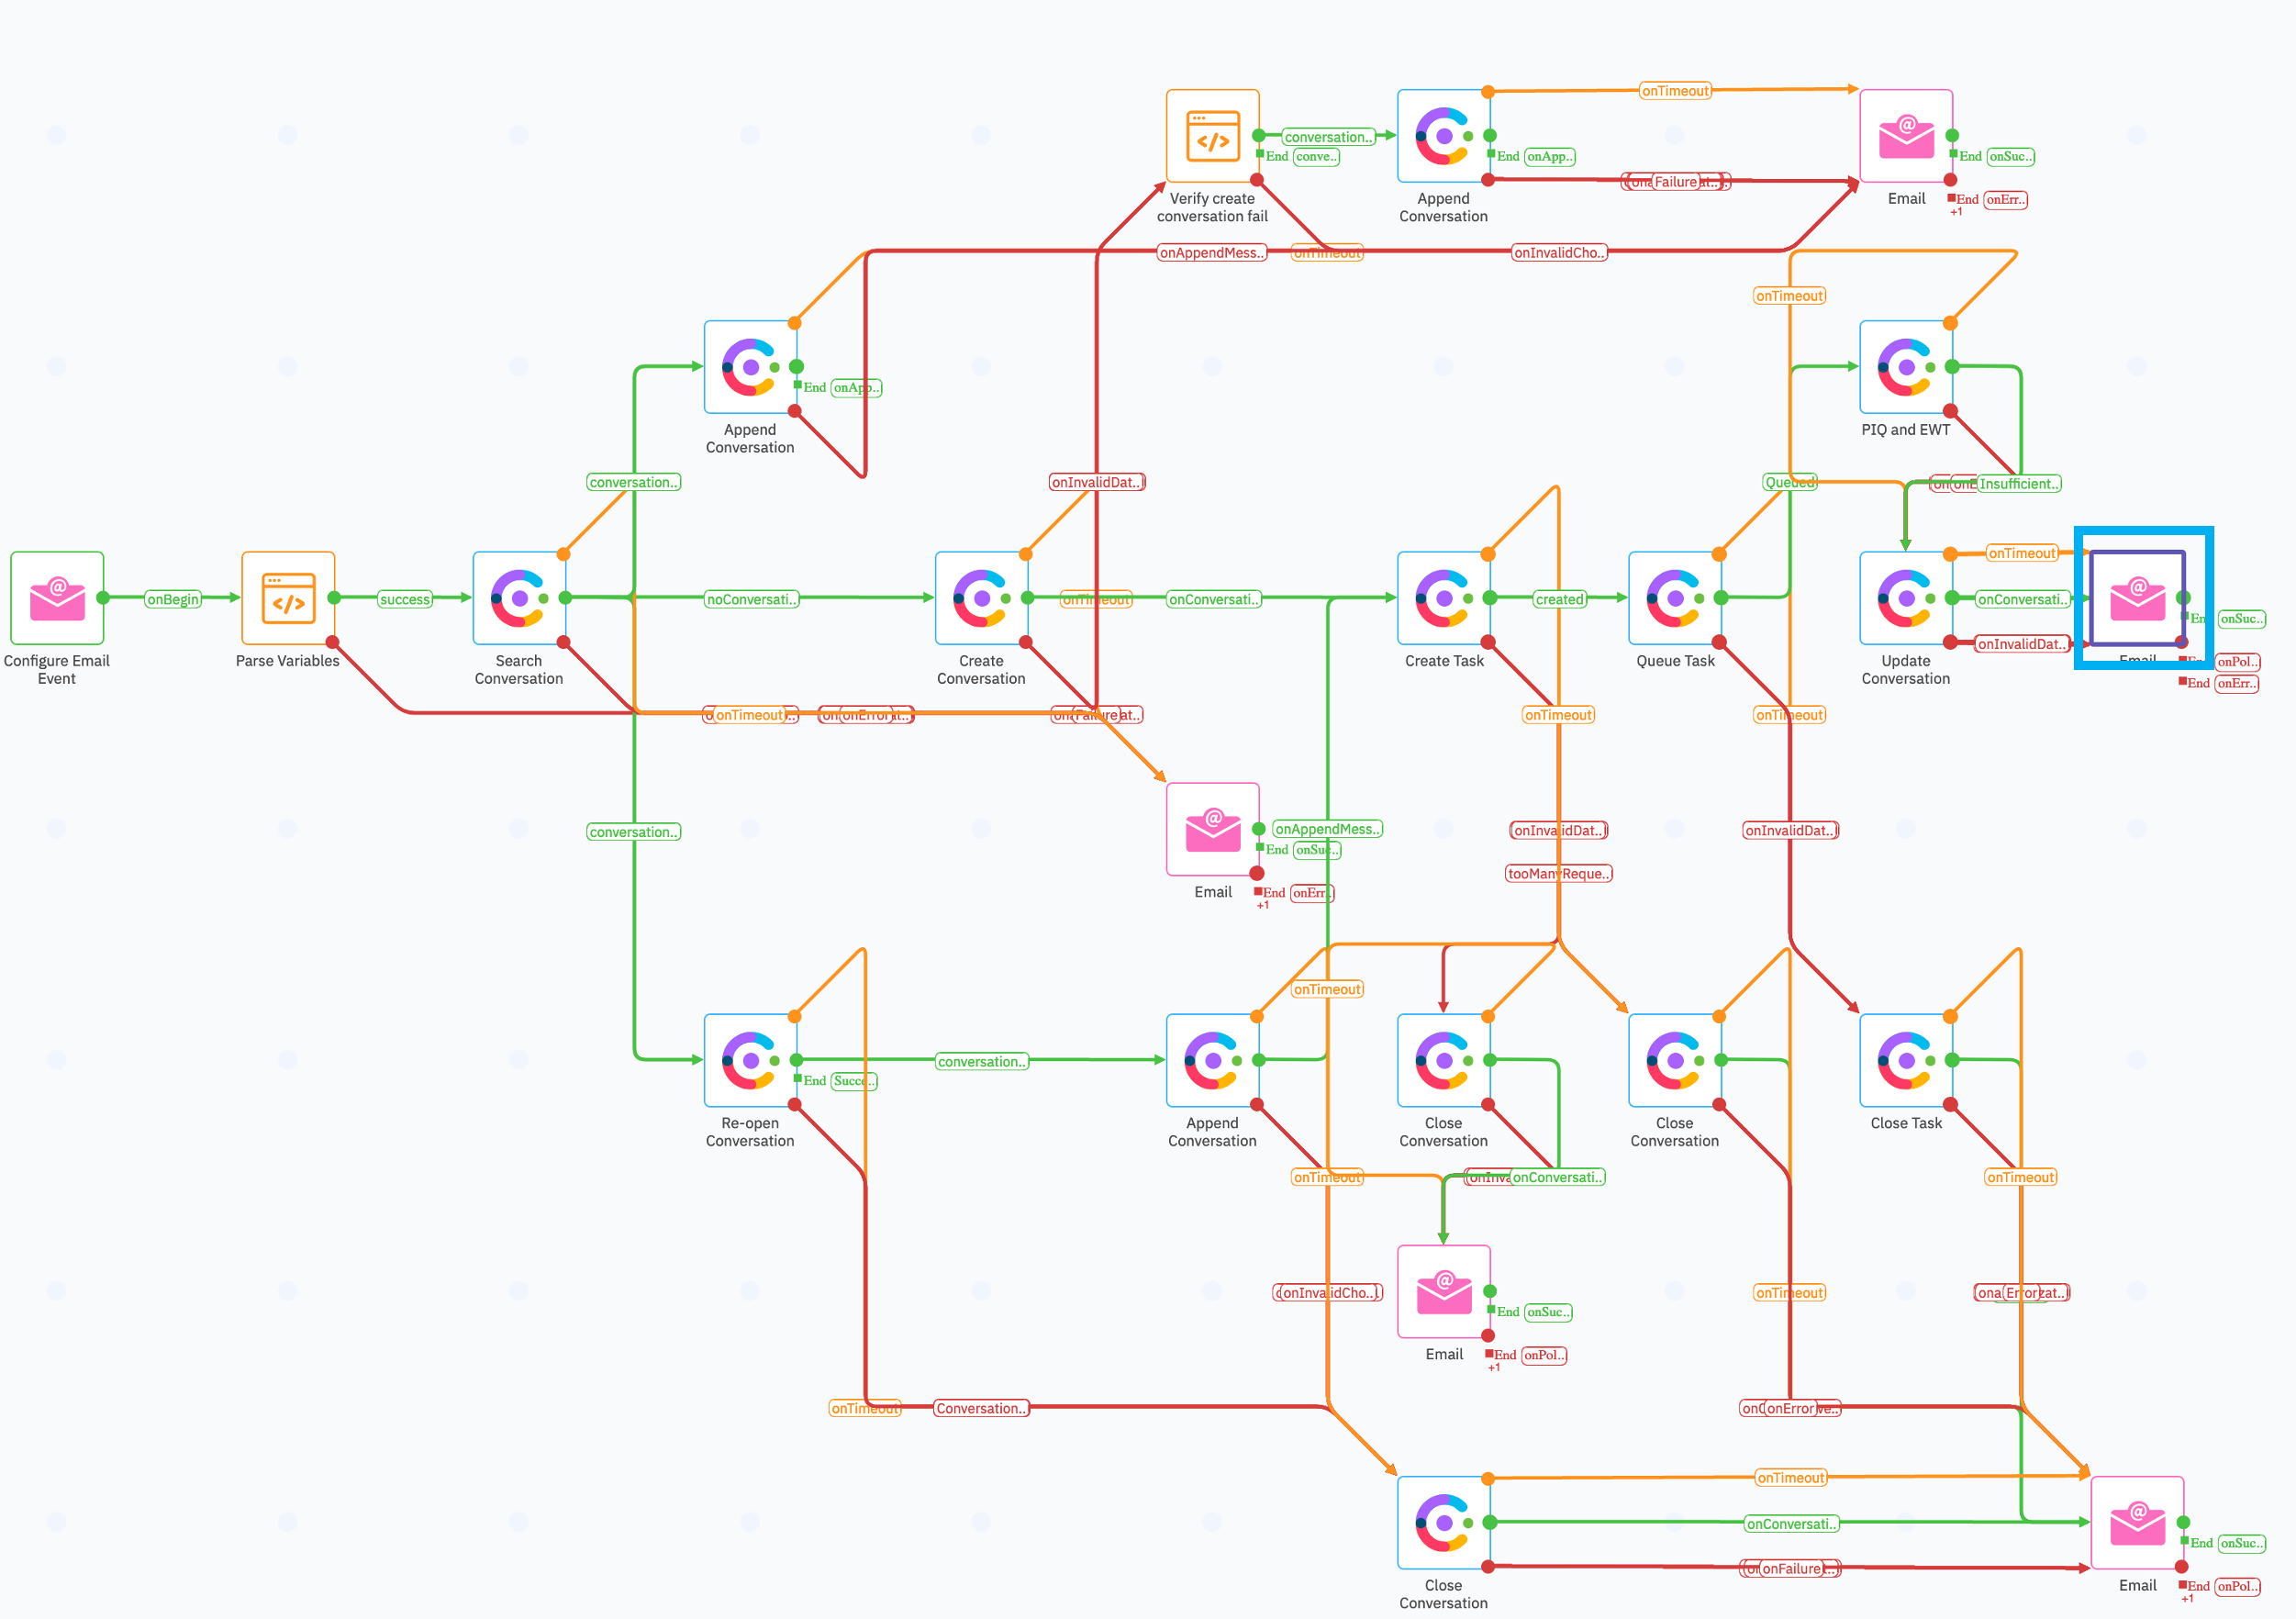
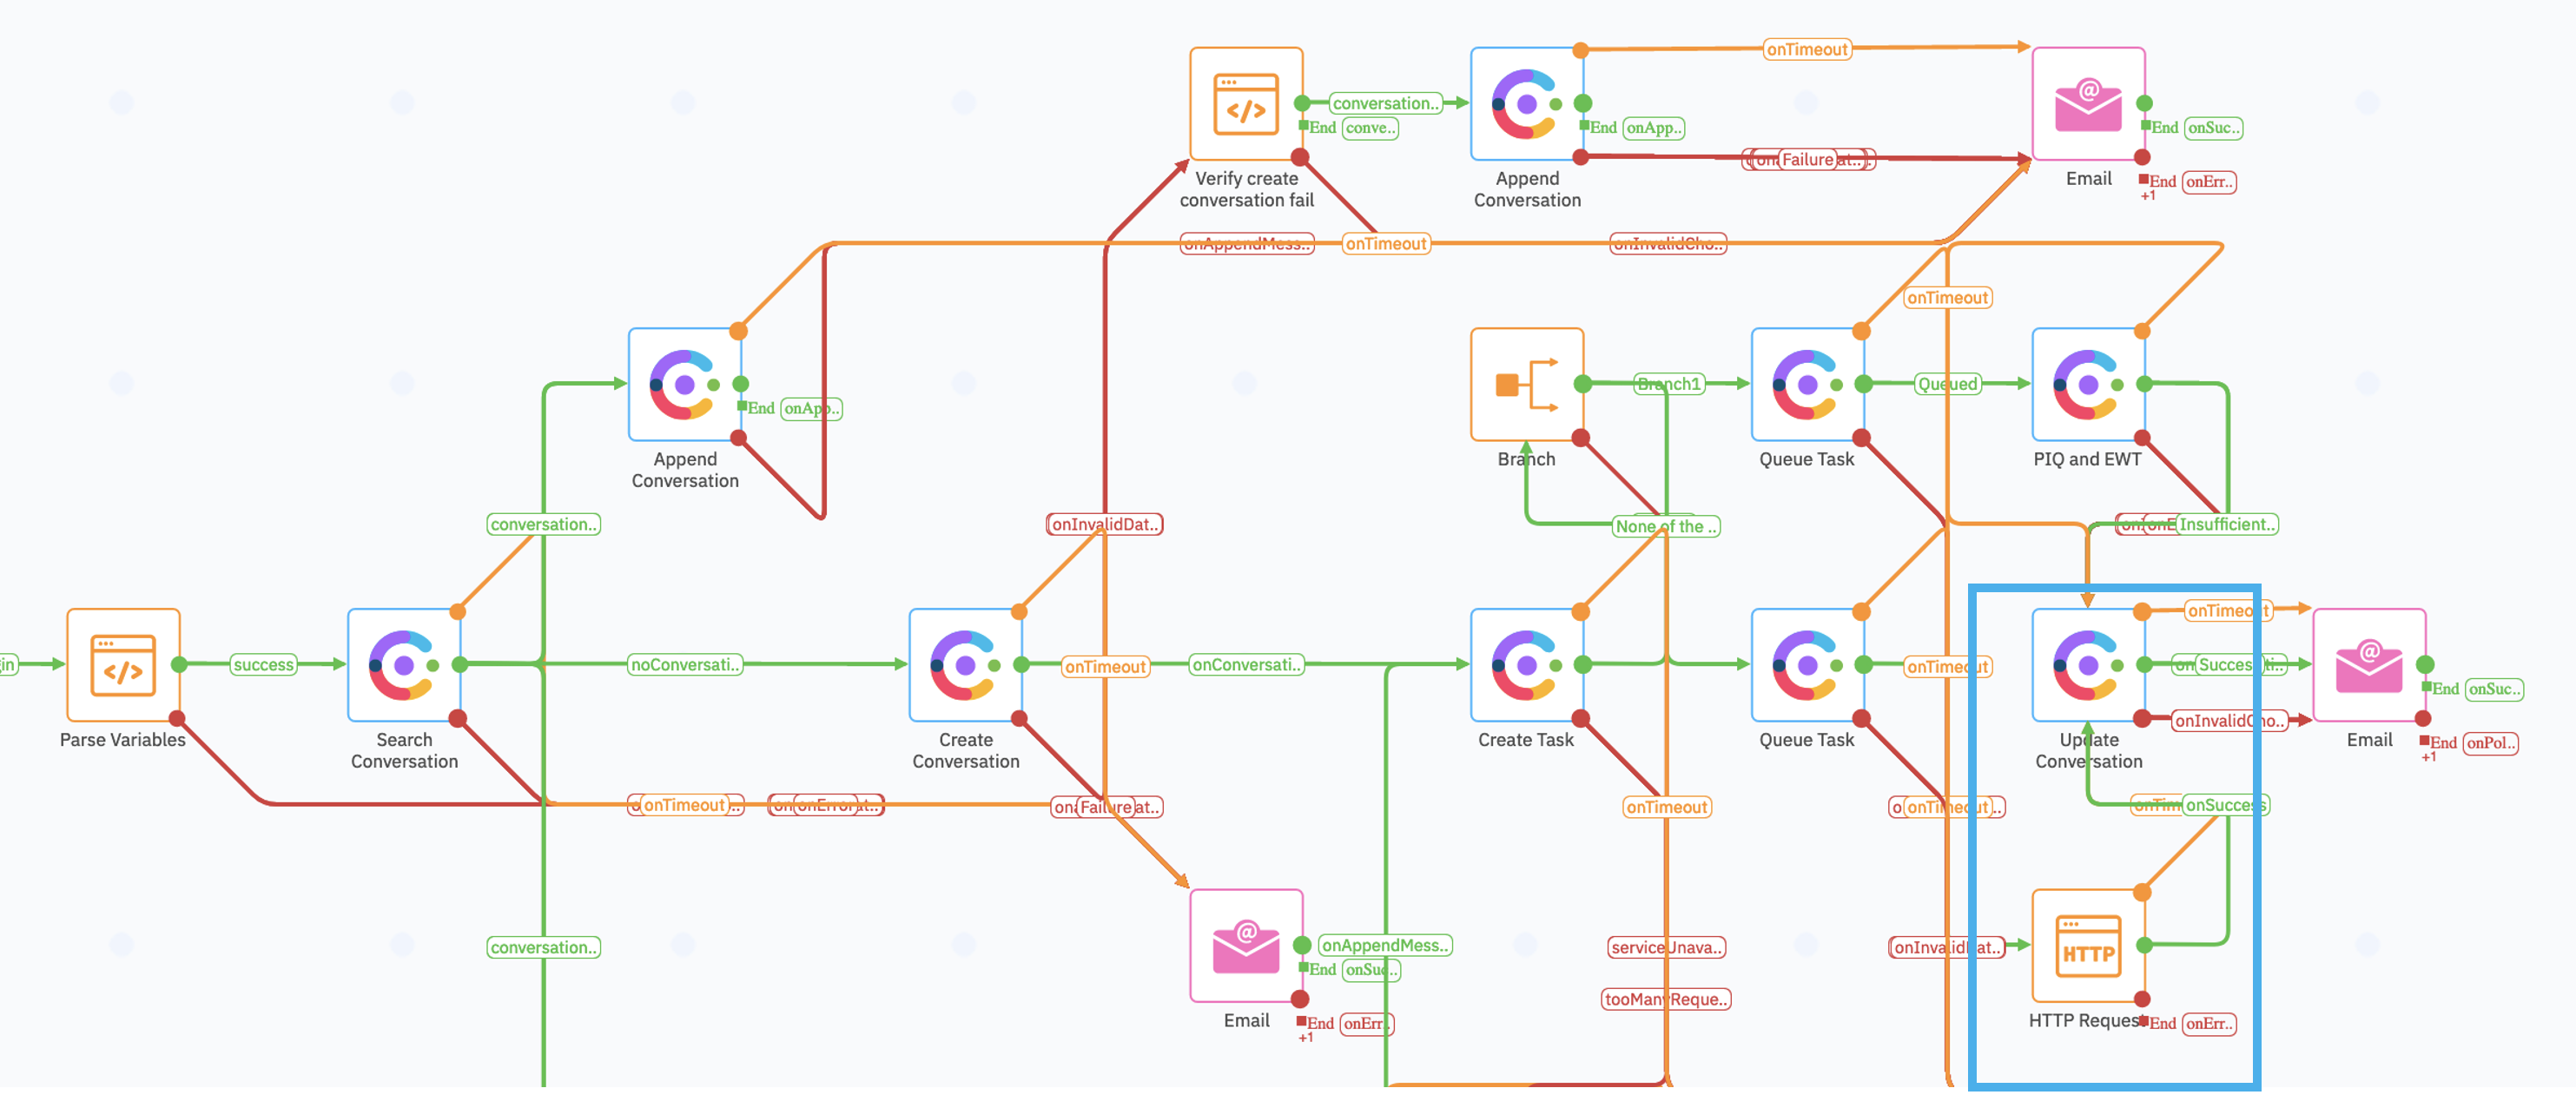
Before proceeding with the configuration task, you need to understand the flow logic. Please follow the diagram below and call the proctor if you have any questions.
Step 2. Position In Queue Configuration
In this task, we will use the predefined node PIQ and EWT. This node provides the caller’s current Position in Queue (PIQ) and the Estimated Wait Time (EWT). The flow developer can use these variables with flow logic to determine agent availability in a queue and route elsewhere when needed. The node has three types of output flow branches. These branches get triggered based on return status and values of EWT and PIQ.
- Success: Triggered when both EWT and PIQ APIs succeed and return nonnegative values.
- Insufficient Information Flow: Triggered when the PIQ API returns a valid variable value, and EWT has the value as -1.
- Failure: This branch is triggered when PIQ API or EWT API fail and/or return invalid values.
Note: PIQ/EWT node can currently be used only after the Queue Task Node.
-
Go to the Services - My First Service and open the Email Inbound Flow.
-
Click on the EDIT button in the upper right corner.
-
Drug and drop the PIQ and EWT node from the Node Palette to the main canvas.
- Delete the existing Queue Task
Queuedlink by clicking on it and pressing the delete button. Re-connect the Queue Task with the PIQ and EWT
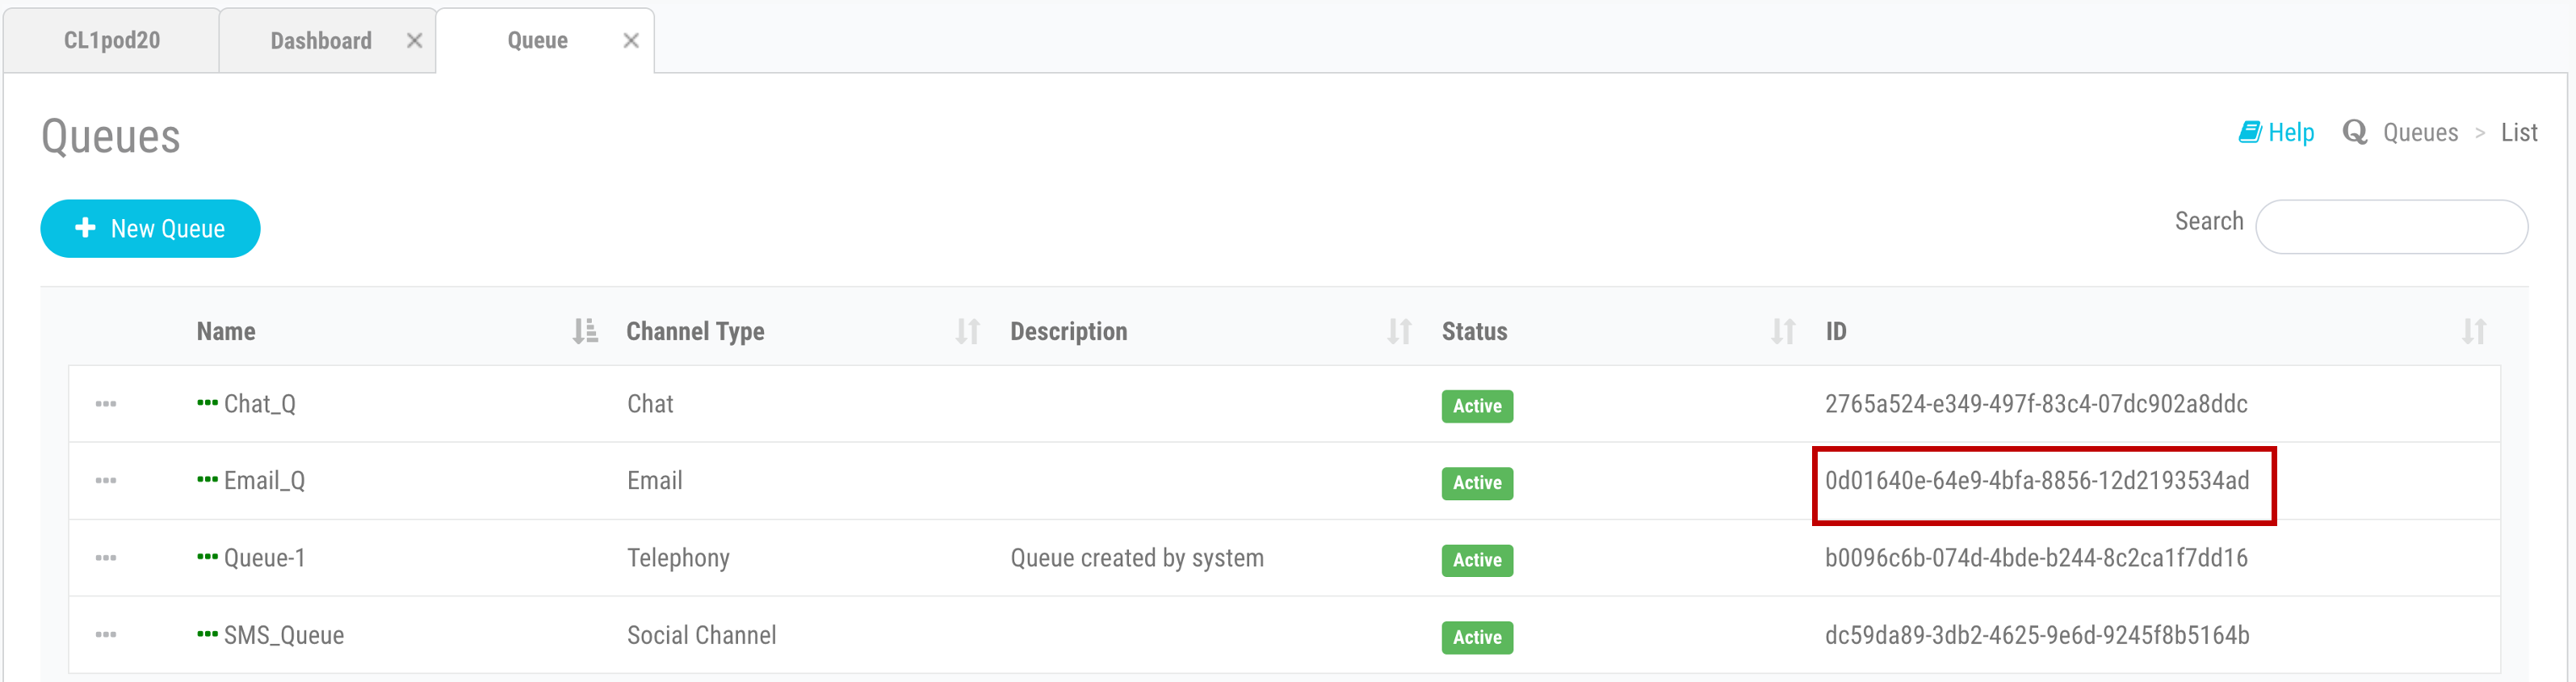
- You will have to set the Queue ID in the PIQ node. Copy the Queue ID from the Management Portal -> Provisioning -> Entry Points/Queues -> Queue
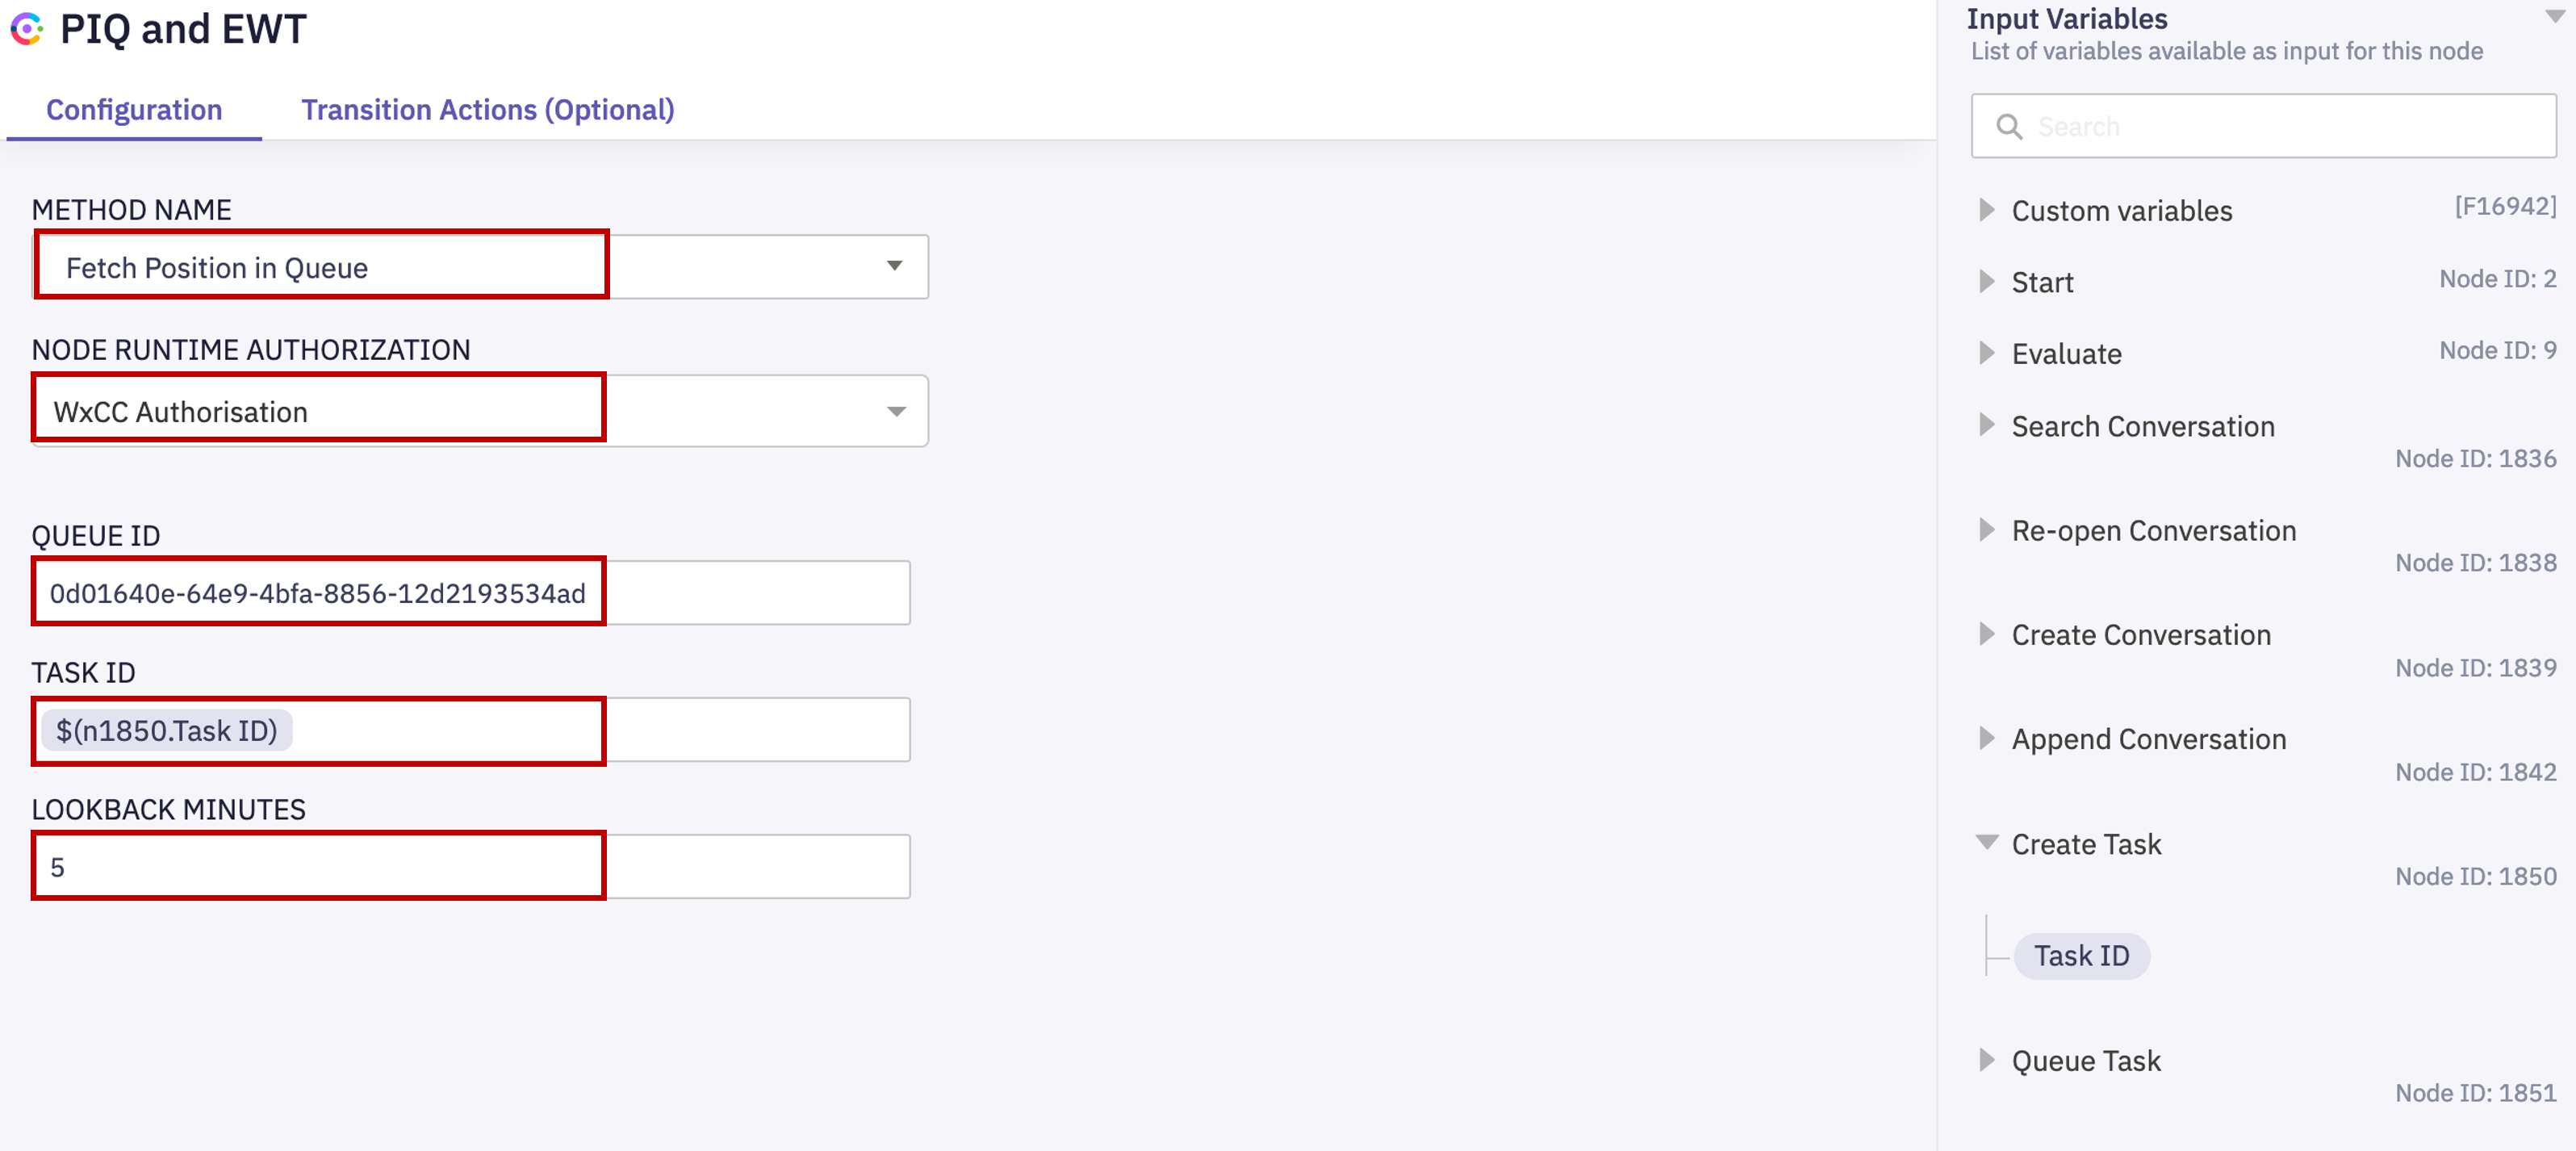
- Go back to Webex Connect and double click on the PIQ and EWT node. Set up the following configuration:
| Setting’s Name | Value |
|---|---|
| METHOD NAME | Fetch Position in Queue |
| NODE RUNTIME AUTHORIZATION | WxCC Authorization |
| QUEUE ID | <Queue ID from Managment Portal> |
| TASK ID | $(n1850.Task ID) |
| LOOKBACK MINUTES | 5 |
- Click SAVE and link all exit states of PIQ and EWT with Update Conversation.
Step 3. Autoreply Configuration
In the default workflow, auto-reply is already configured for all new tasks. In this step, we will improve the answer by changing the message and adding the PIQ variable.
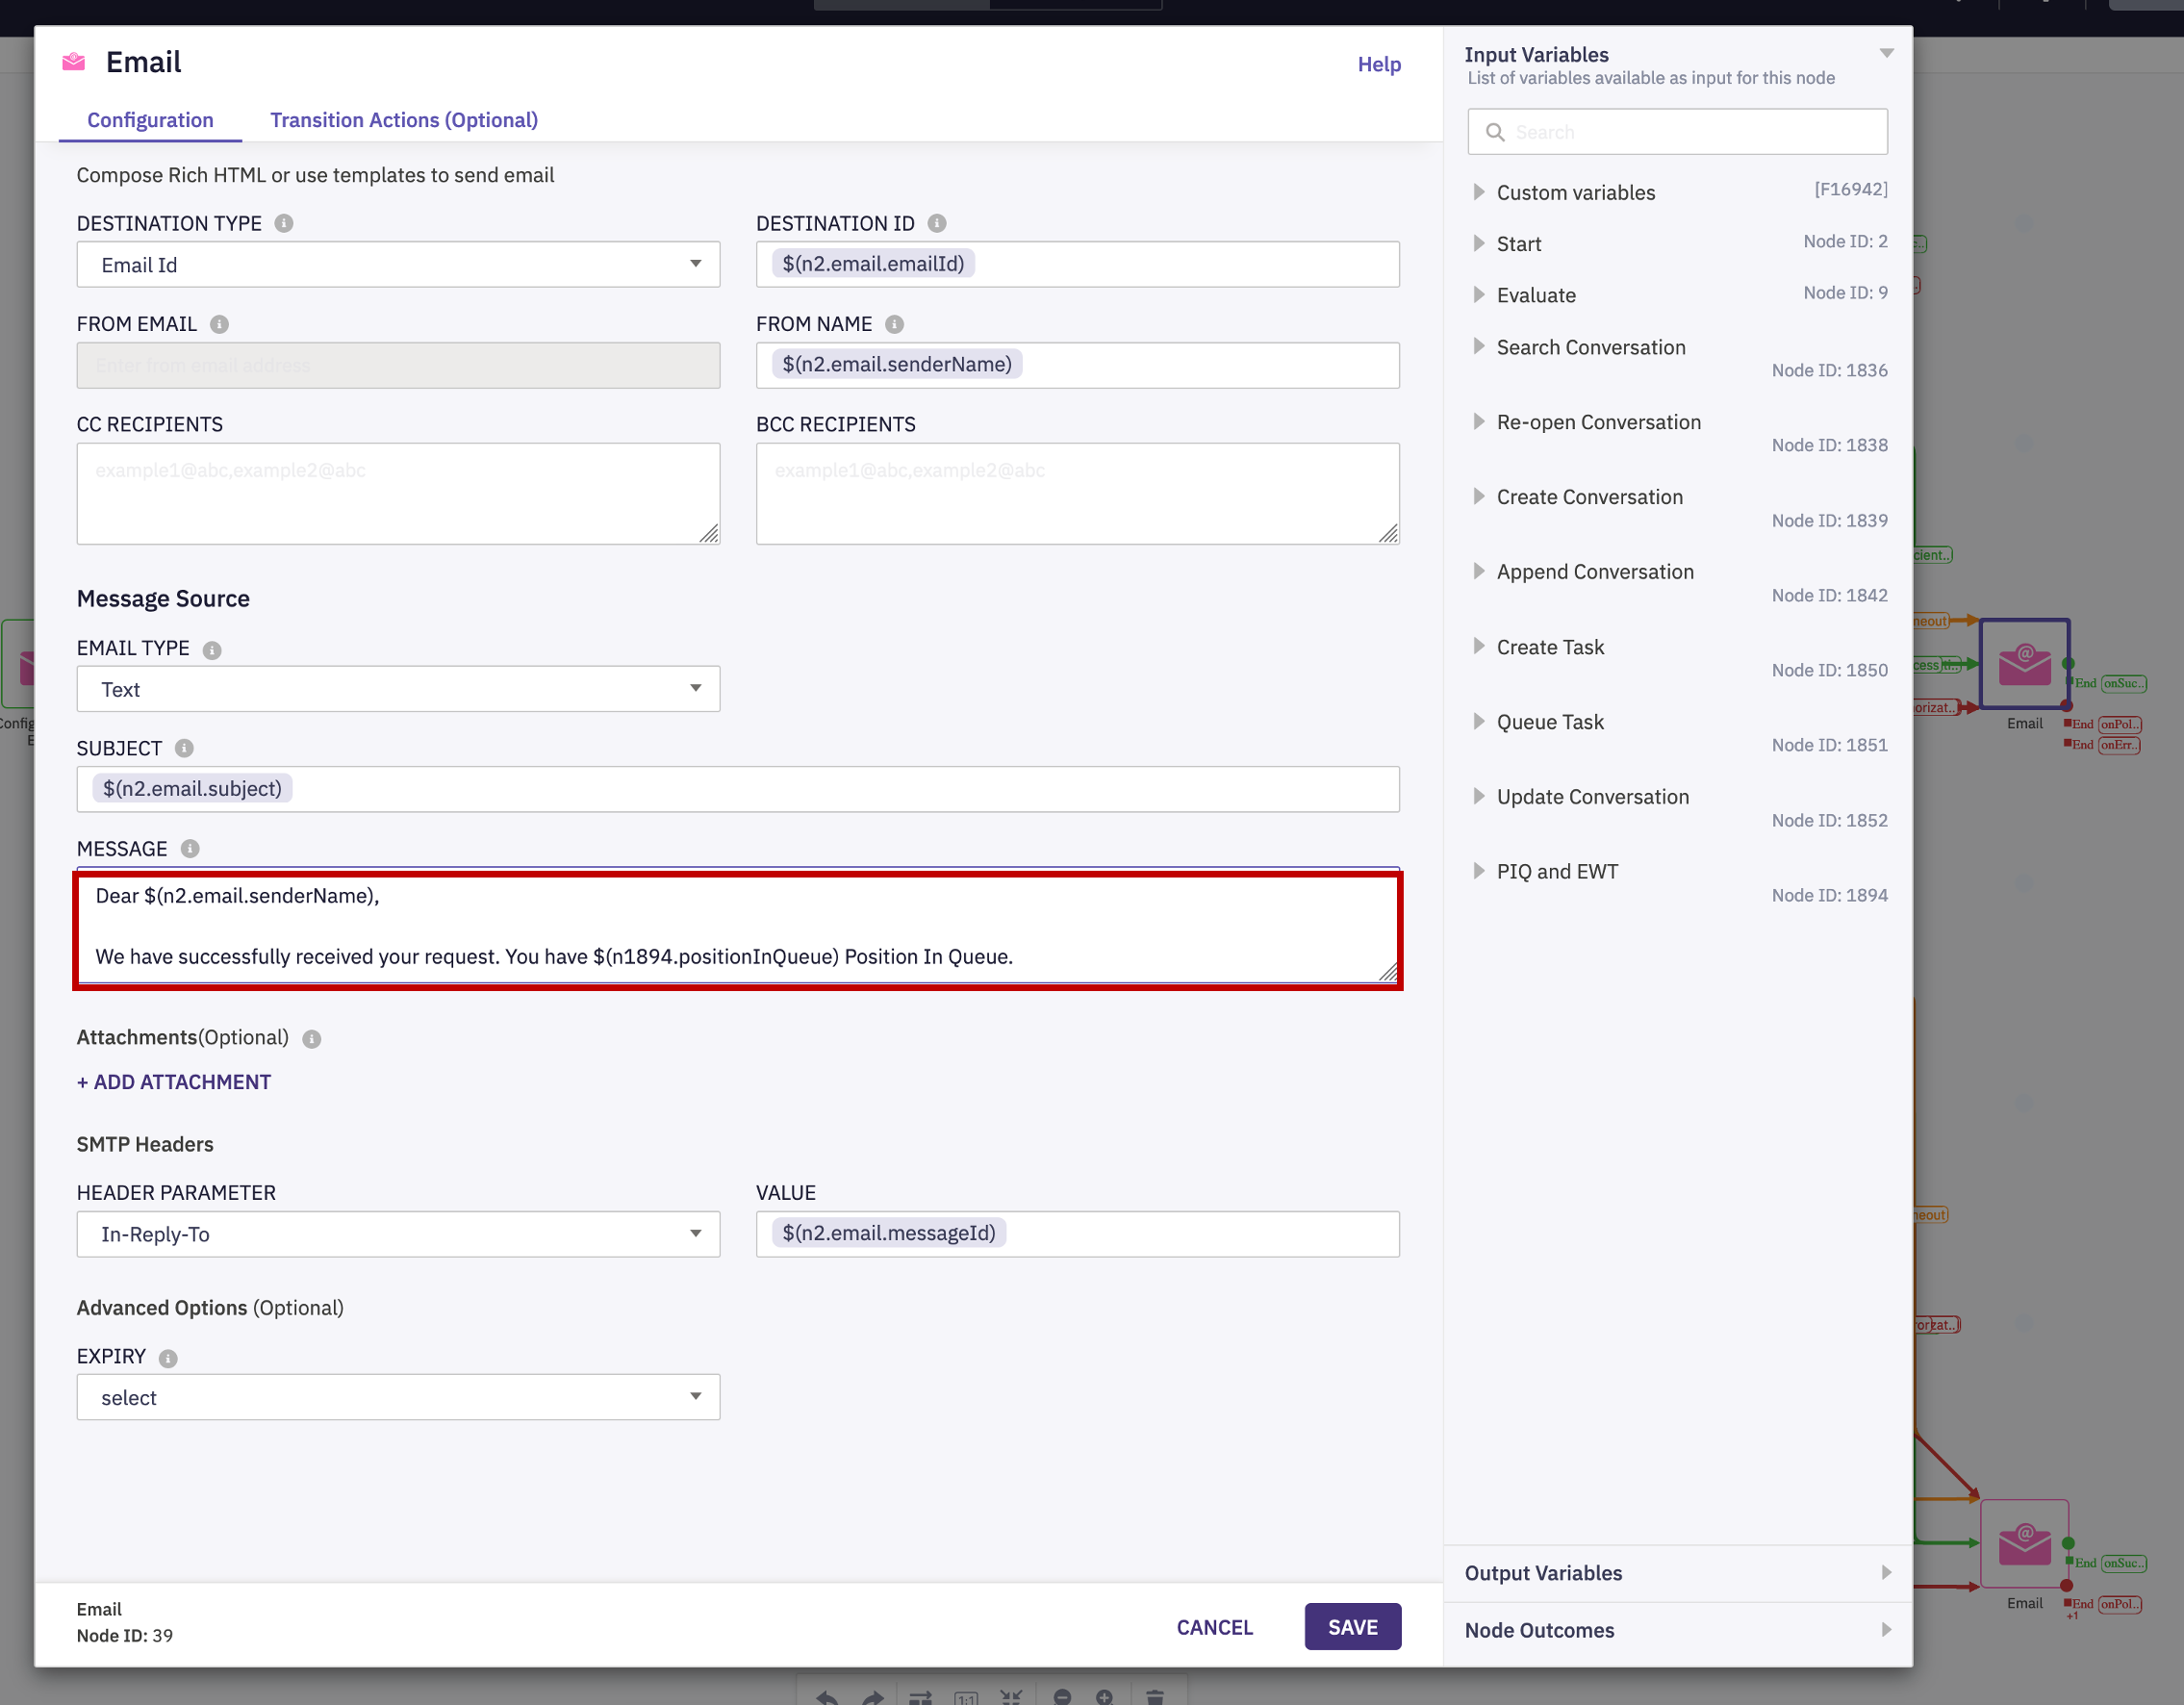
- Double-click the the Email node and in the MESSAGE.
- Set the customized message. Exampel: Dear $(n2.email.senderName). We have successfully received your request. You are $(n1894.positionInQueue) in Queue.. Press SAVE.
Note: Your PIQ node ID can be different from the example above. Select the right variable from the Input Variables in the right panel.
-
Publish your workflow by clicking SAVE and MAKE LIVE.
-
The goal is to get several emails in queue. Make sure that the agent is in IDLE state in the Agent Desktop.
-
Go to your personal email account or ask the proctor to send 2 emails with different subjects to the configured email address.
-
Wait for 1 minute and check the auto response, you should see your PIQ.
Step 4. Enhancing Routing based on a Subject
In this task, you will be checking “Cisco Live” text in the Subject. If it is not there, the task will be routed to another queue Email_Q2.
We will use the Branch node which allows you to split your flow based on conditional statements without the need to write any custom code. You can configure multiple branches within a single node. The supported conditions are:
- Equals
- Not equals
- Less than
- Greater than
- Less than or equals
- Greater than or equals
- Regular expression (RegEx)
- Equals ignore case
- Contains
- Contains ignore case
- In
- Not in
- Starts with
- Ends with
- Between
-
Click the EDIT button in the upper right corner.
-
Drag the Branch node from the nodes palette to the main canvas.
- Delete the existing Create Task
Createdlink by clicking on it and pressing the delete button. Re-connect Create Task with Branch.
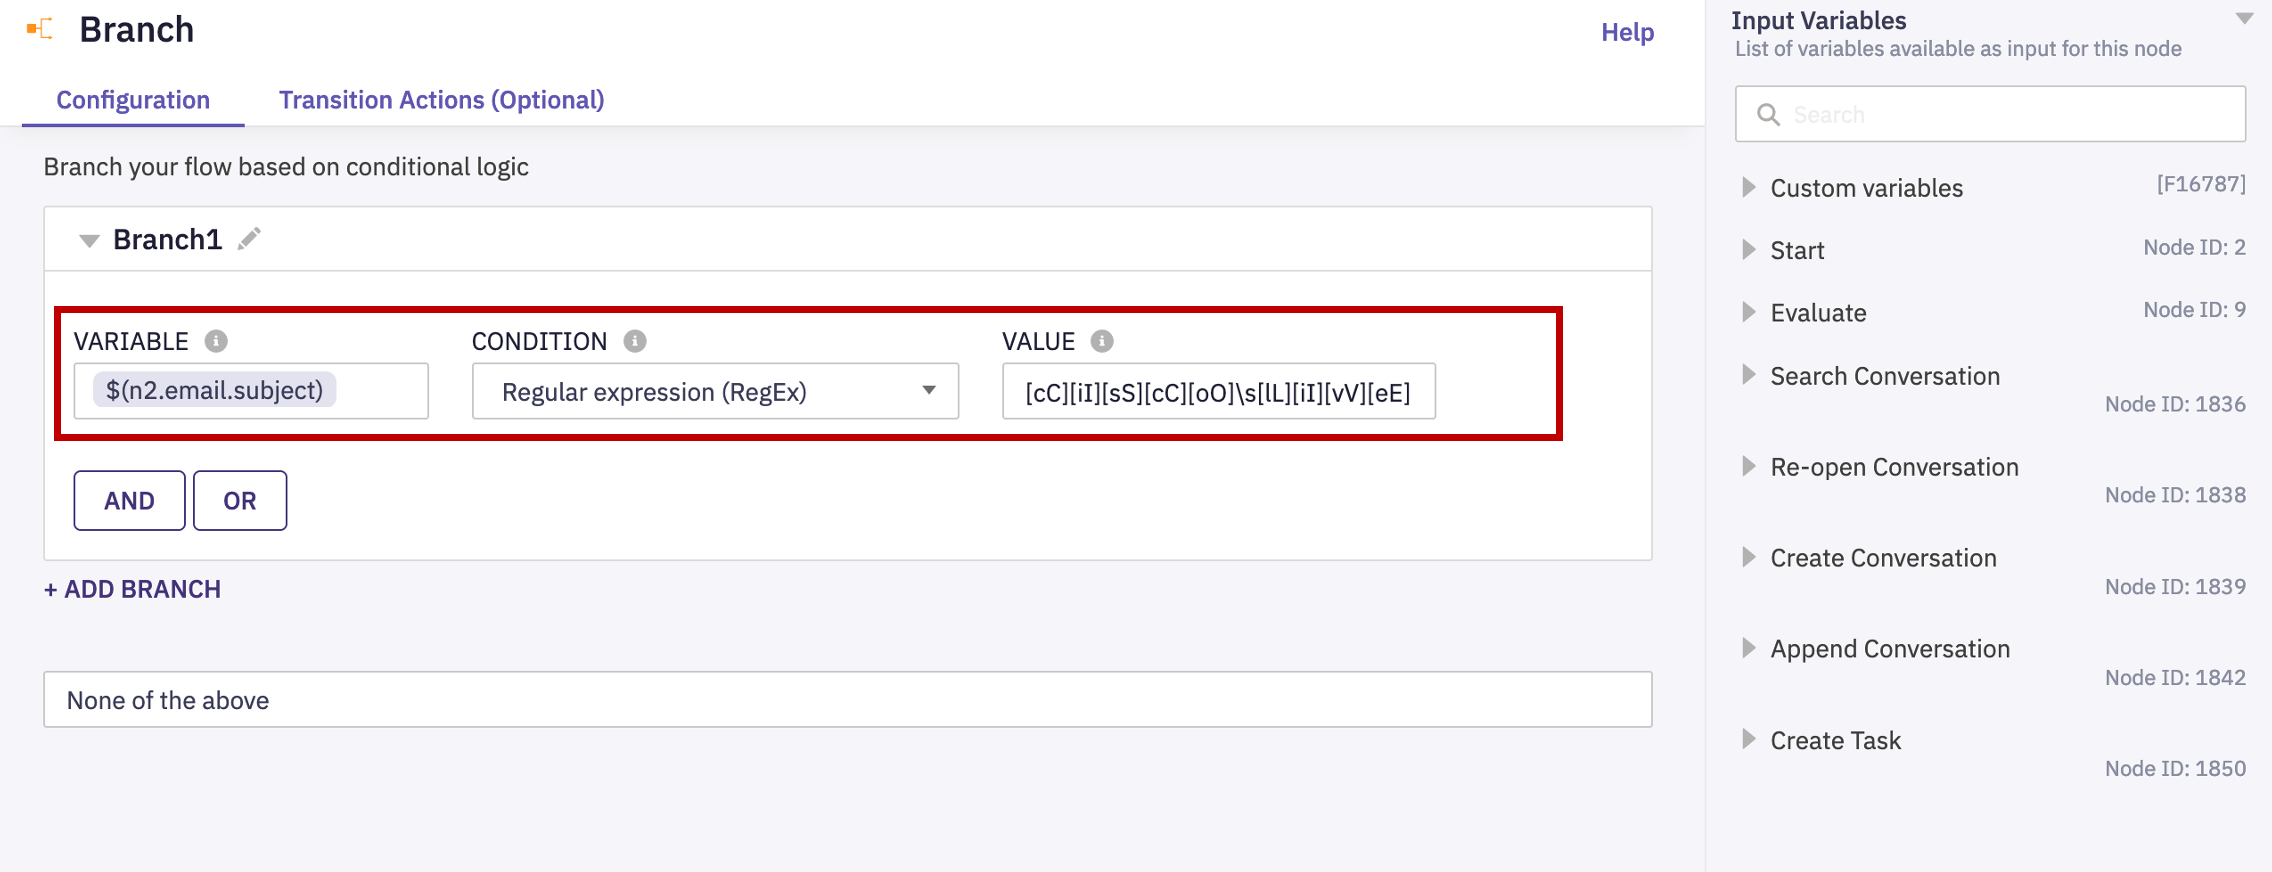
- Double-click the Branch node and set the following conditions for Branch 1:
| Setting’s Name | Value |
|---|---|
| Variable | $(n2.email.subject) |
| CONDITION | Regular expression (RegEx) |
| VALUE | [cC][iI][sS][cC][oO]\s[lL][iI][vV][eE] |
-
Drug a second Queue Task node from the Node Palette to the main canvas.
-
Connect exit
Branch1with the second Queue Task. ConnectNone of the aboveexit with the first (existing) Queue Task. -
Connect
onErrornode outcome with the Close Conversation .
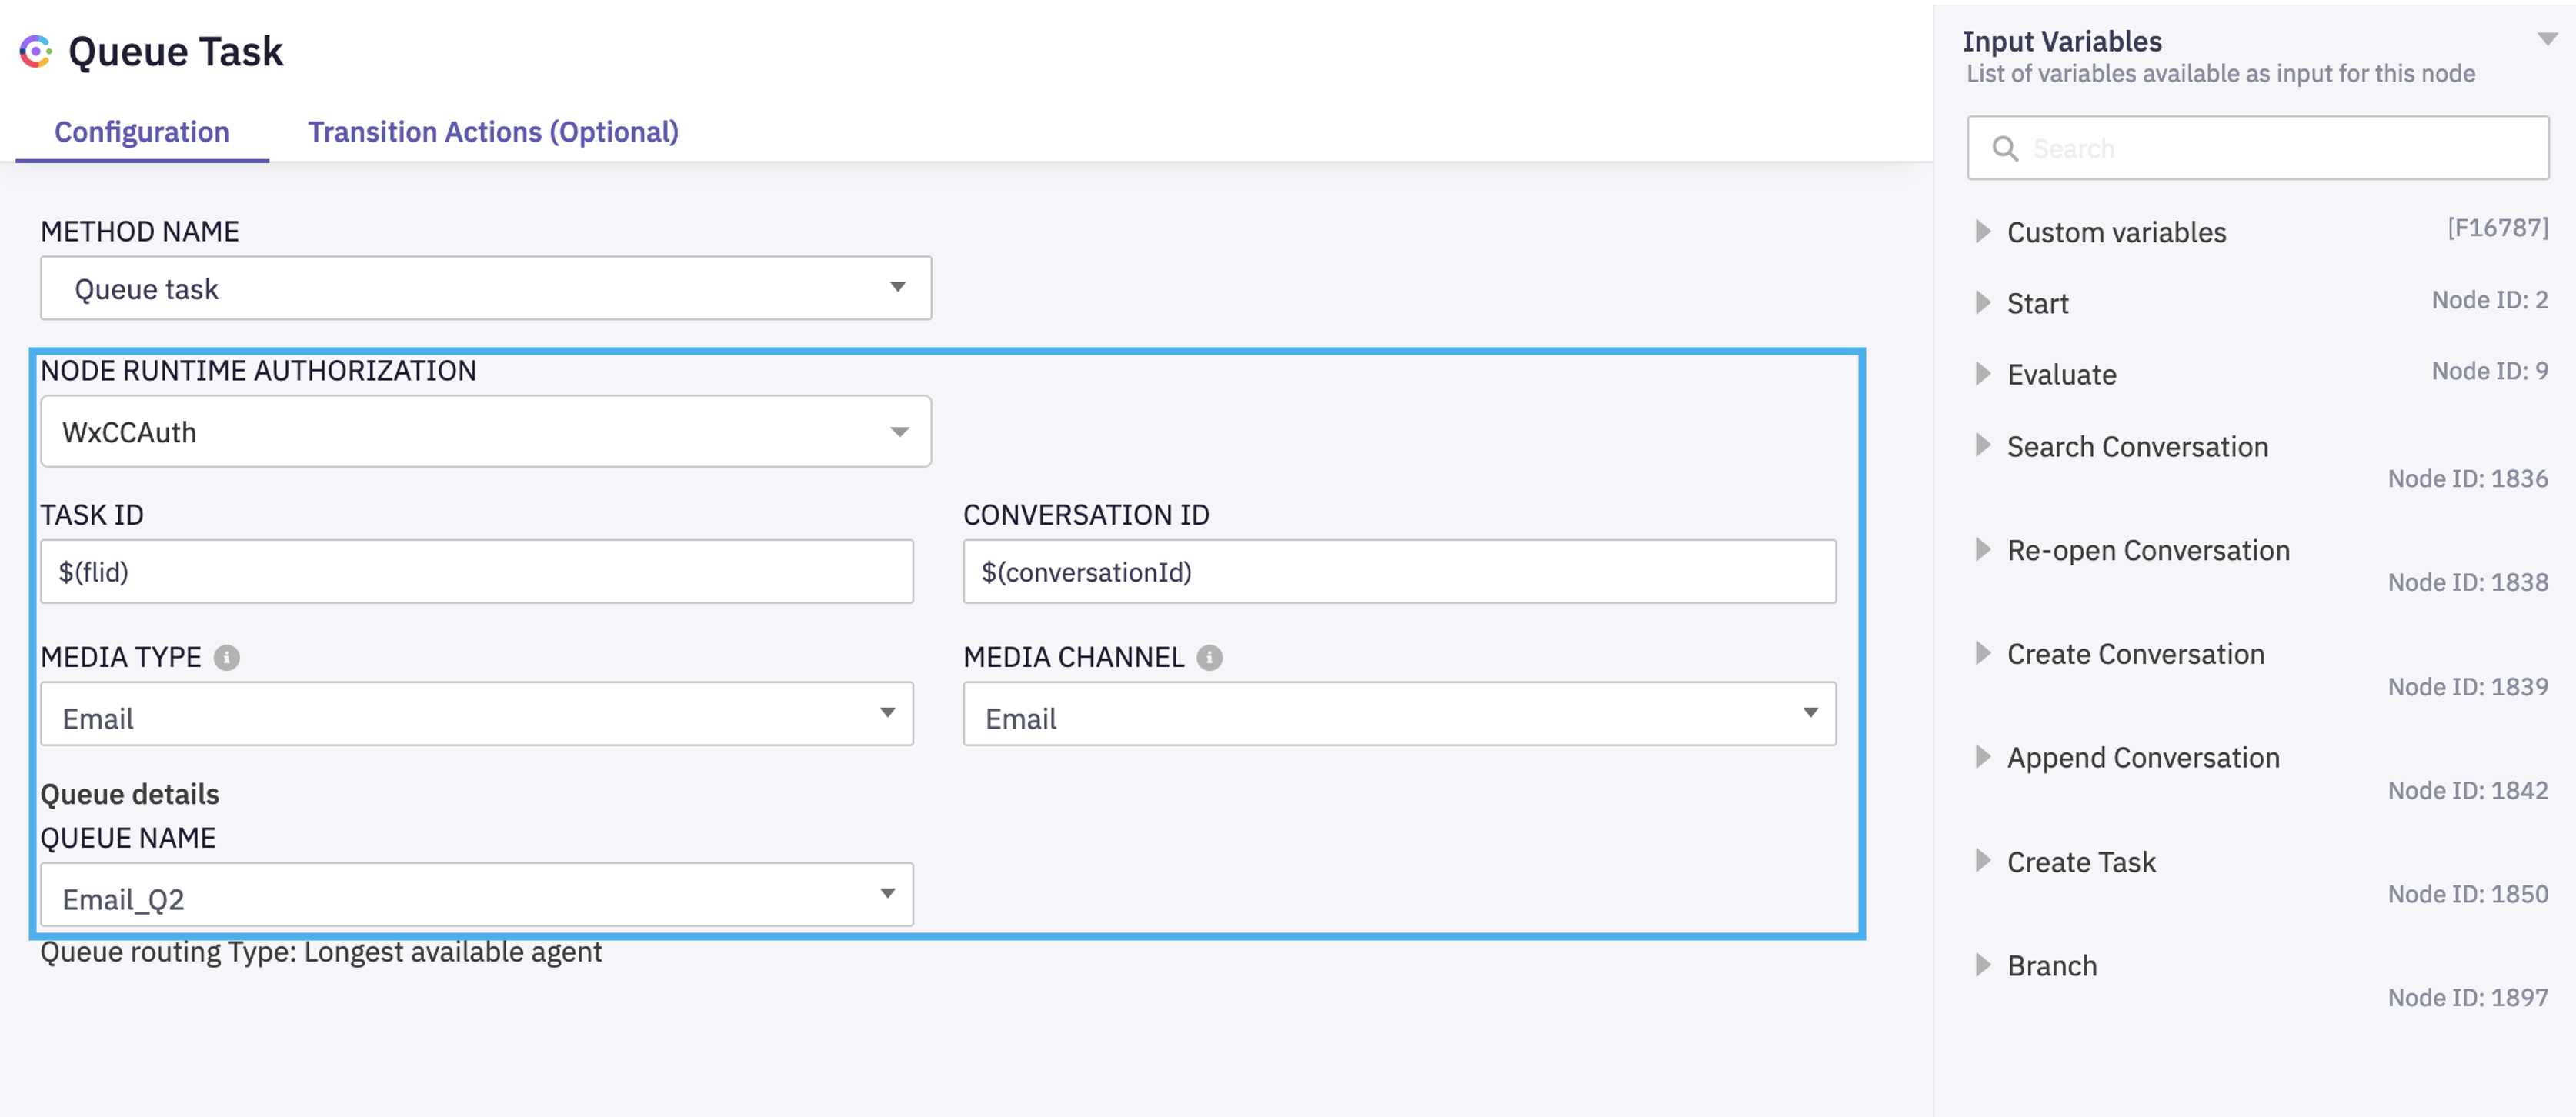
Double-click the second Queue Task node and set the following options:
| Setting’s Name | Value |
|---|---|
| NODE AUTHORIZATION | <WxCC Authorisation> |
| TASK ID | $(flid) |
| CONVERSATION ID | $(conversationId) |
| MEDIA TYPE | |
| MEDIA CHANNEL | |
| QUEUE NAME | Email_Q2 |
- Click SAVE and link all exit events of the second Queue Task node:
Queuedwith PIQ and EWT.onErro,OnTimeout,onInvalideData,taskFailed, etc with the Close Task.

-
Publish your workflow by clicking SAVE and MAKE LIVE.
-
Go to your personal email account or ask the proctor to send 2 emails with and without the “Cisco Live” subject.
-
Go to the agent desktop https://desktop.wxcc-us1.cisco.com. Sign in as the agent in “Team1” and make the agent Available. You should get only 1 email without “Cisco Live” subject.
-
End this task.
-
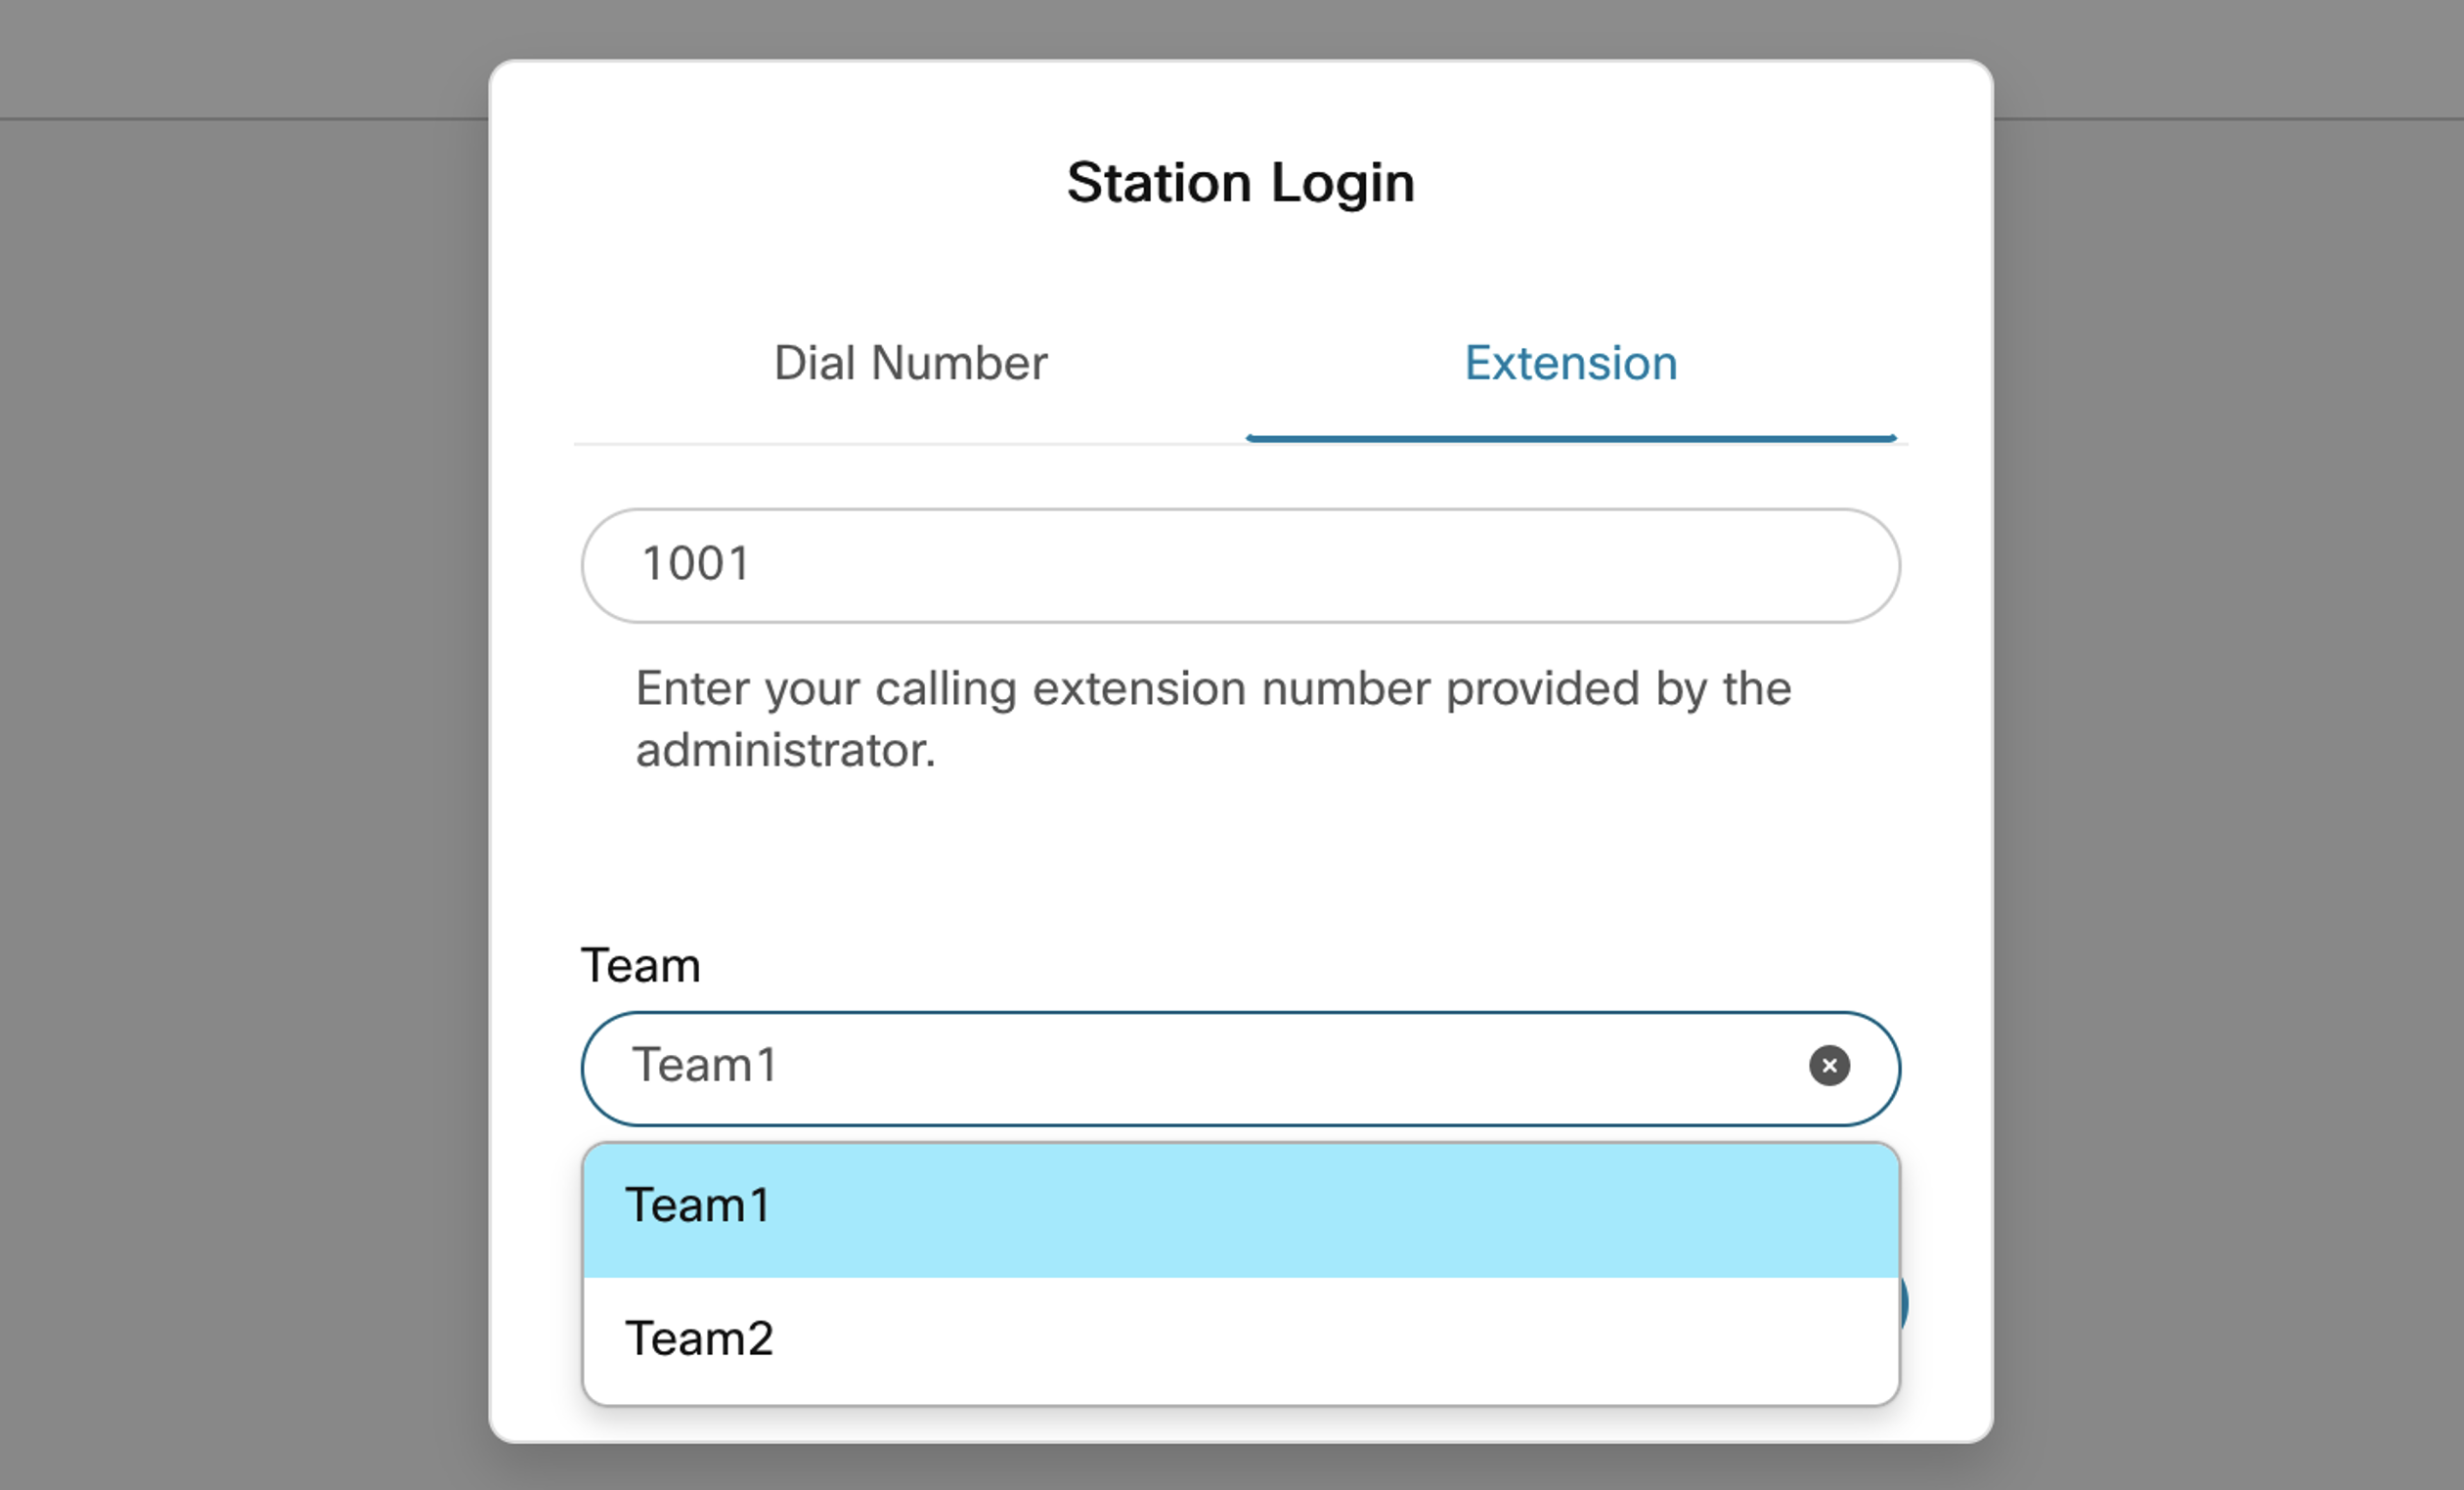
Change the agent team, by clicking on Profile Settings. In the Team section, choose the
Team2from the Team drop-down list and click Save Team Selection.
Note: You cannot change your team if you have active tasks, interactions, or incoming task requests. The Team option is disabled.
- Make the agent Available. As a result, the second email should come into the Email queue for the
Team2with the “Cisco Live” subject.
Step 5. Integration with Smartsheet using smartsheet APIs
In this task, you will learn how to work with the HTTP Request node. As an example, we are going to make the integration with the external product through smartsheet APIs. Smartsheet APIs are used as an example. They allow you to programmatically access and manage Smartsheet data especially read and update sheets. In our logic, if the email’s subject does not contain “Cisco Live” we will be adding a new row to the smartsheet with the email details (Sender Name, From Address and Subject).
1. Preconfigured settings (no actions needed)
The steps below were preconfigured for you. They has to be done only once.
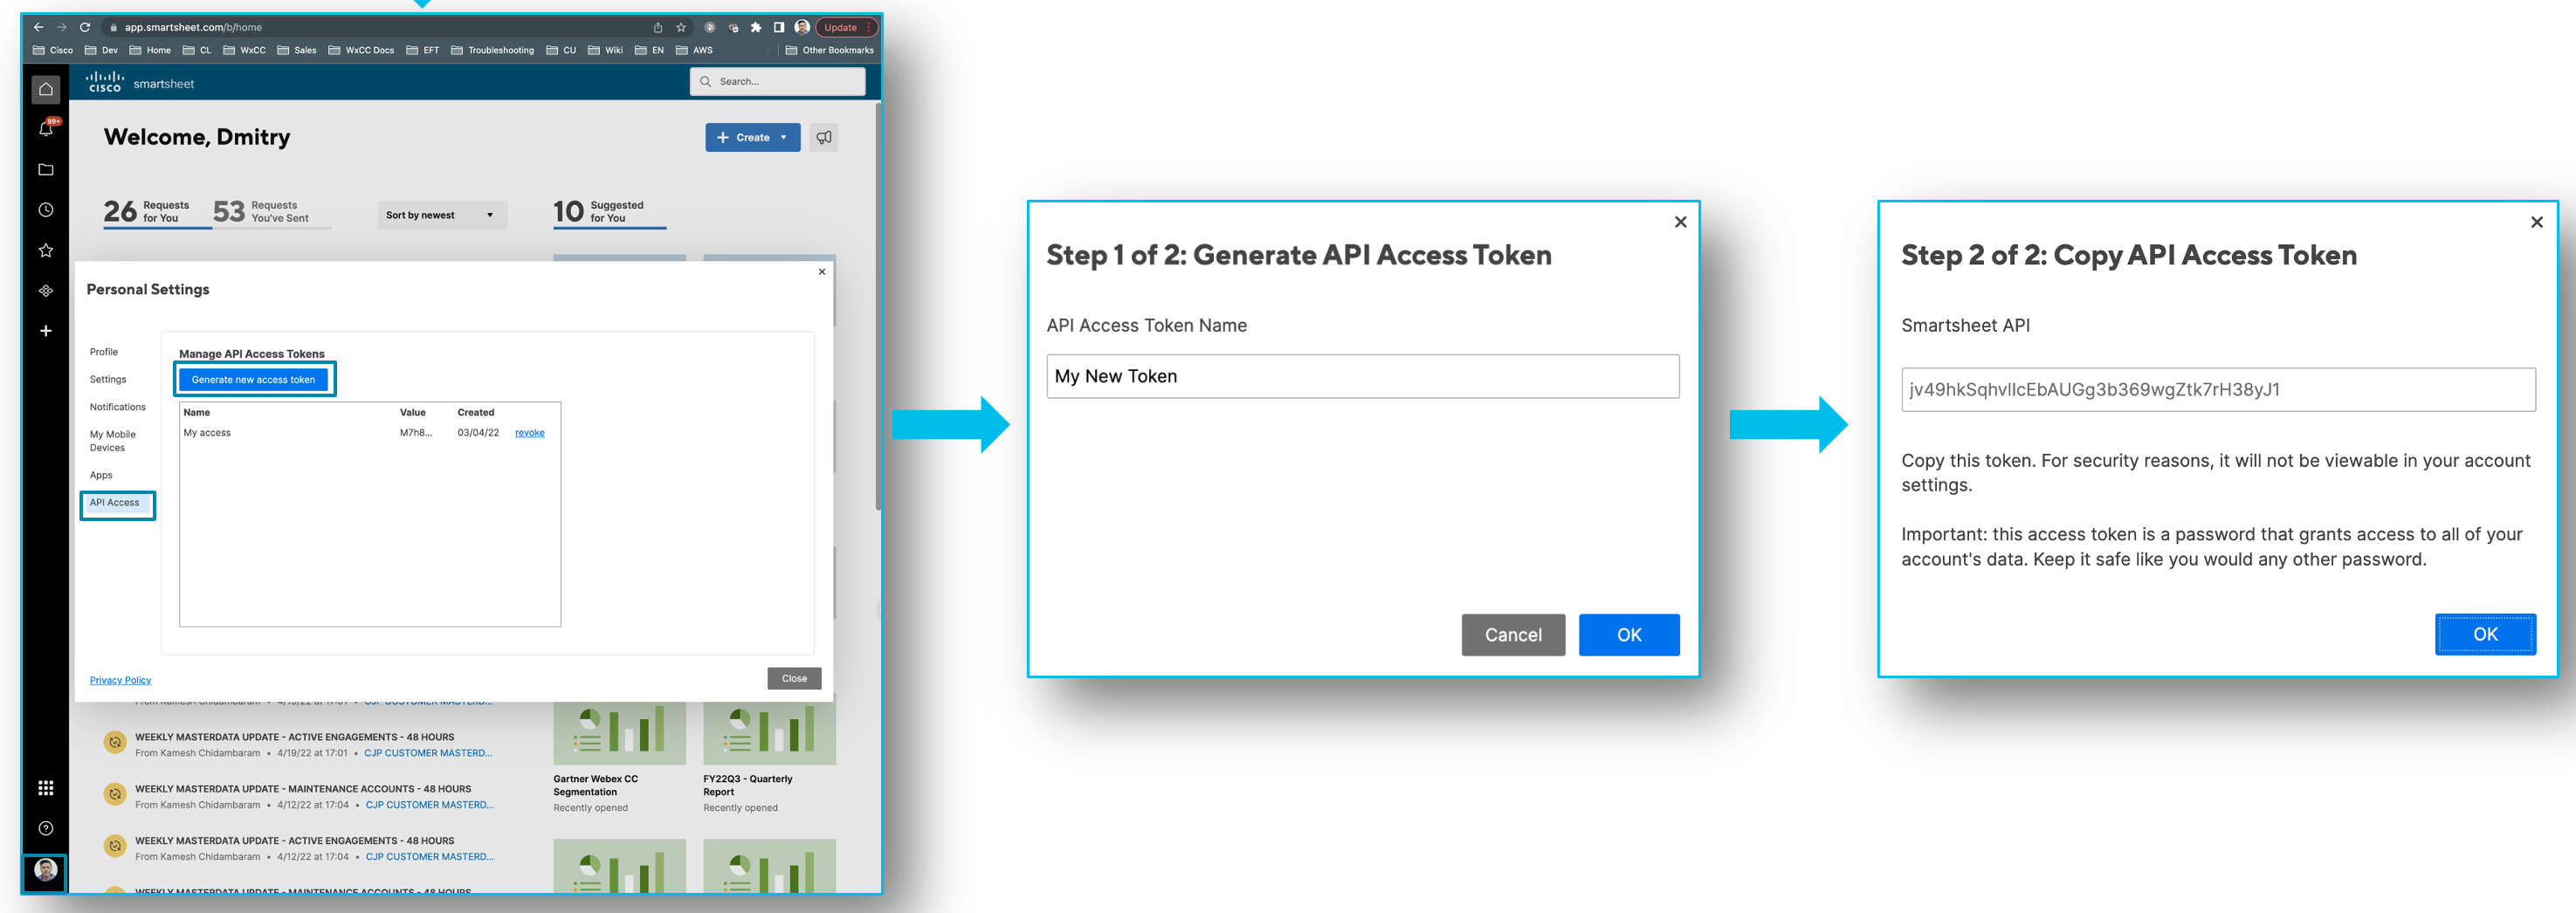
- The smartsheet API key has been generated according to the smarthseet guide. You will be using this API key in your lab.
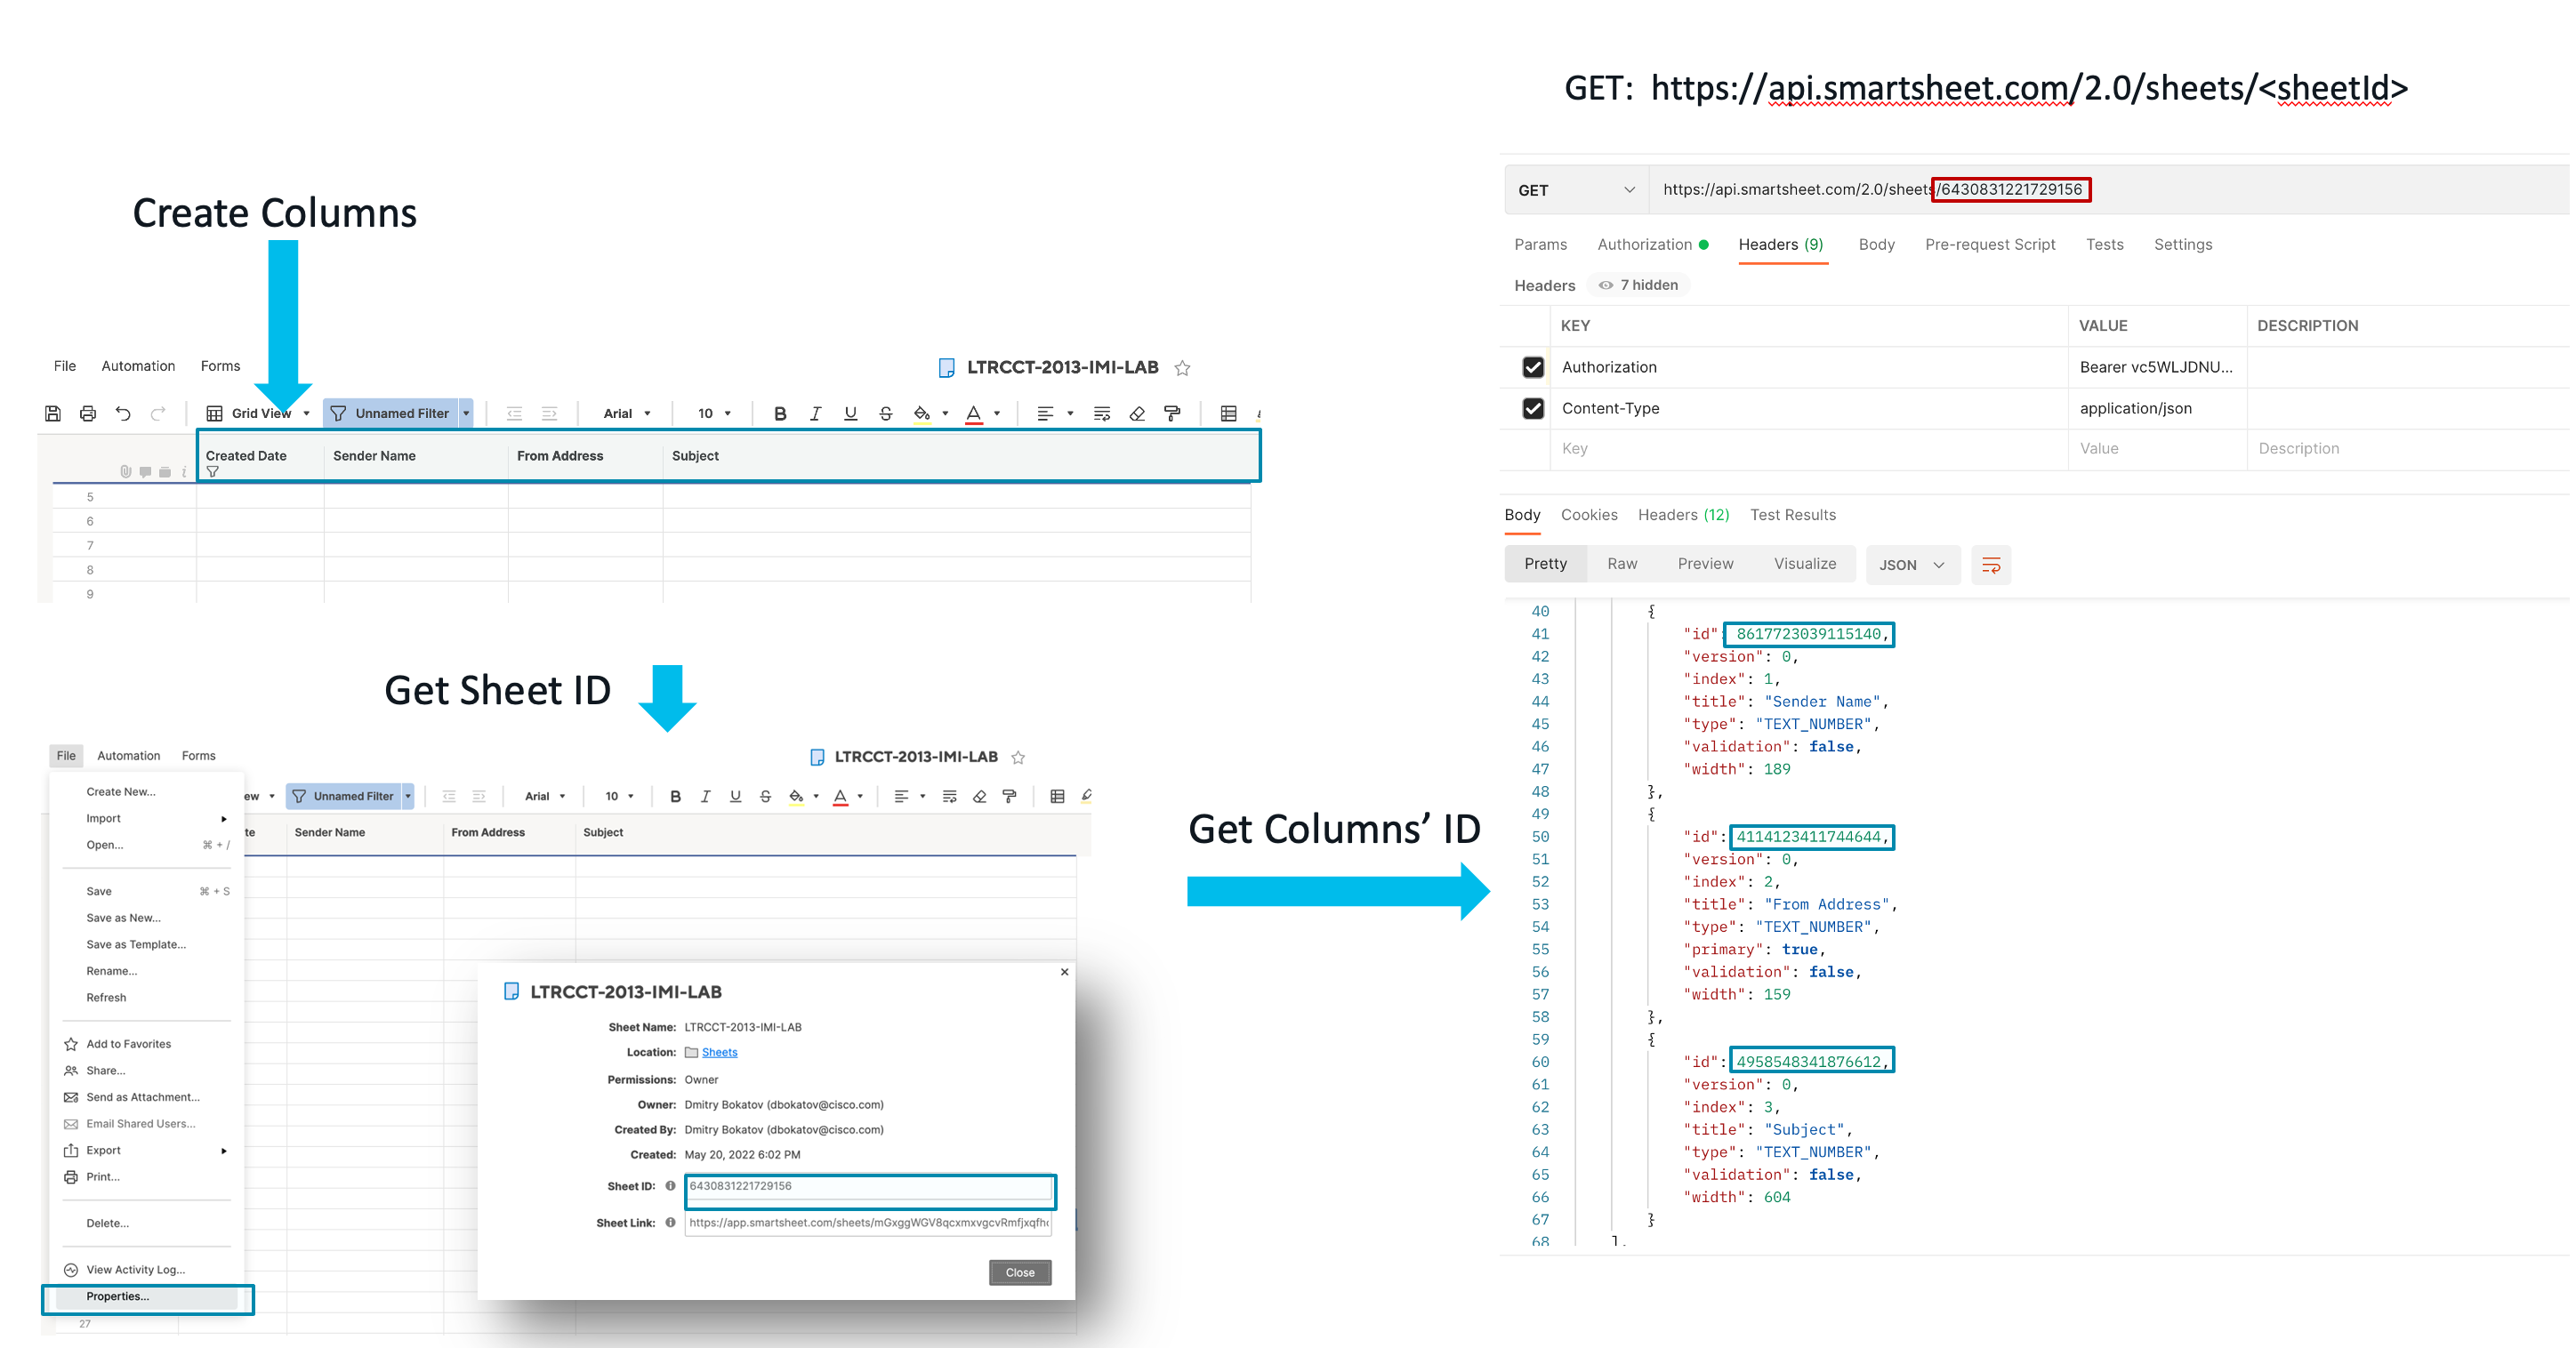
- The smartsheet grid was created. And Columns’ ID were collected through API (we will need it for the API request when we will be adding a new row).
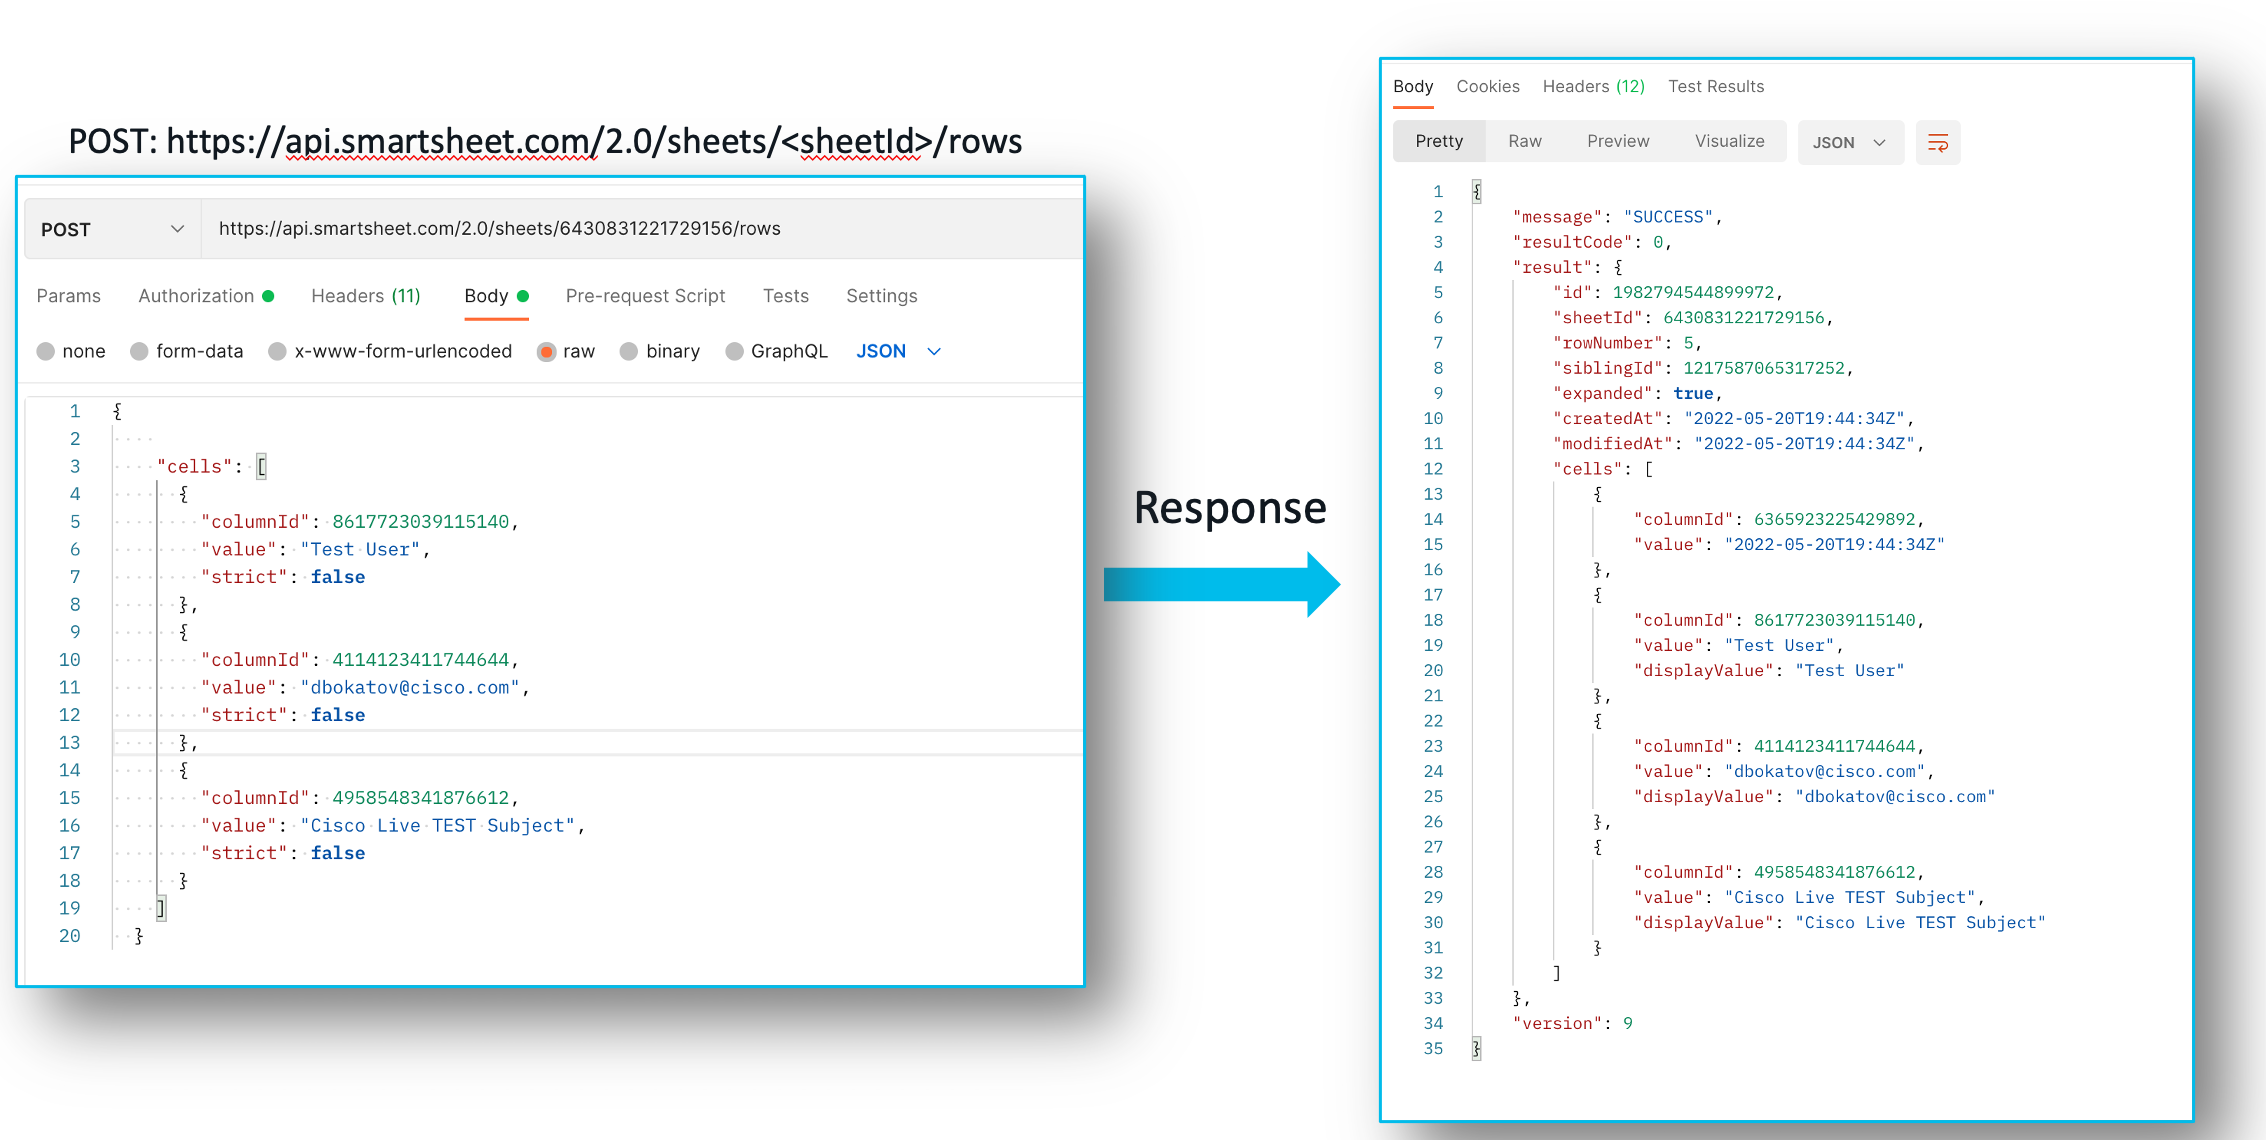
- We checked that we are able to add a row through the postman acording to the smartsheet documentation. It needs just for the verification, exactly the same we will be doing in the Email Workflow with the HTTP Request node.
2. HTTP Request configuration
-
Make sure that you have an access to the smartsheet table. Please ask the proctor to grand the access.
-
Click the EDIT button in the upper right corner.
-
Drug and drop the HTTP Request node from the Node Palette to the main canvas. Connect exit of the first Queue Task
Queuedwith the HTTP Request
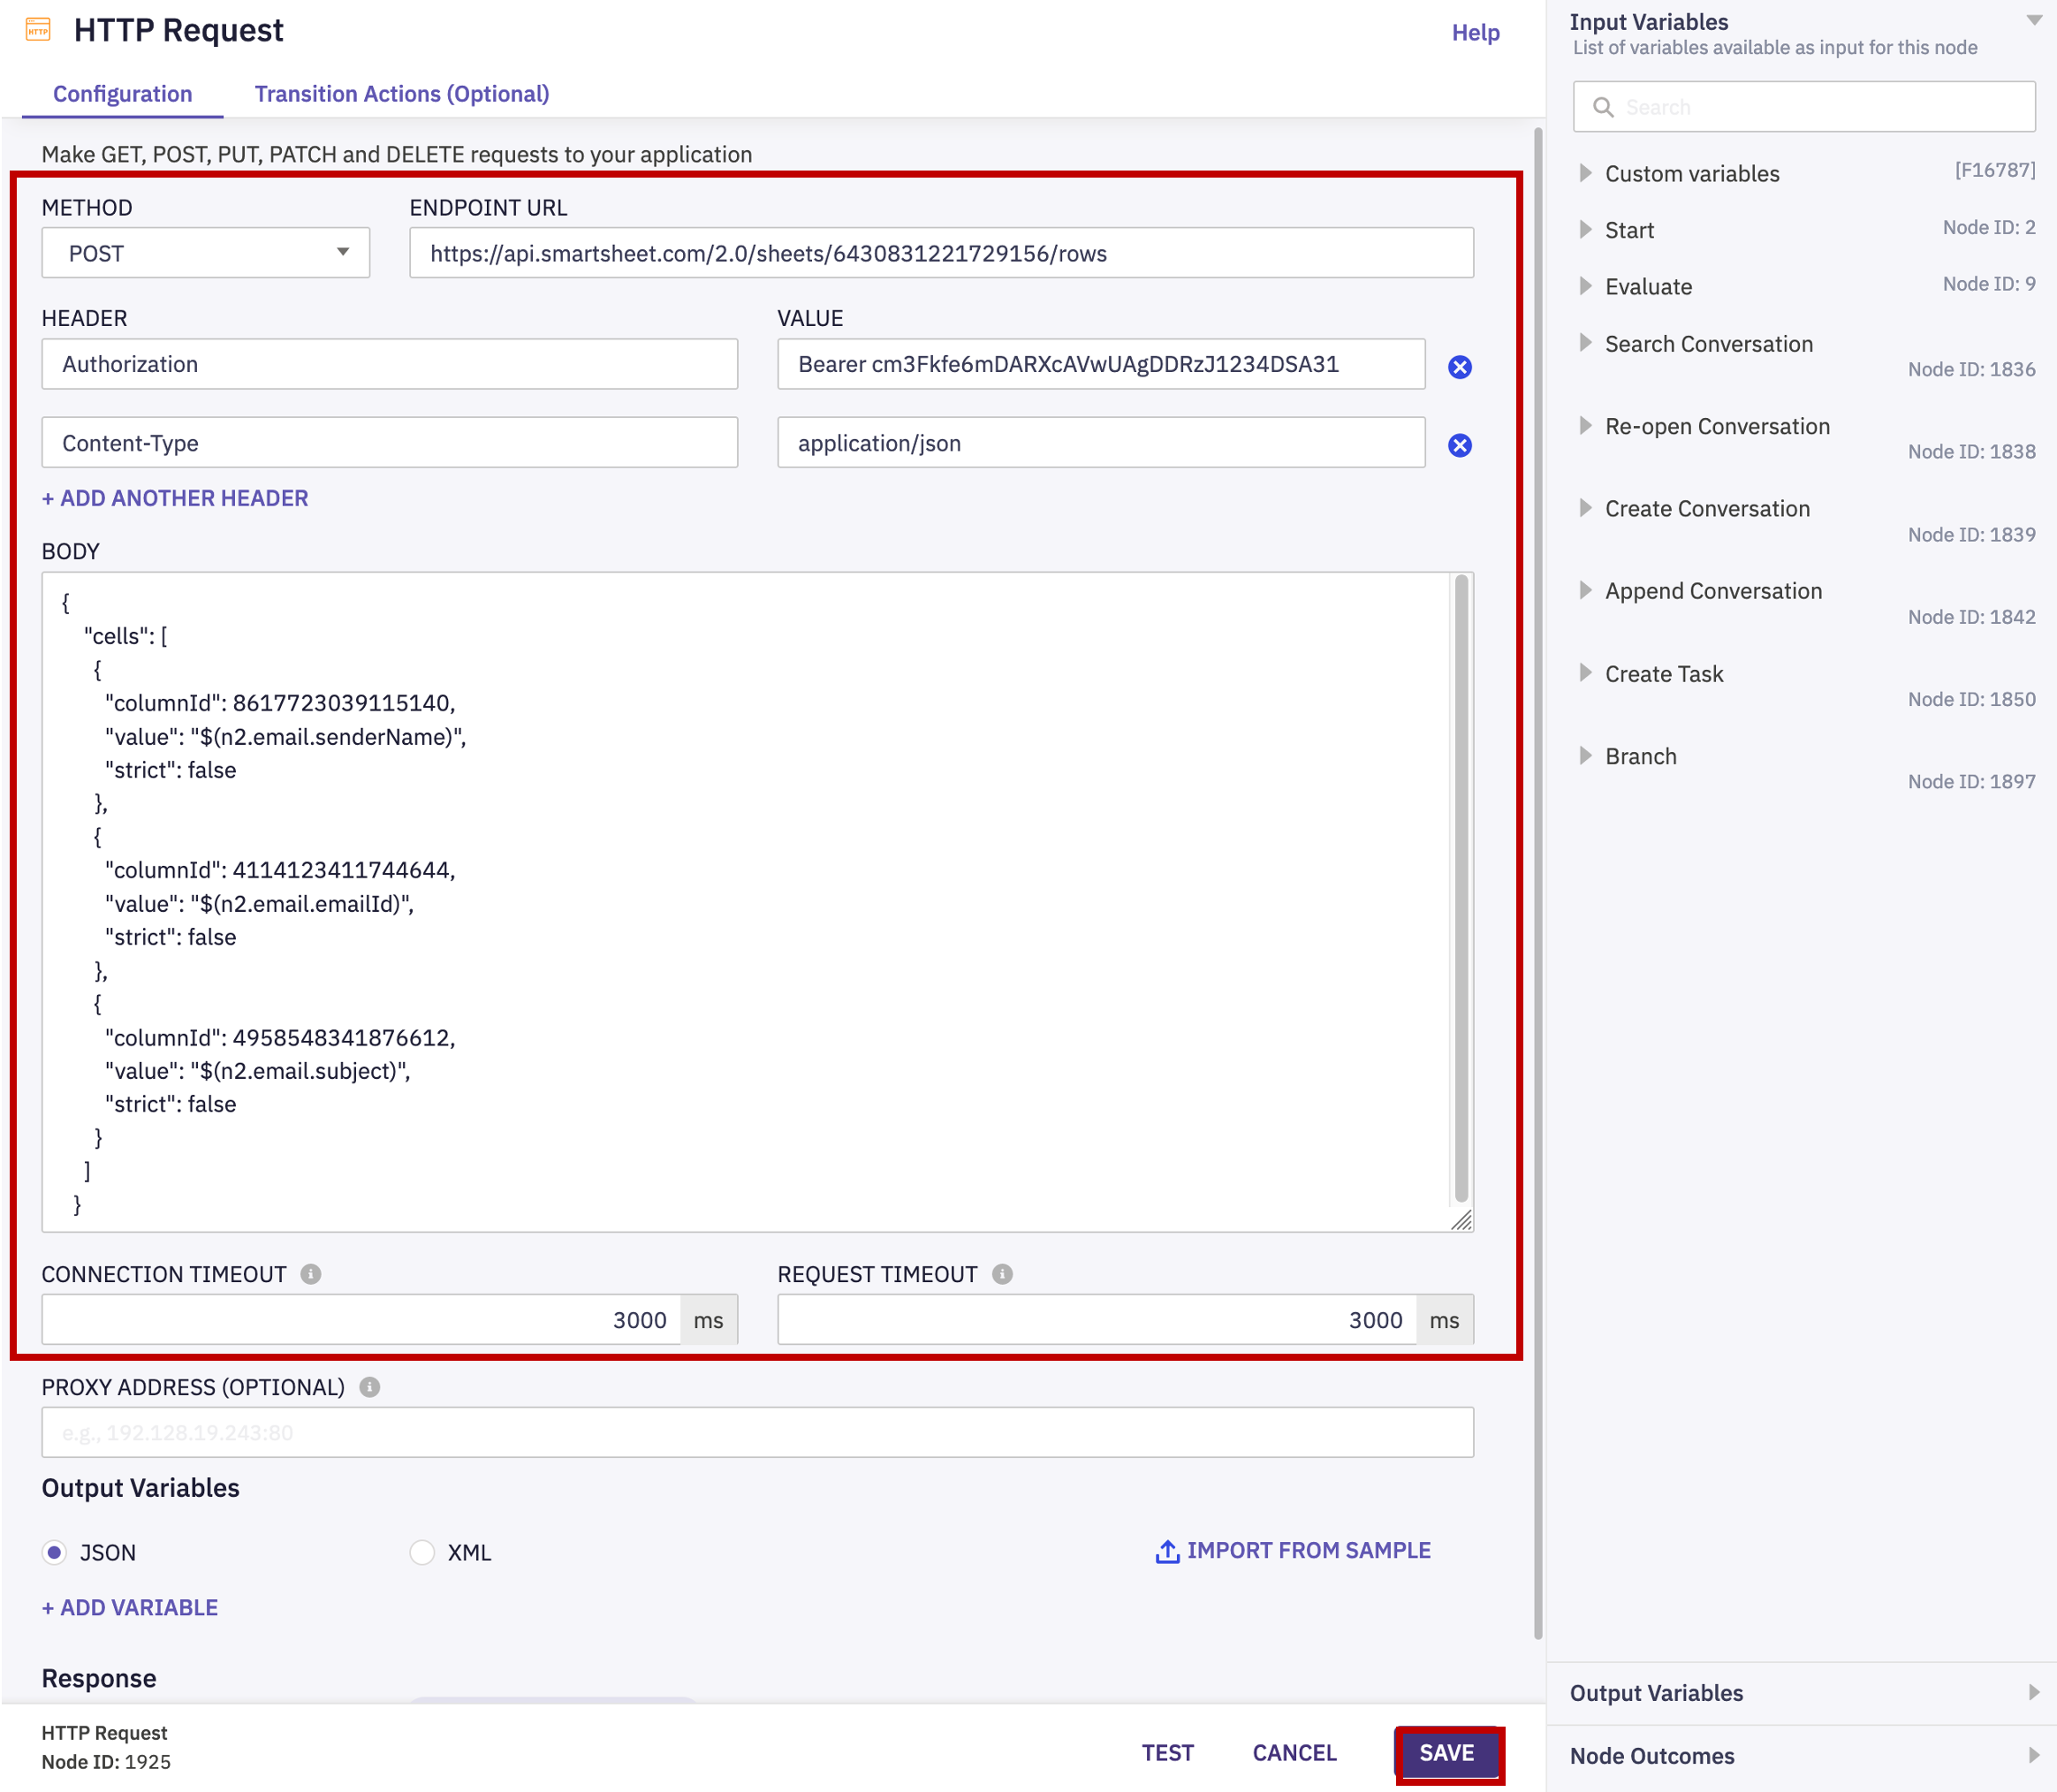
- Double-click the HTTP Request node, set the following options, and click SAVE.
| Setting’s Name | Value |
|---|---|
| METHOD | POST |
| ENDPOINT URL | https://api.smartsheet.com/2.0/sheets/6430831221729156/rows |
| Authorization | Bearer XXXXXXXXXXXXXXXXXX |
| Content-Type | application/json |
| TIMEOUT | 3000 |
BODY:
{
    "cells": [
      {
        "columnId": 8617723039115140,
        "value": "$(n2.email.senderName)",
        "strict": false
      },
      {
        "columnId": 4114123411744644,
        "value": "$(n2.email.emailId)",
        "strict": false
      },
      {
        "columnId": 4958548341876612,
        "value": "$(n2.email.subject)",
        "strict": false
      }
    ]
  }
- Connect all exits of the HTTP Request with the Update Conversation node.
-
Publish your workflow by clicking the SAVE and MAKE LIVE.
-
Go to your personal email account or ask the proctor to send 1 email without the “Cisco Live” subject.
-
After 1 minute check the smartsheet table. The row with the email details has to appear: https://app.smartsheet.com/sheets/mGxggWGV8qcxmxvgcvRmfjxqfhcCFwGg4RHmQP71?view=grid
BONUS TASK - Integration with Webex Teams (Alarm notification)
The idea is to show that you can integrate the Flow with Webex Teams and this can be used as the notifications for supervisors based on the specific criteria. This section has the bonus category where we can check how you understand this topic. Here we give you the task without a step-by-step explanation the result will be the message from the Webex bot in our Cisco Live space.
Use case: As a supervisor, I want to get the notifications in the Webex Teams if there are more then 3 email in queue (PIQ > 3).
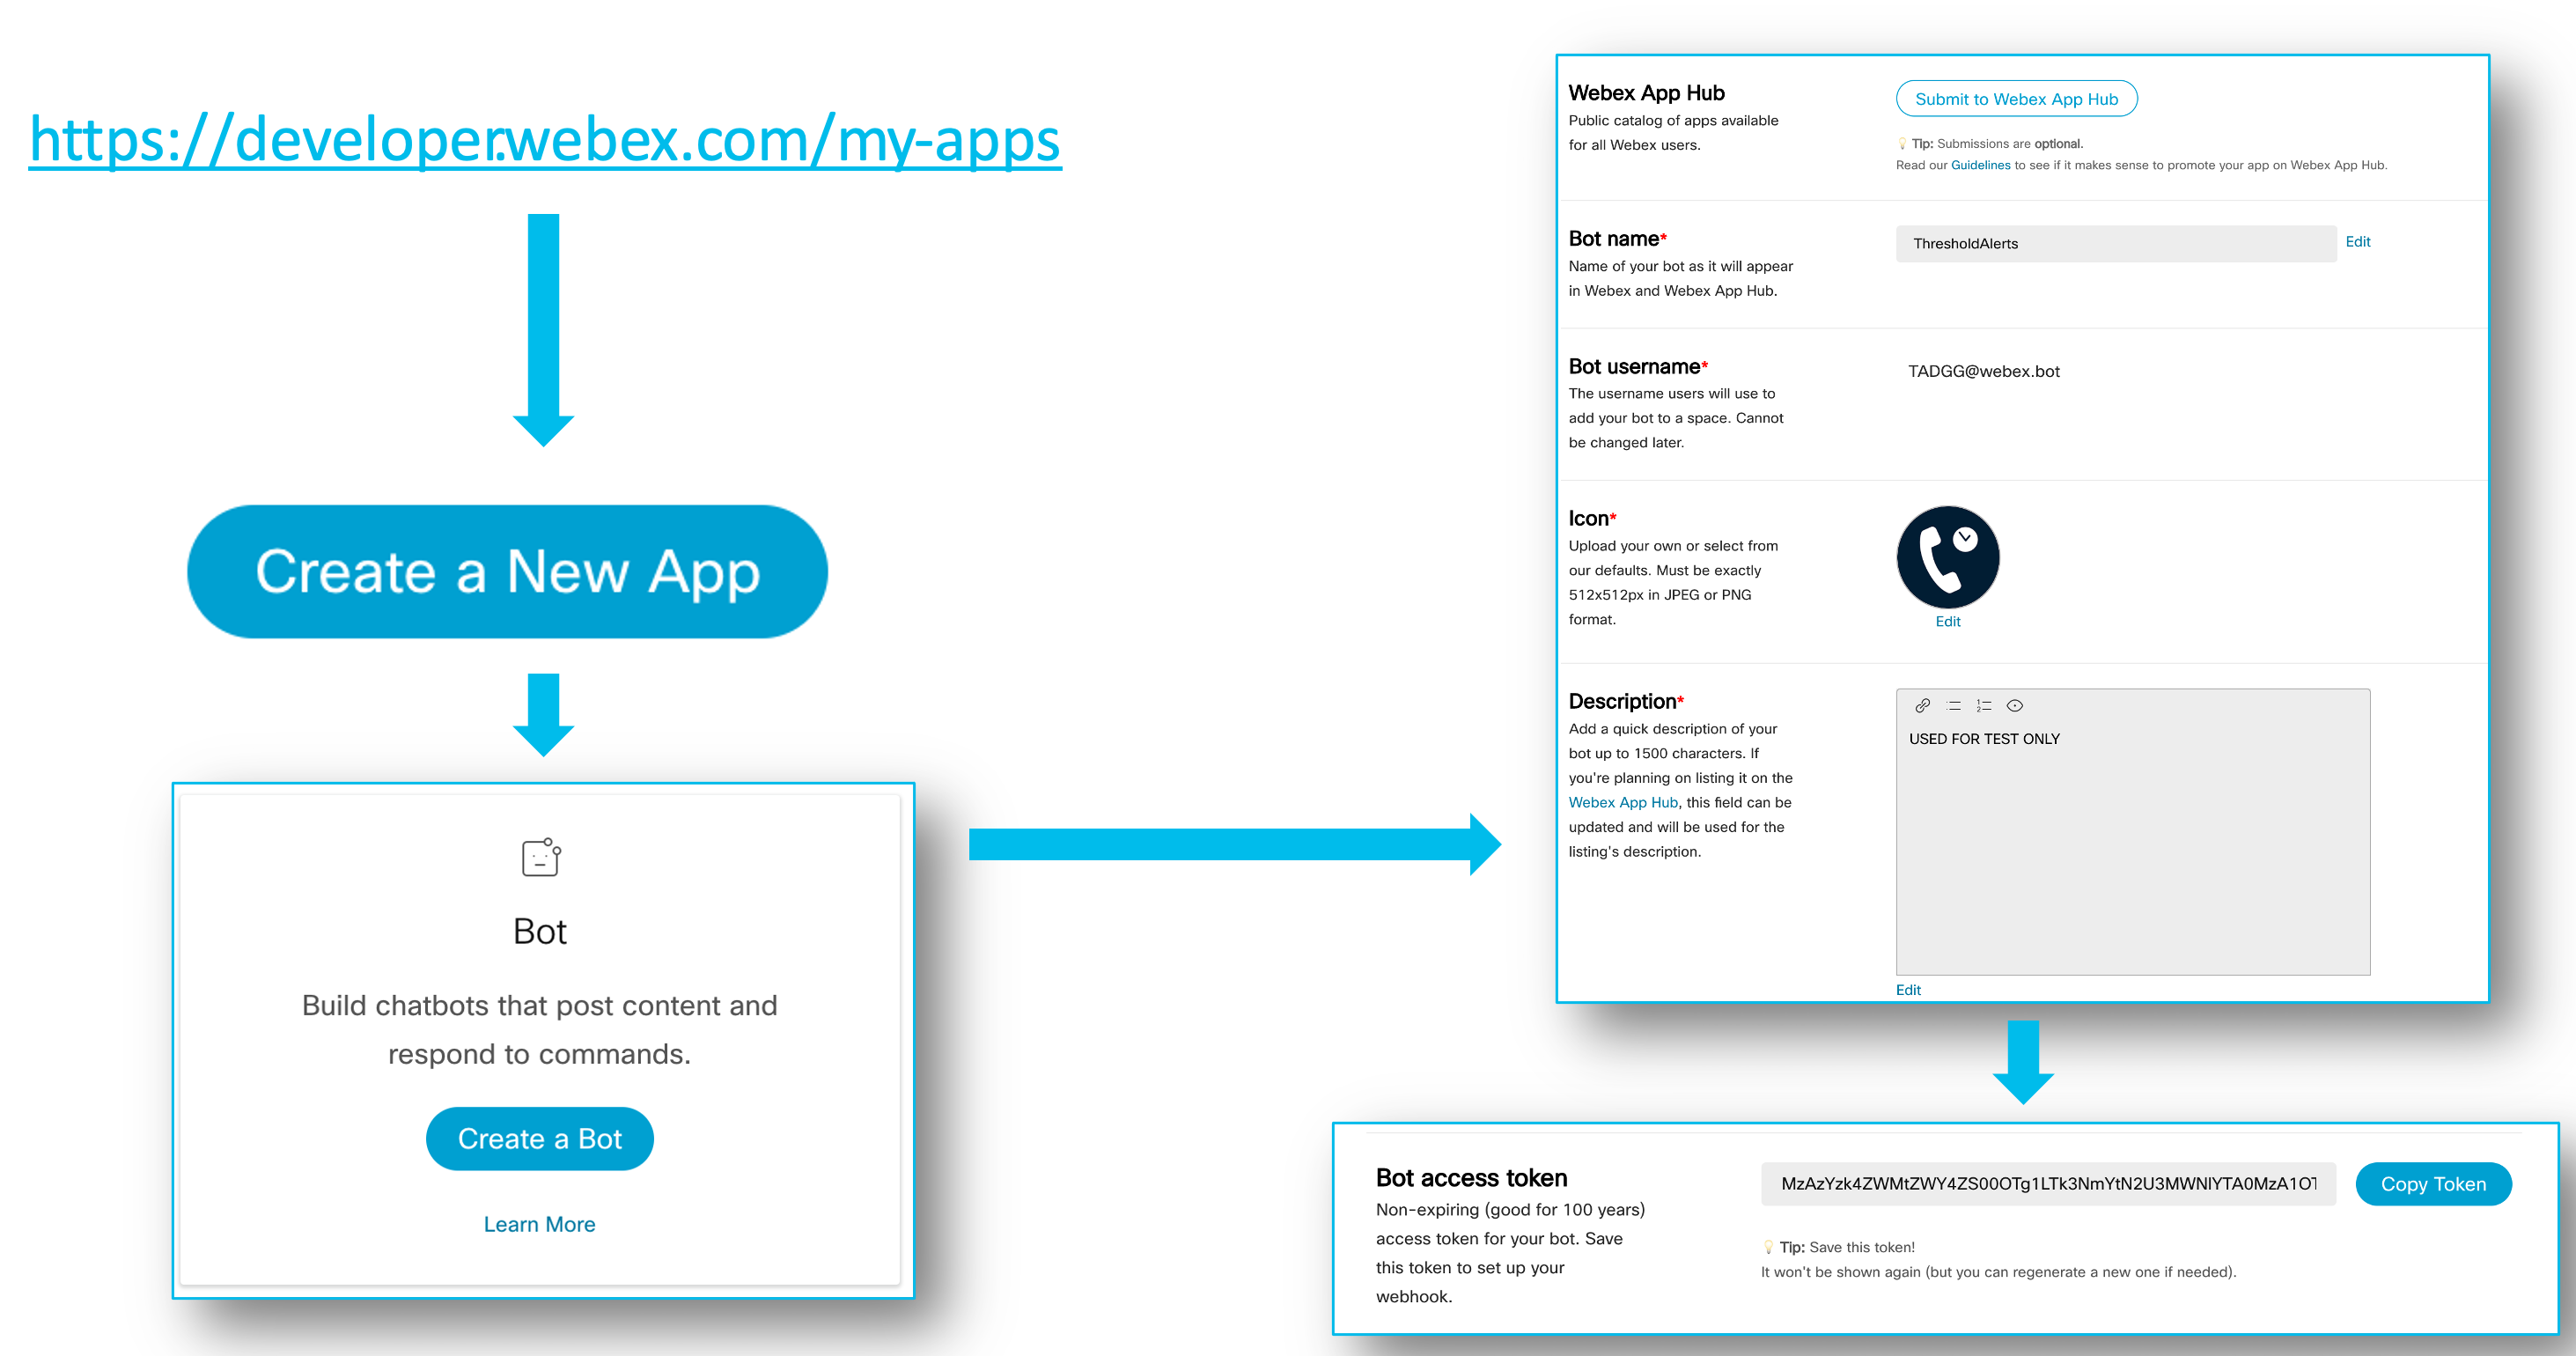
1) The Webex API token is generated for you.
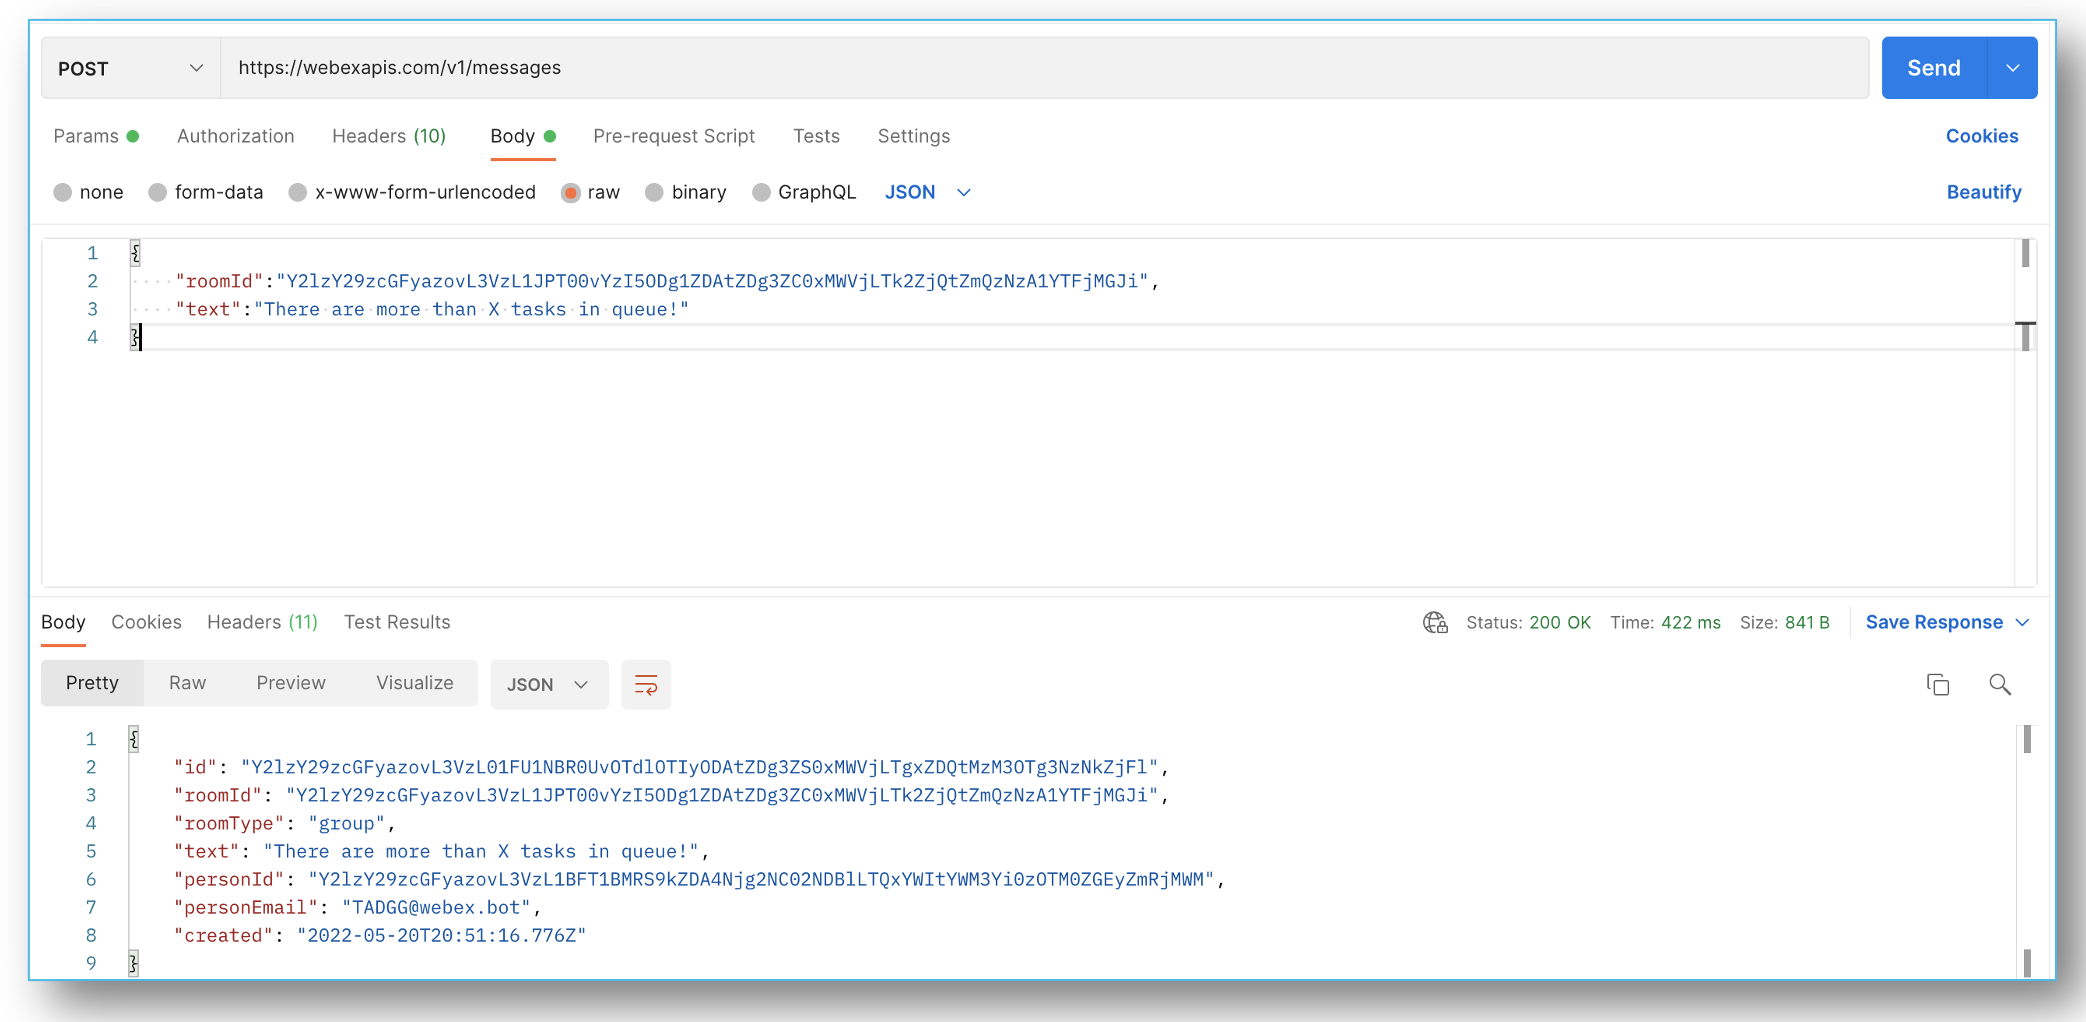
2) Here is the example of the Postman request.
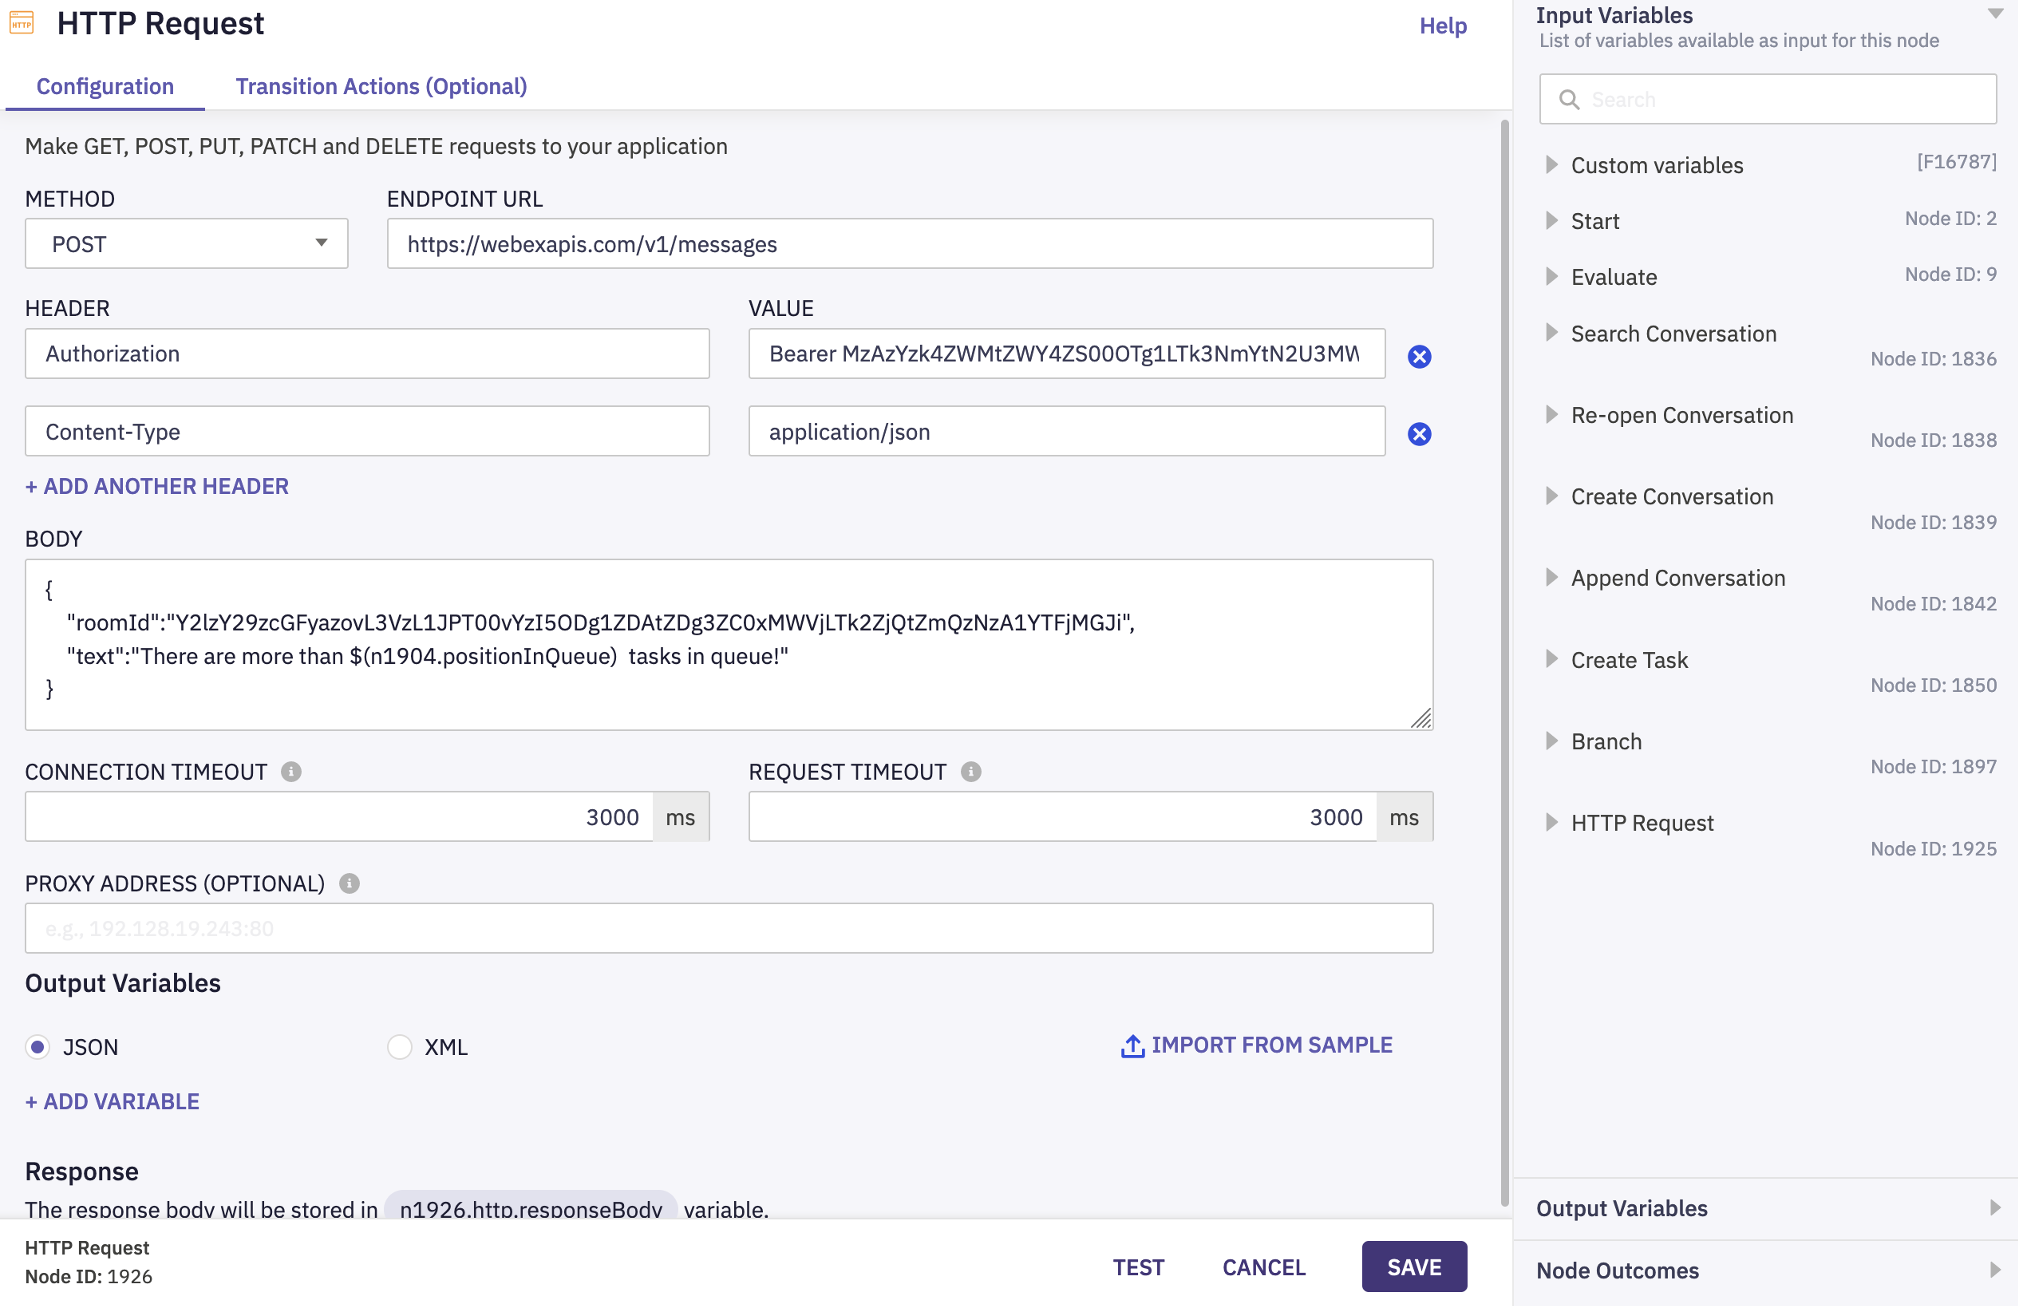
3) HTTP Request node settings:
| Setting’s Name | Value |
|---|---|
| METHOD | POST |
| ENDPOINT URL | https://webexapis.com/v1/messages |
| Authorization | Bearer XXXXXXXXXXXXXXXXXX |
| Content-Type | application/json |
| TIMEOUT | 3000 |
BODY:
{
    "roomId":"Y2lzY29zcGFyazovL3VzL1JPT00vYzI5ODg1ZDAtZDg3ZC0xMWVjLTk2ZjQtZmQzNzA1YTFjMGJi",
    "text":"There are more than $(nX.positionInQueue) tasks in queue!"
}