Lab 1: Pre-configuration
Table of Contents
- Table of Contents
- Introduction
- Lab Section
Introduction
Lab Objective
In this Lab, we will go through the tasks that are required to complete the general pre-configuration of a tenant. These tasks are to be undertaken by an administrator. By following each of the steps, you would have prepared your tenant to begin configuring different bot functionalities that are supported with the new digital channels. The lab contains multiple exercises to make you familiar with the Control Hub, Management portal UI and Webex Connect. At the end of the lab, you should be able to log in to an agent desktop interface and also complete the basic authentications required for working with Webex Connect application.
Pre-requisites
- You have received the access credentials with a full admin access
- You have received the access to the agent account
Quick Links
Control Hub: https://admin.webex.com
Portal: https://portal.wxcc-us1.cisco.com/portal
Agent Desktop: https://desktop.wxcc-us1.cisco.com
Connect: https://cl2podX.imiconnect.io/ (where X is your POD number)
Lab Section
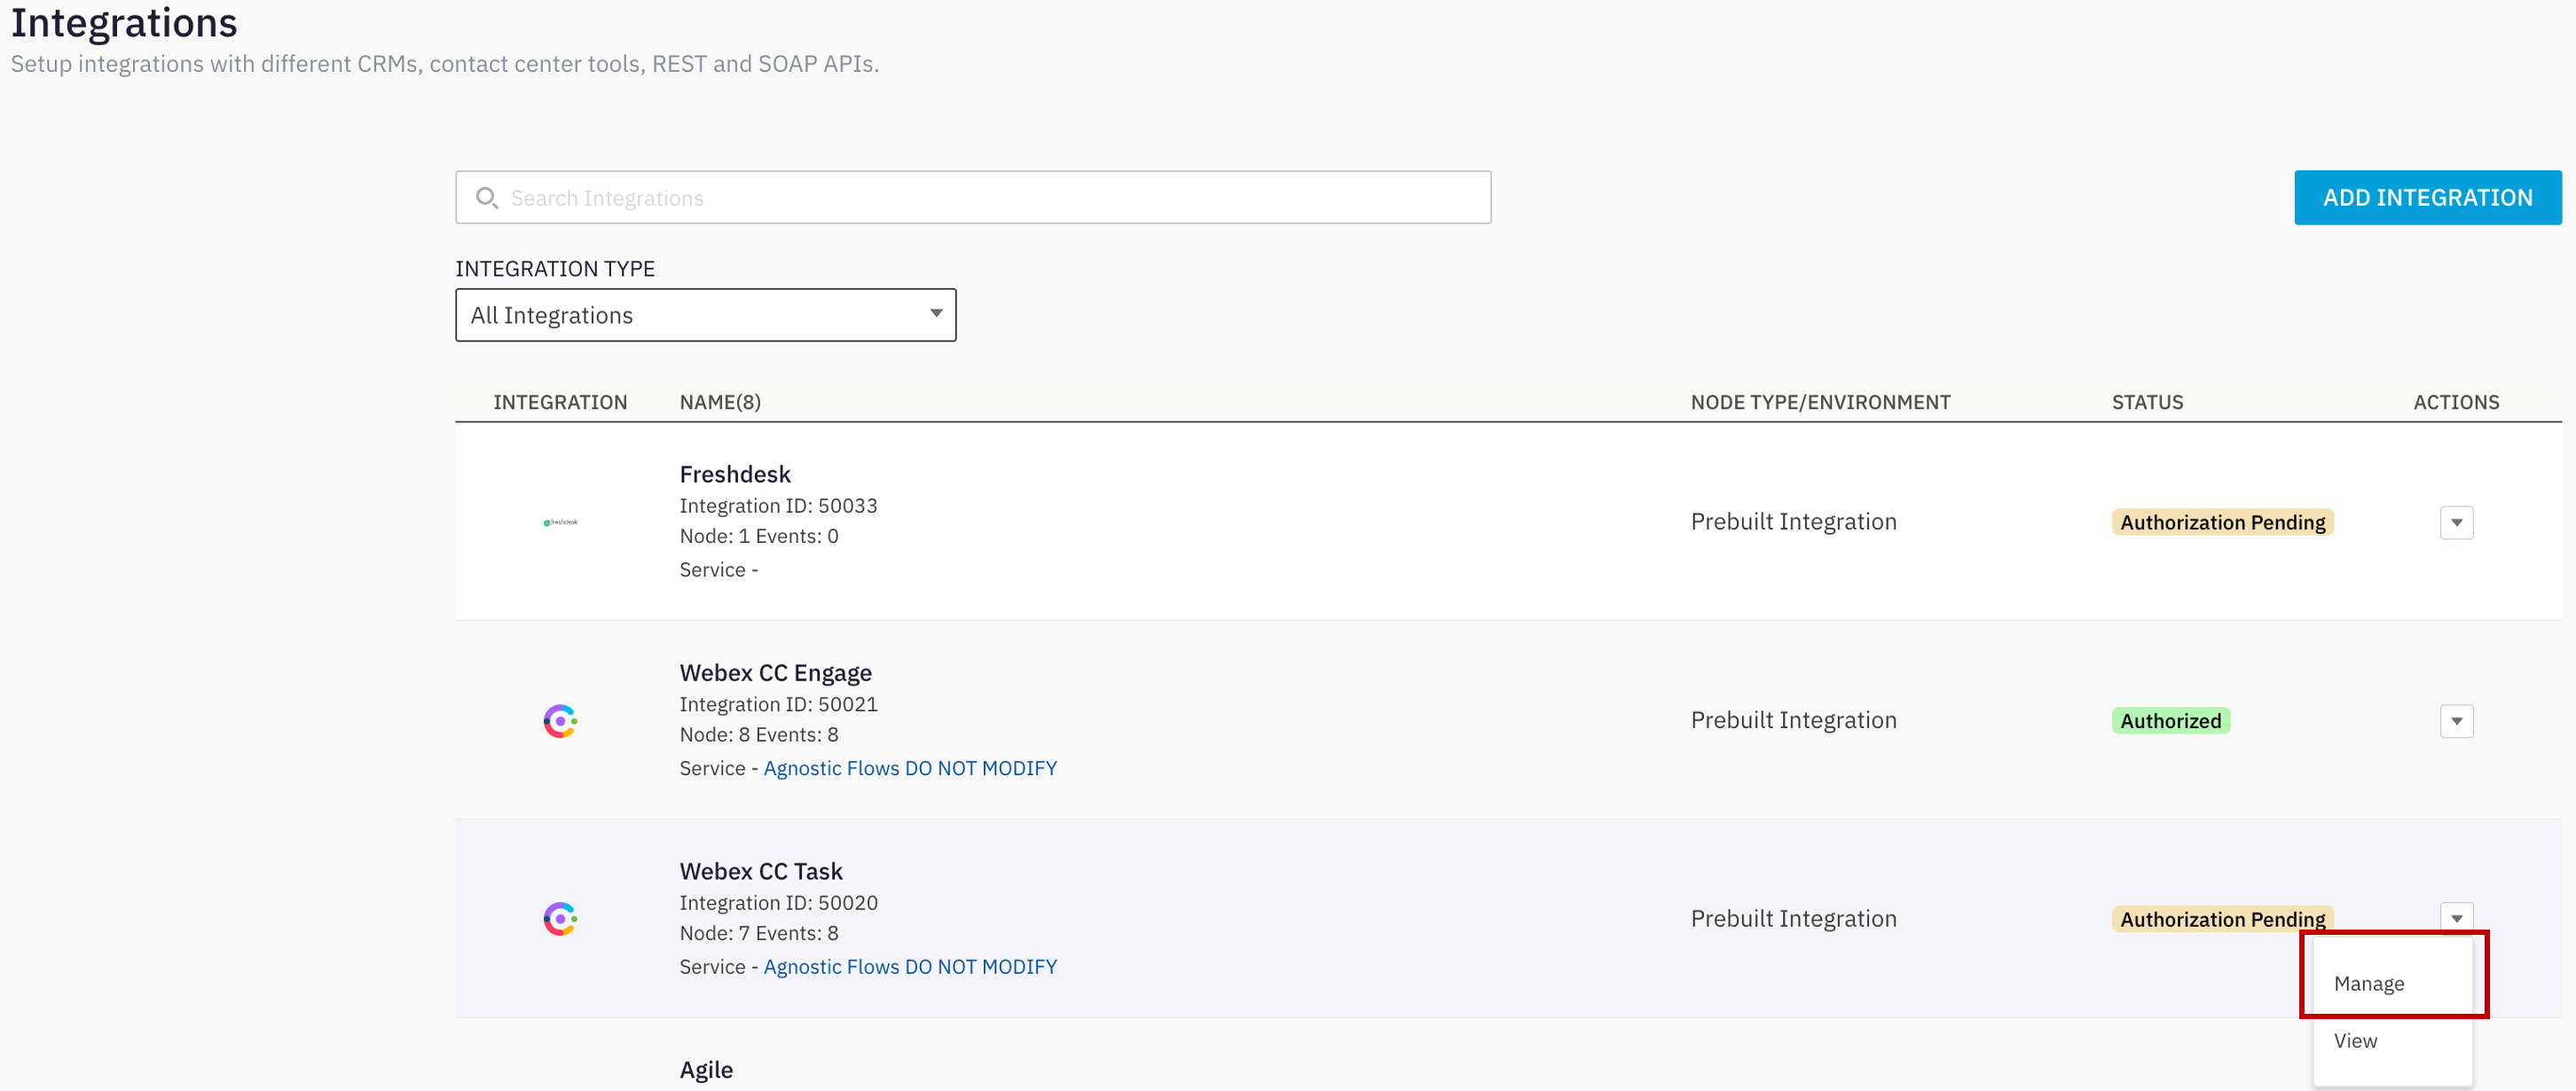
Step 1. Node Authorization for Webex CC Task and Engage nodes
Webex Connect is required to provide a valid access token for using various Webex Contact Center and imiengage APIs. The access token is generated using the authorization details configured within the ‘Node Runtime Authorization’ field that Webex Contact Center users are required to provide during flow configuration.
-
Access the Webex Connect UI: https://cl2podX.imiconnect.io/ (where X is your POD number)
-
To authorize a pre-built integration go to Assets > Integrations. The integrations which are not yet authorized show the status as Pending Authorization.
-
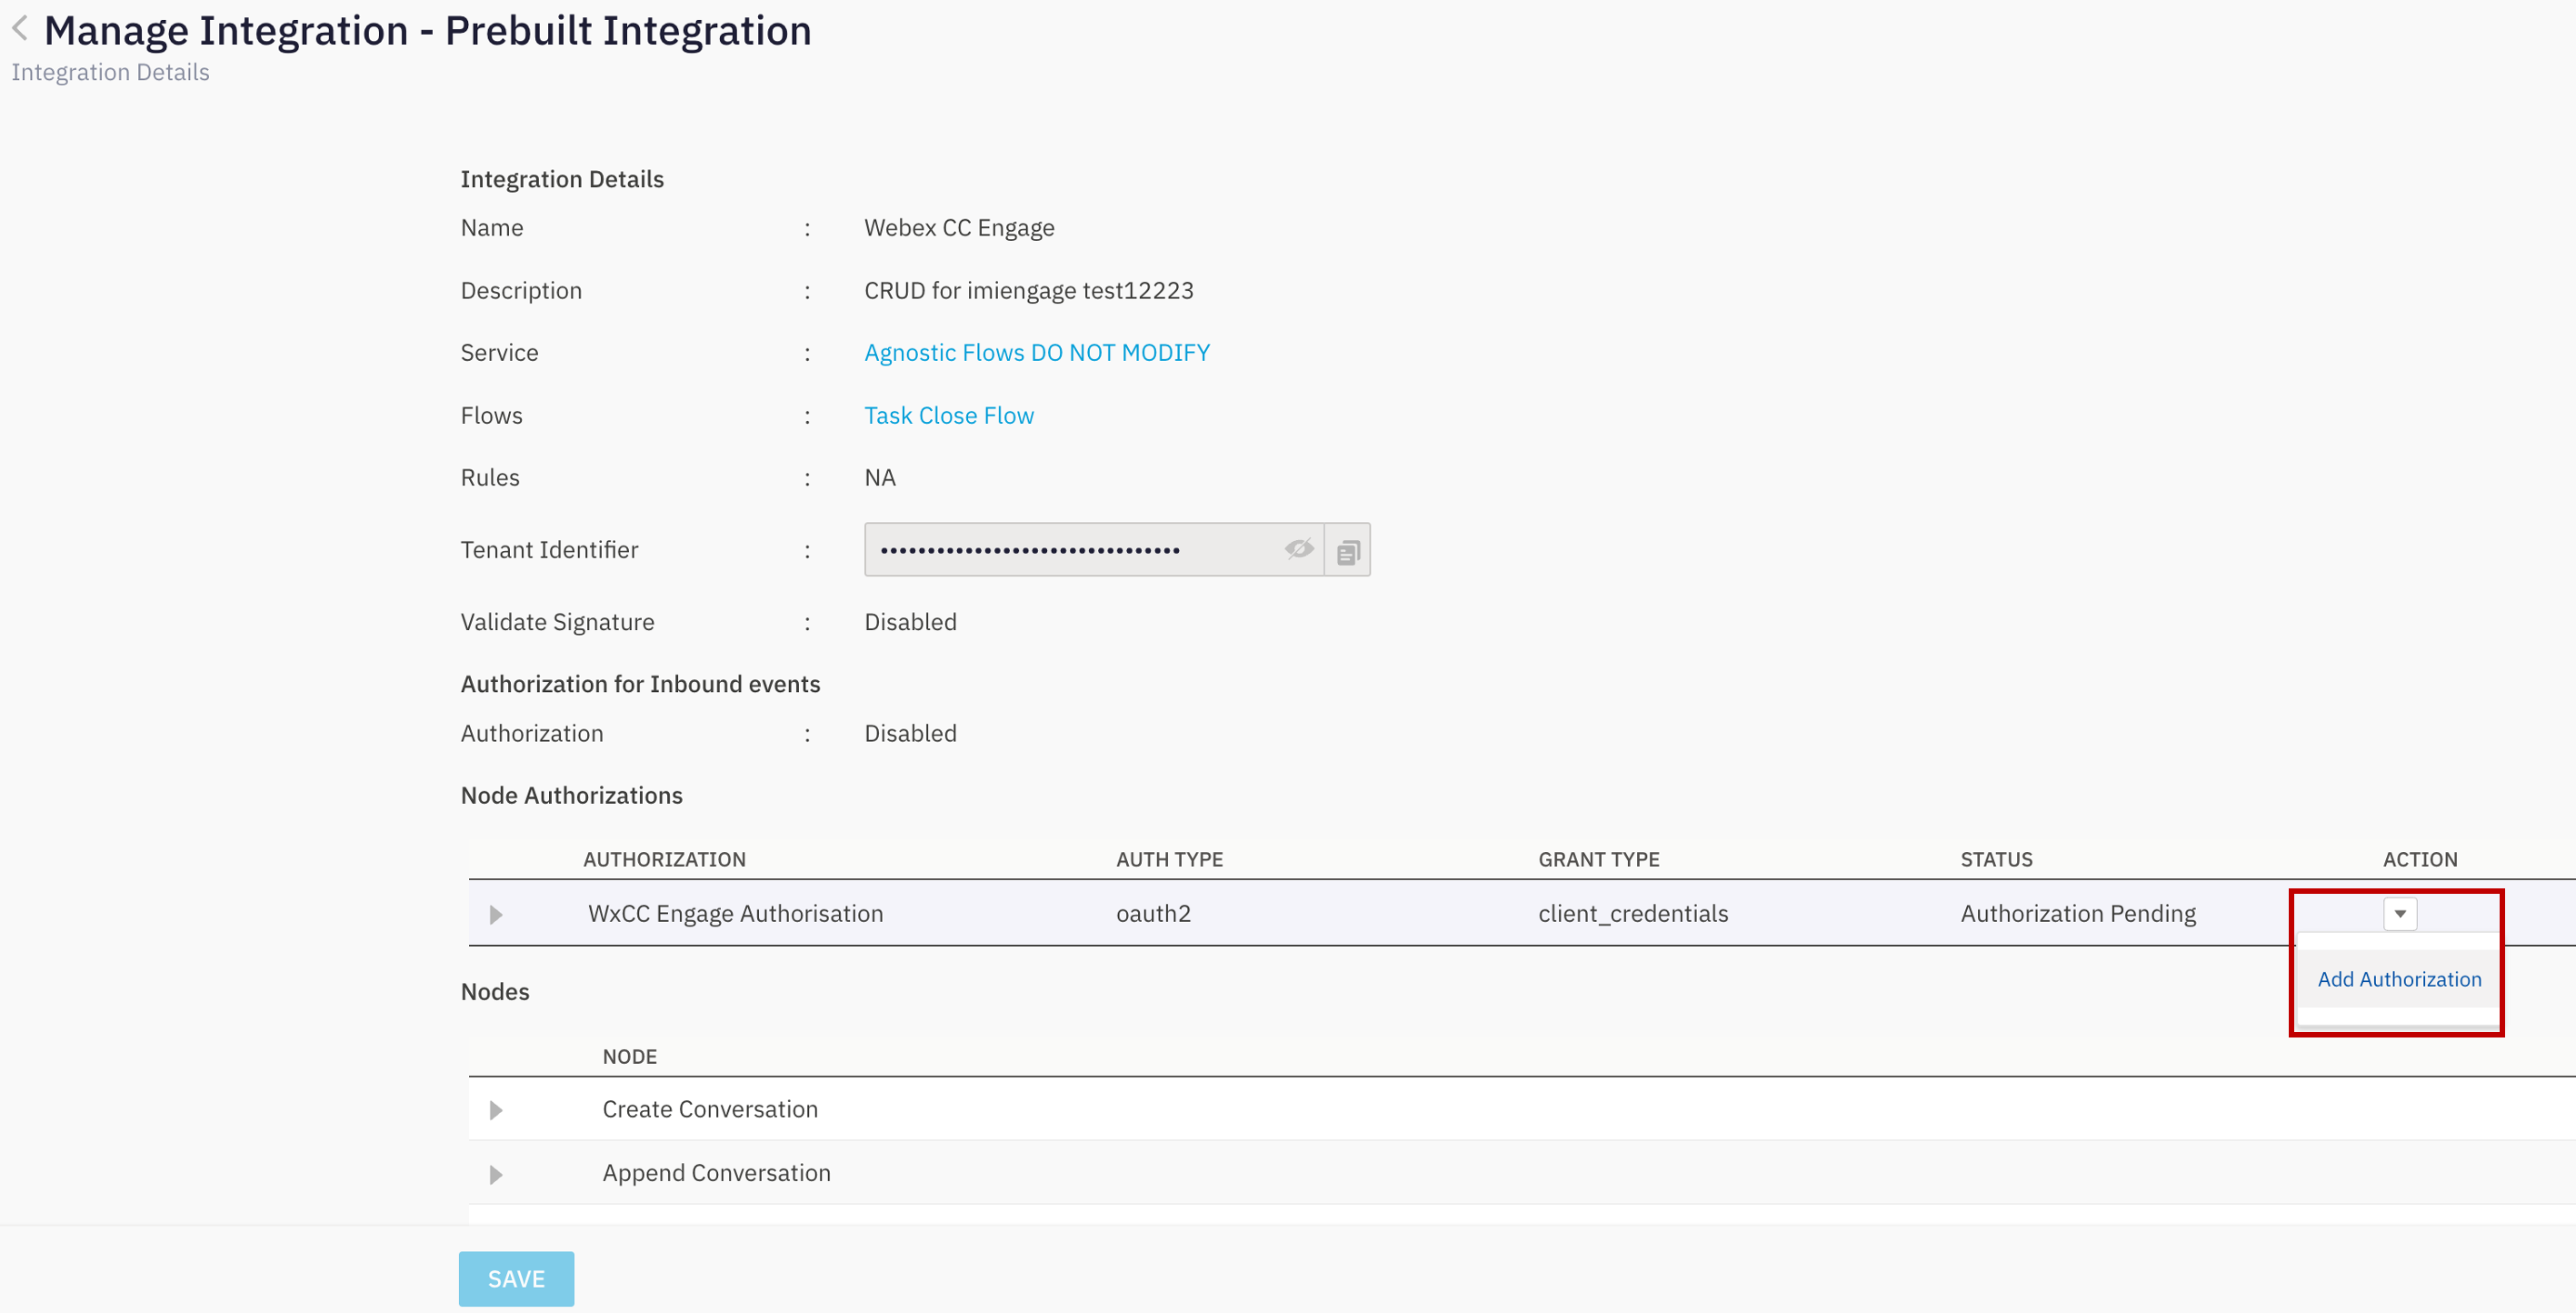
In front of Webex CC Engage Click Actions → Manage.
-
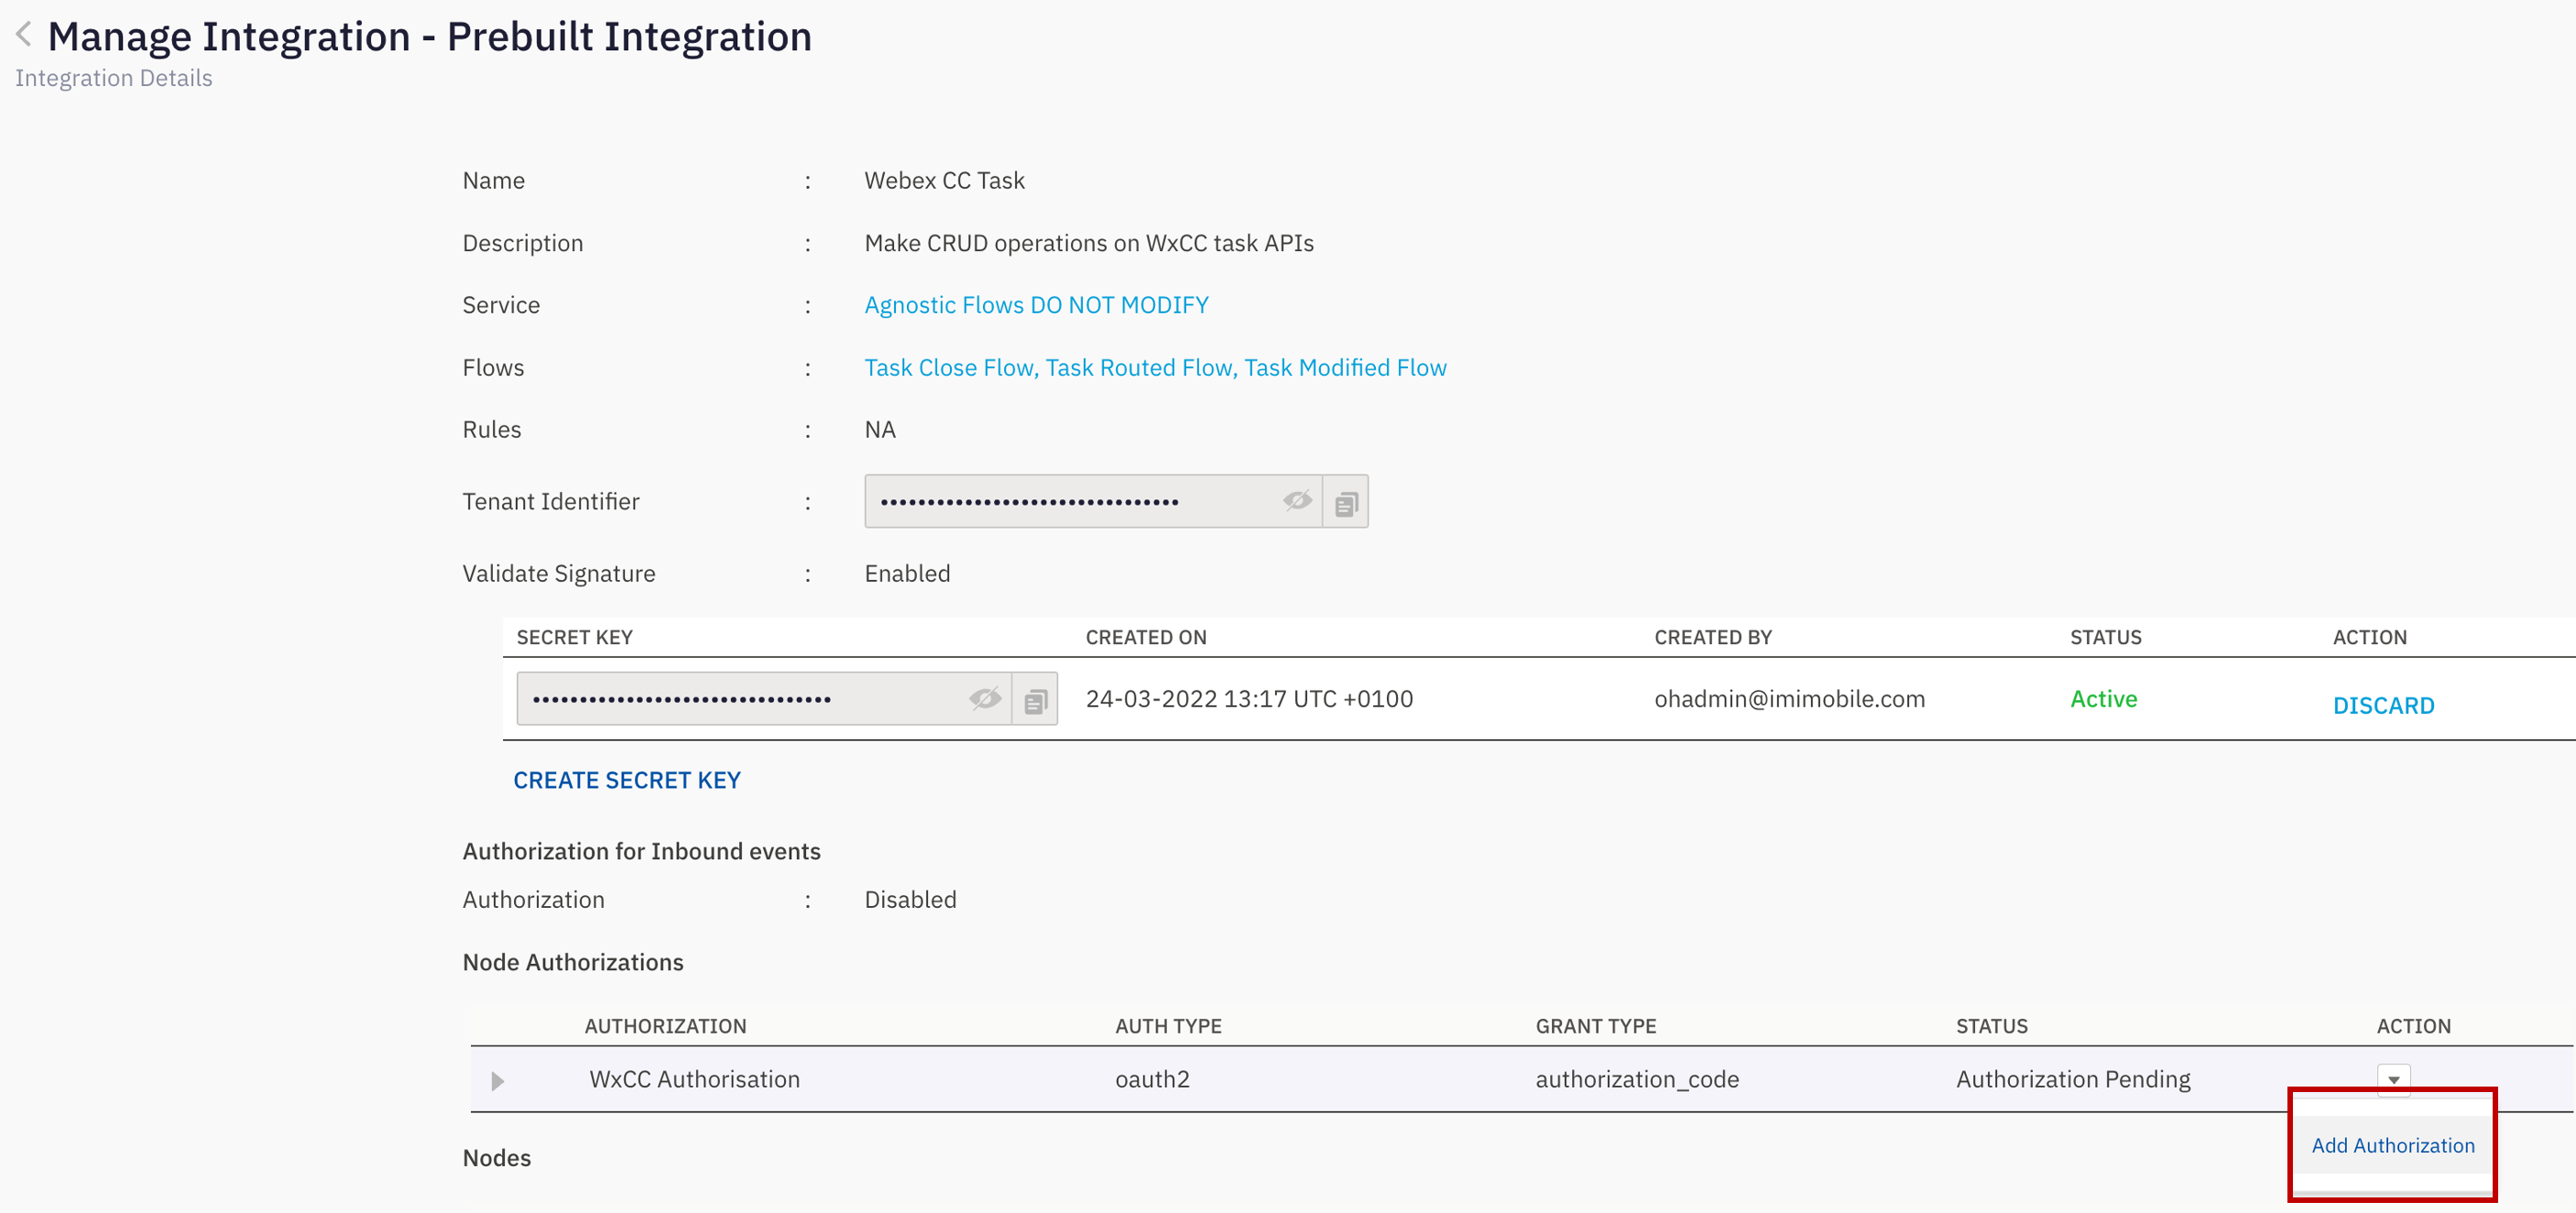
On the Manage Integrations page, scroll down to the Node Authorizations section. This section lists all the authorizations mapped to this integration.
-
Click Action → Add Authorization associated with the authorization, where Auth Type is oauth2 and Status is Authorization Pending.
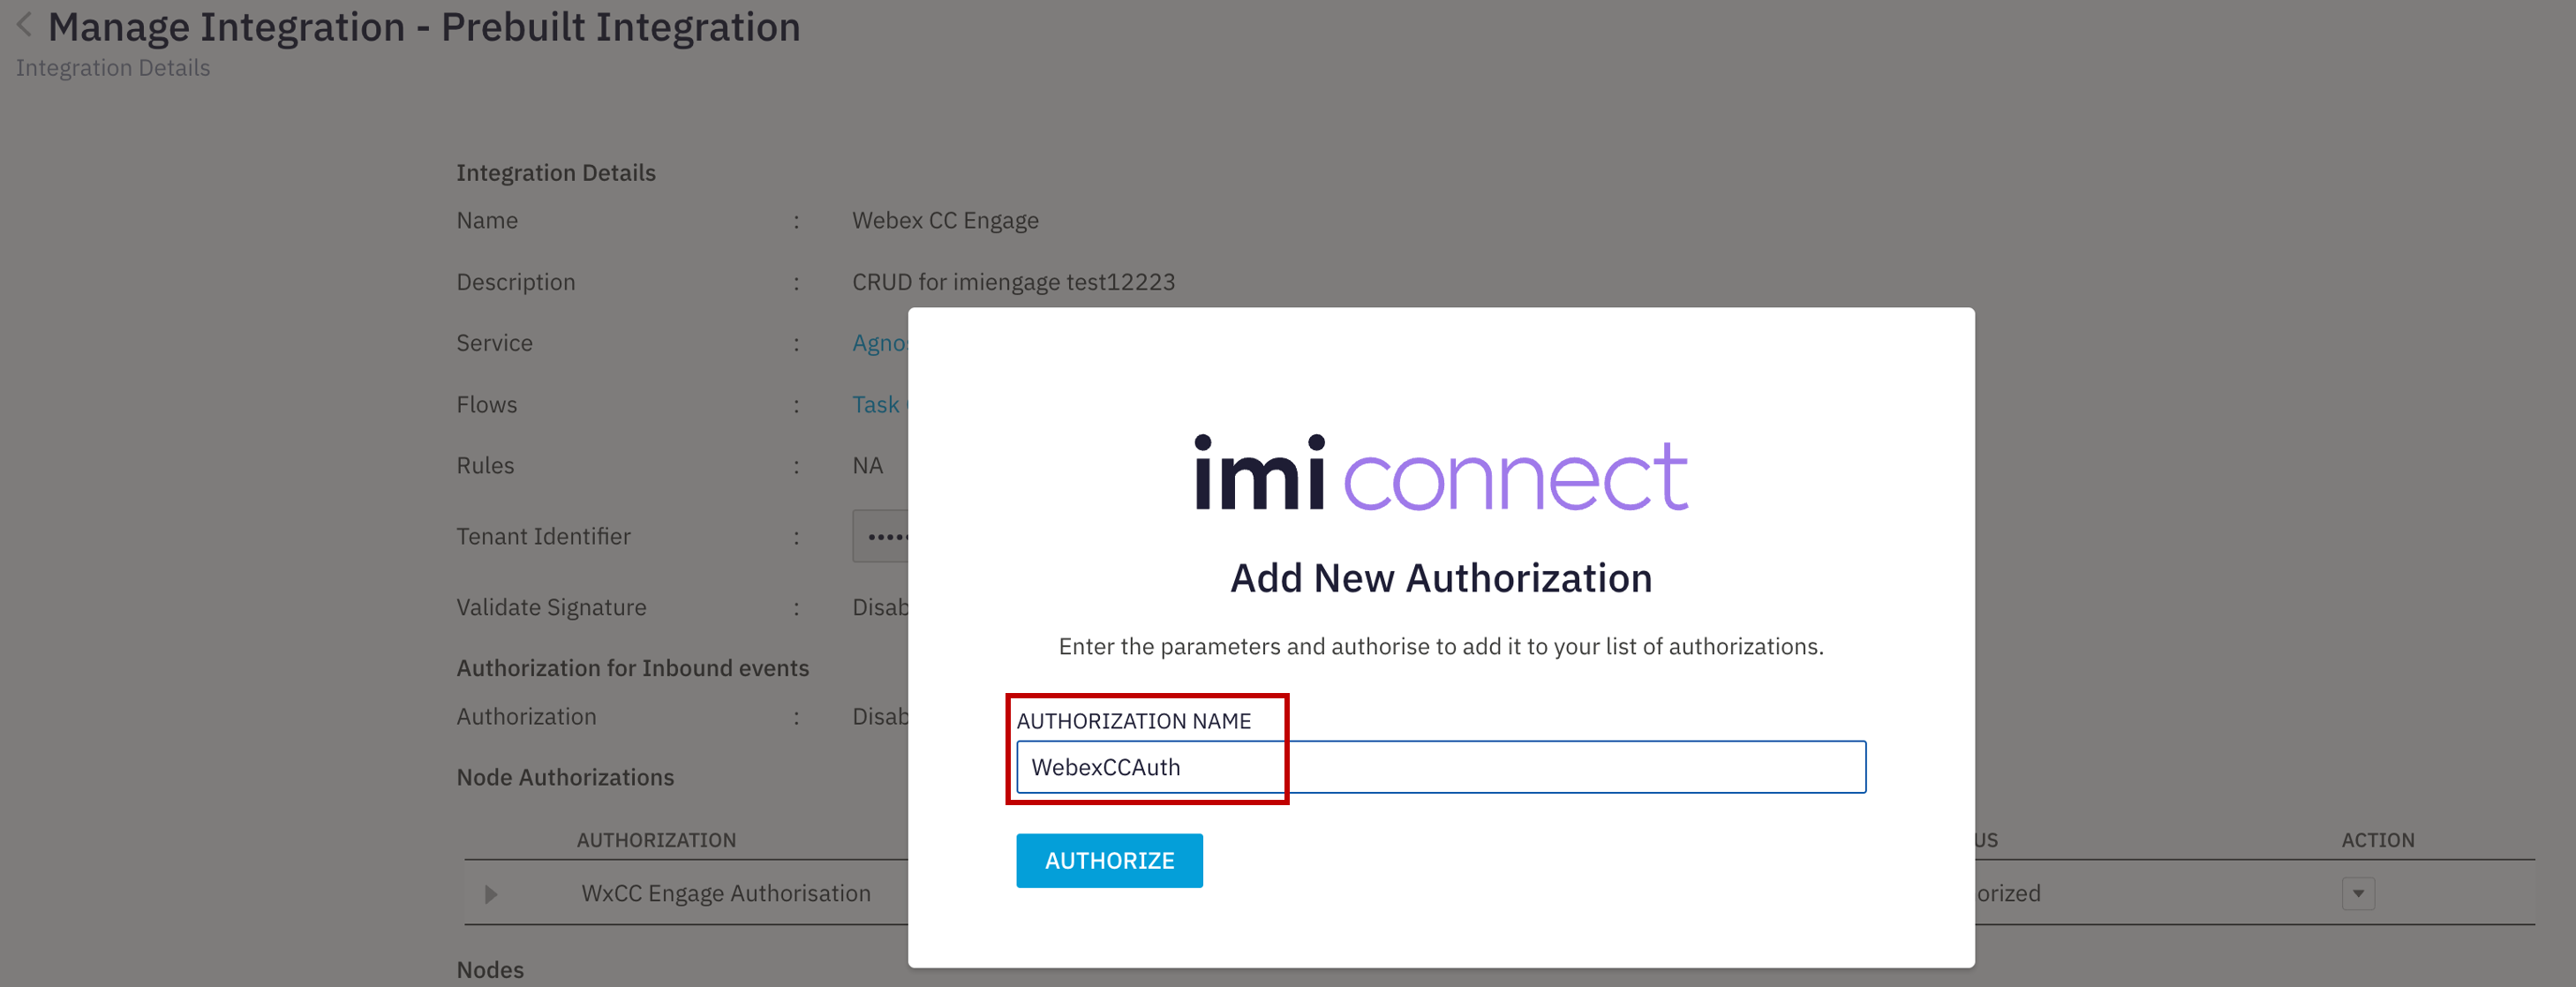
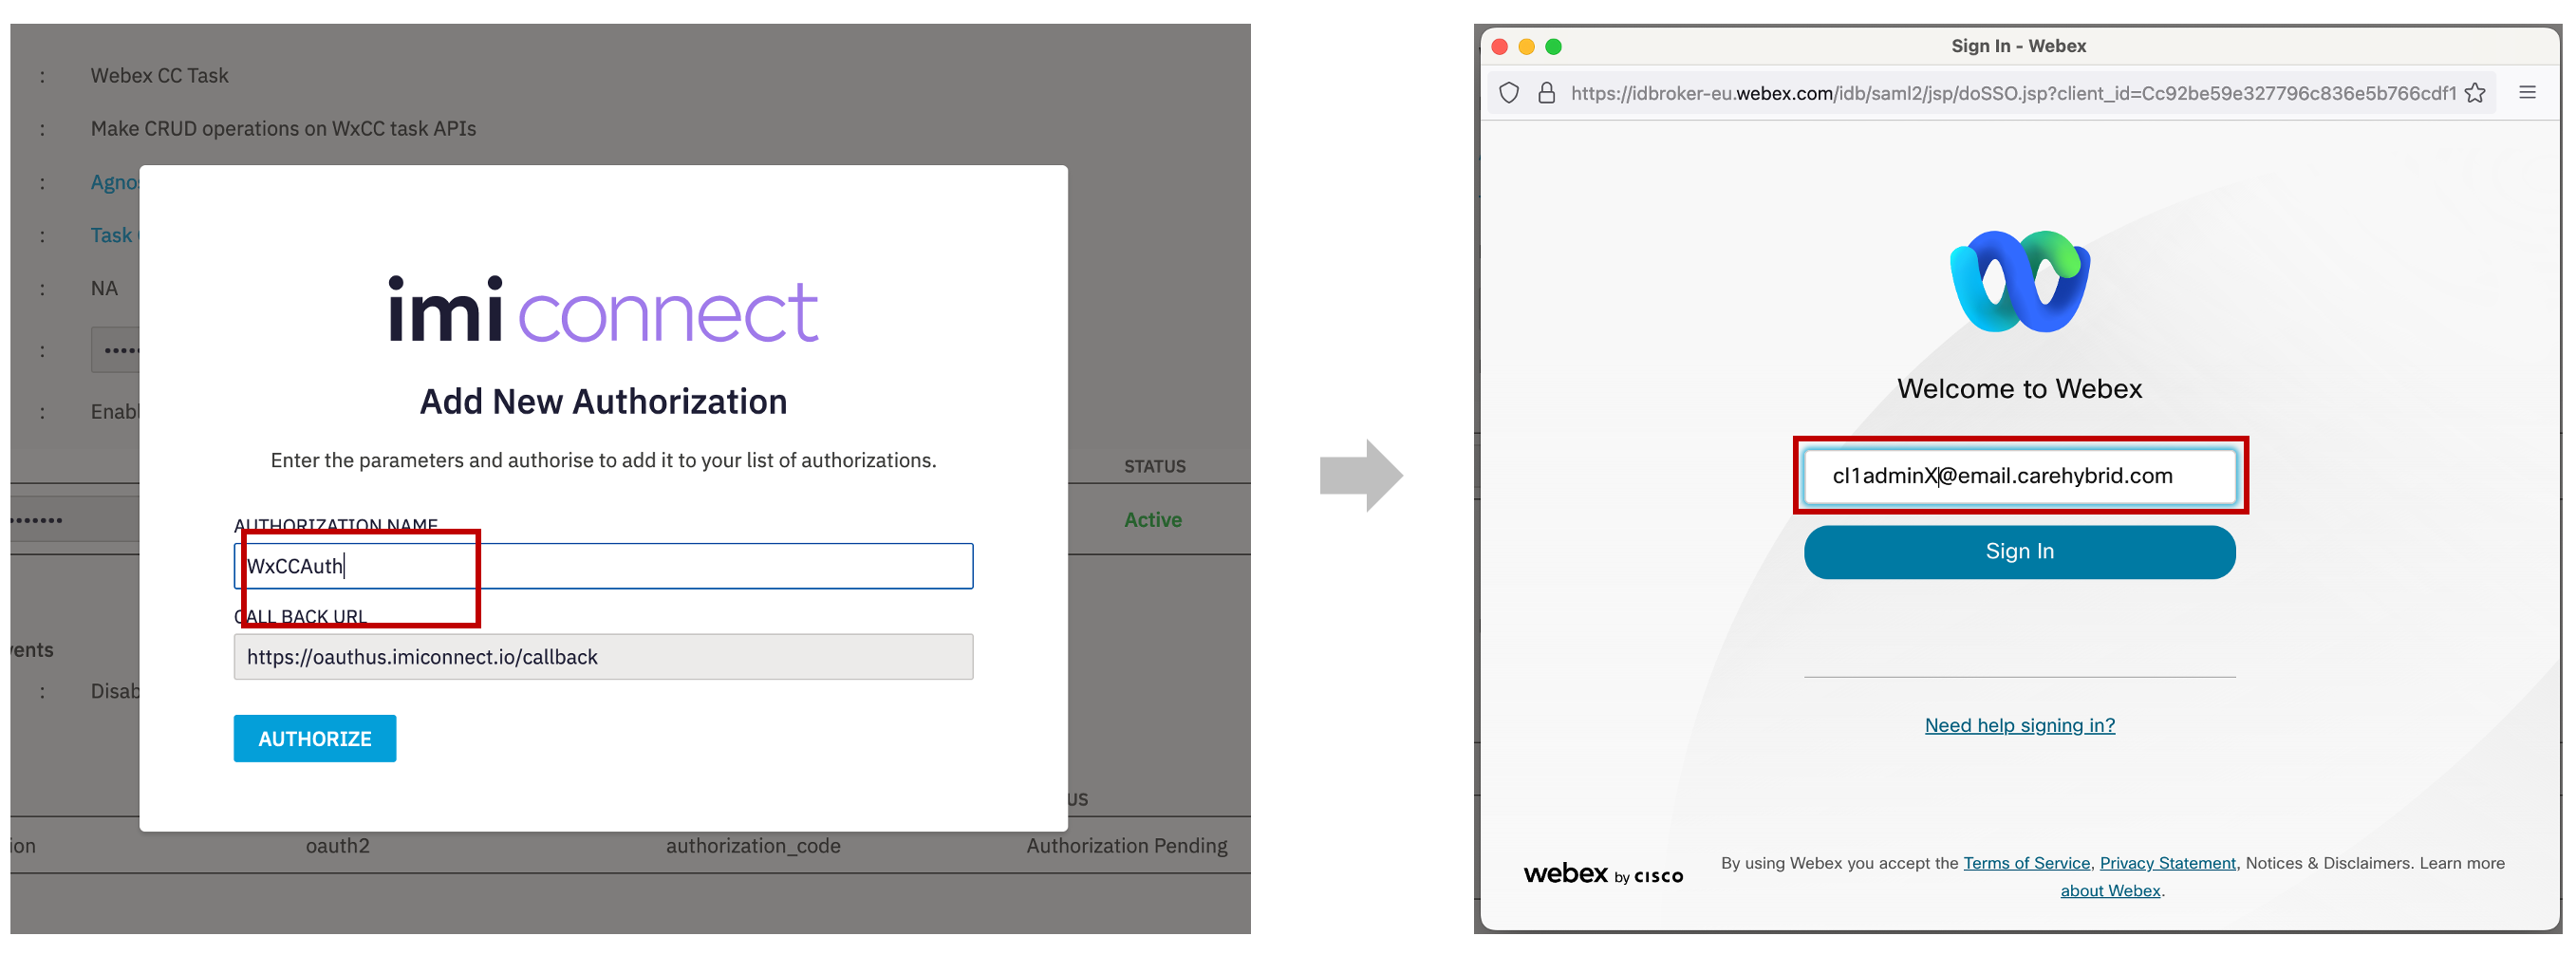
- Enter the Authorization Name and click Authorize. In that example we use WebexCCAuth\
- Click on the back button for being redirected back to Integrations page and in front of Webex CC Task Click Actions → Manage.
-
On the Manage Integrations page, scroll down to the Node Authorizations section. This section lists all the authorizations mapped to this integration.
-
Click Action → Add Authorization associated with the authorization, where Auth Type is oauth2 and Status is Authorization Pending.
- Enter the Authorization Name (for example: WxCCAuth) and click Authorize. As the result the pop-up appears where you need to enter your Cisco admin email address (cl1adminX@email.carehybrid.com) and click Sign in.
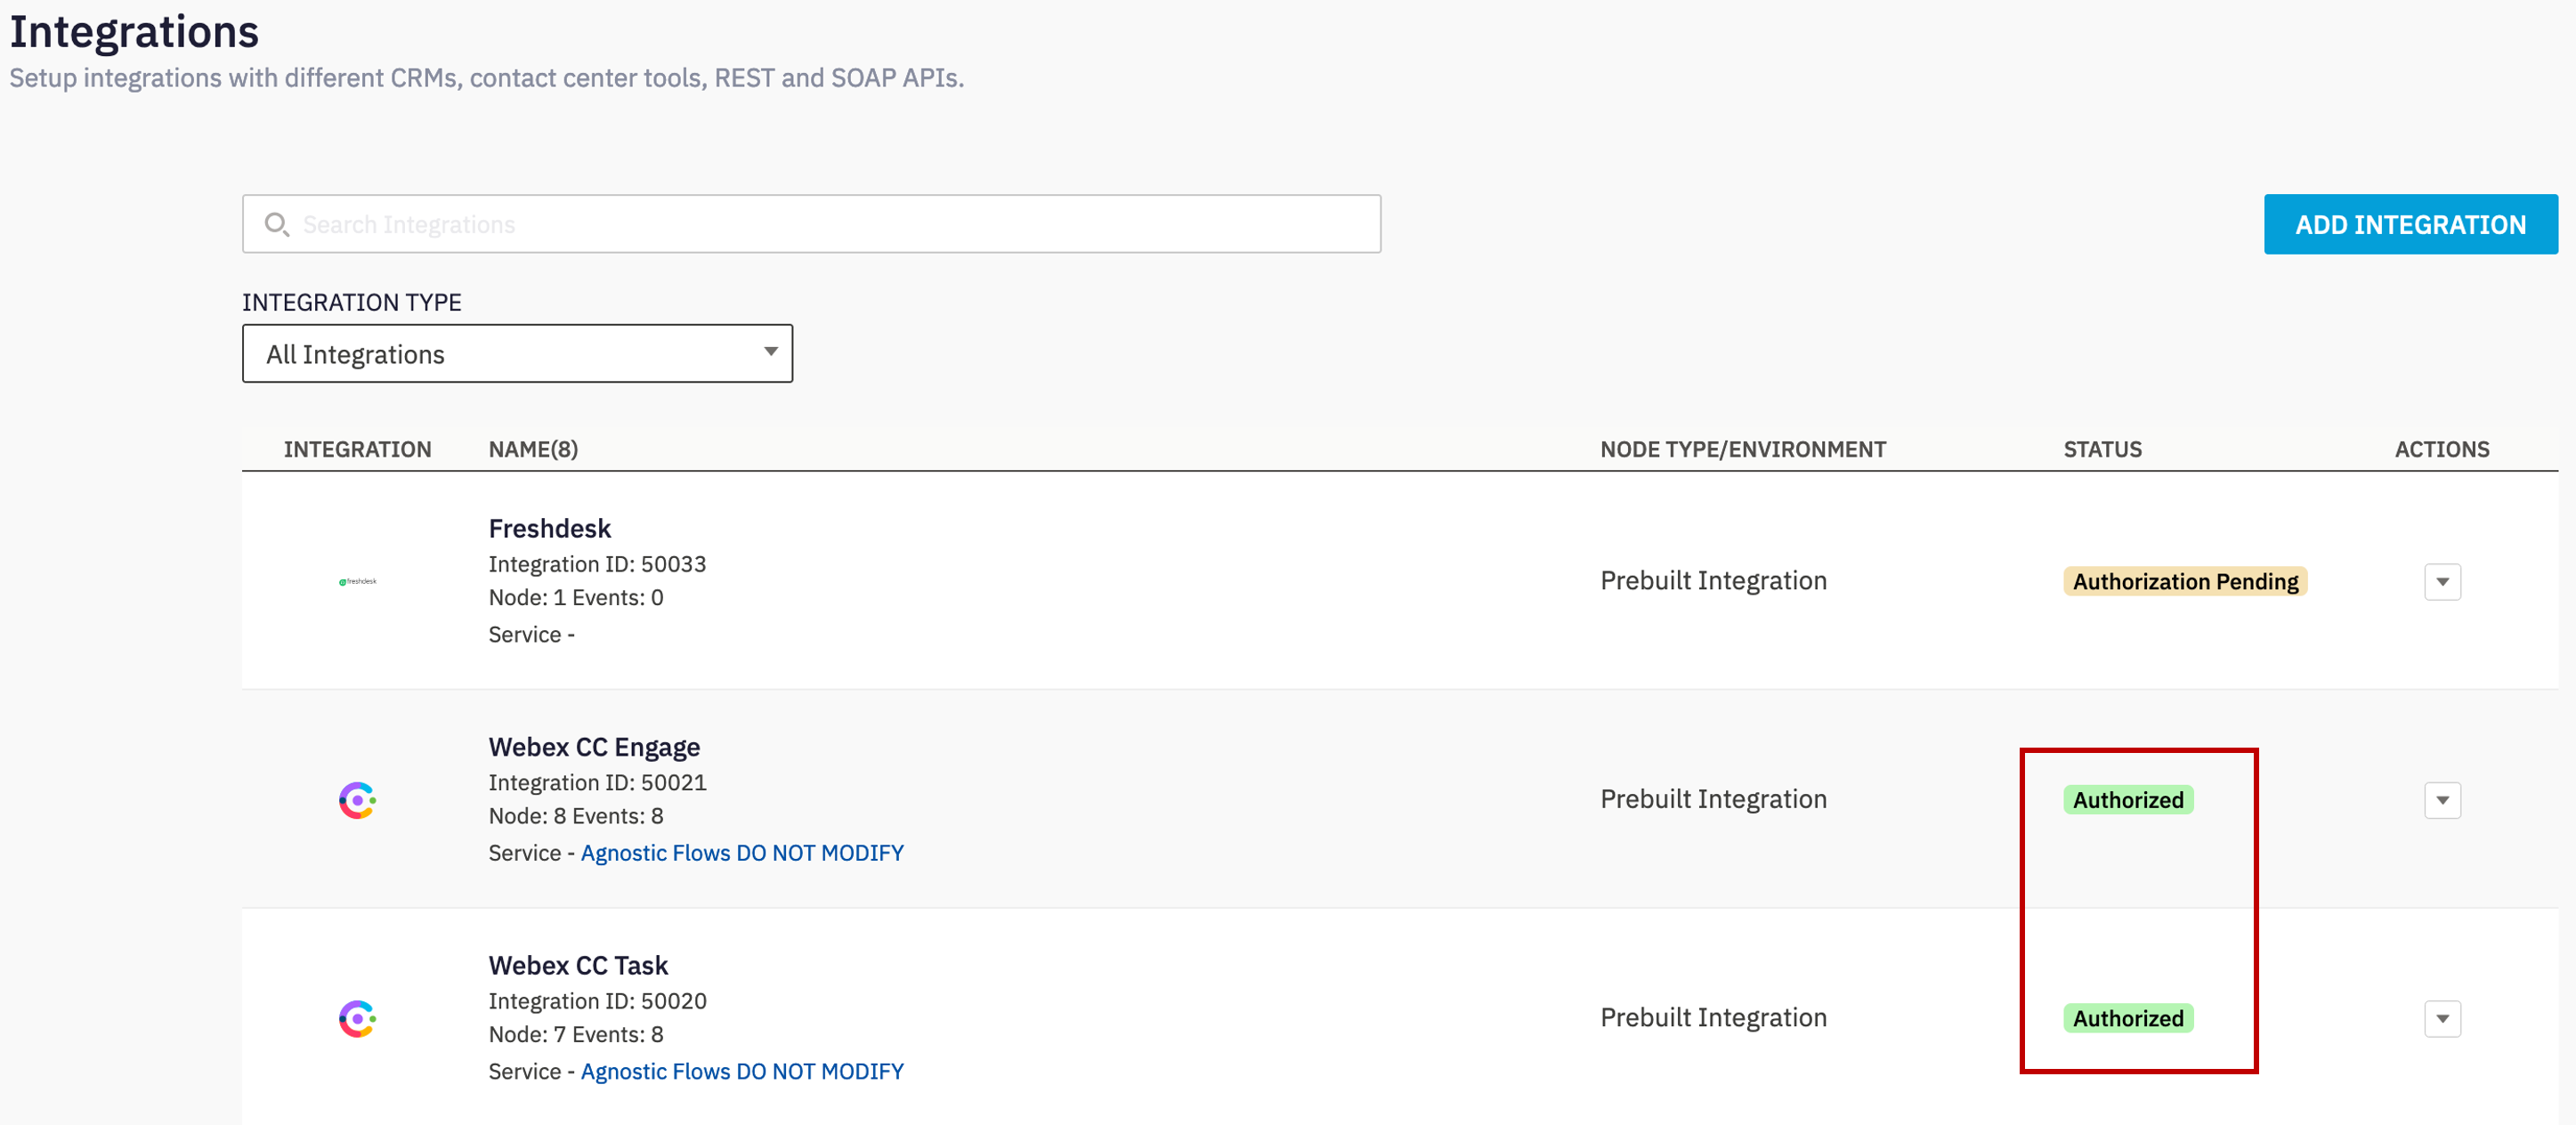
!!!: The status of the authorization will change to Authorized and all the nodes under this authorization are authorized and ready for use.
Step 2. Download and upload Channel Agnostic flows in Connect
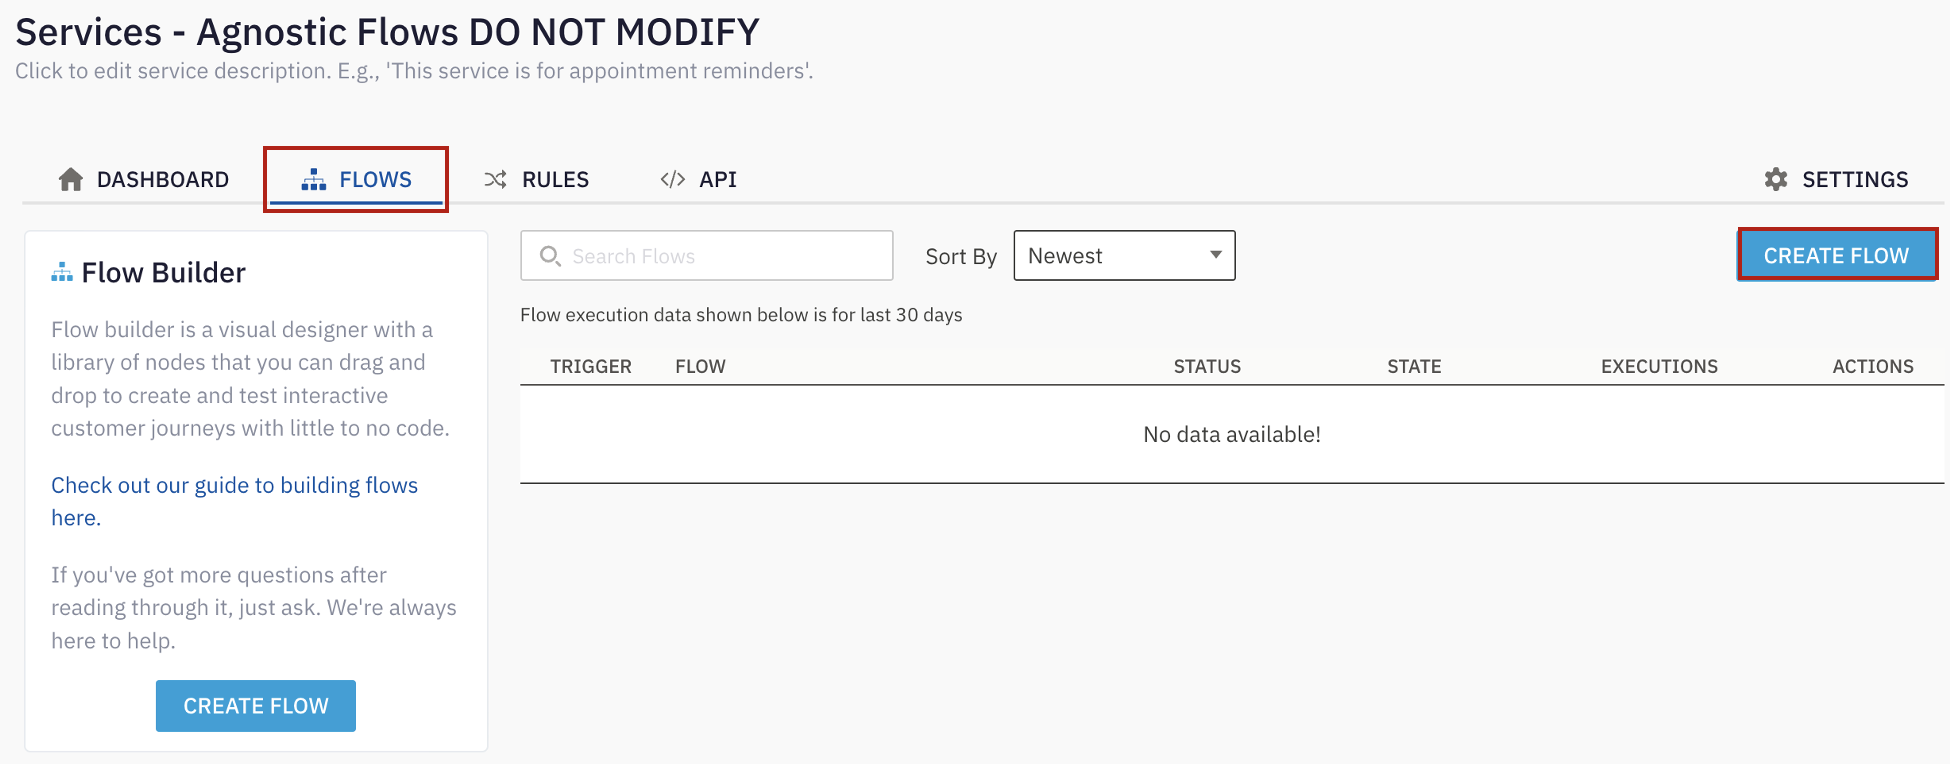
Every tenant must include Channel Agnostic (CA) flows. CA flows can be imported from the template folder in this GitHub page. CA flow can be added only once and will be automatically be used by all existing channel specific flows in the tenant when needed. Recommended to add these flow in a dedicated Service named “Agnostic Flows - DO NOT MODIFY”
The agnostic flows consist of:
• Task Routed - Adding an agent participant to a conversation;
• Task Modified - Adding an agent to or removing an agent from an ongoing conversation (e.g., for chat transfer or conference);
• Task Close - Closing the conversation;
1) Download all flows from the GitHub page.
2) Navigate to Webex Connect Flows -> v2.1.
3) Unzip All Files.
4) Login to the Webex Connect portal with the admin account.
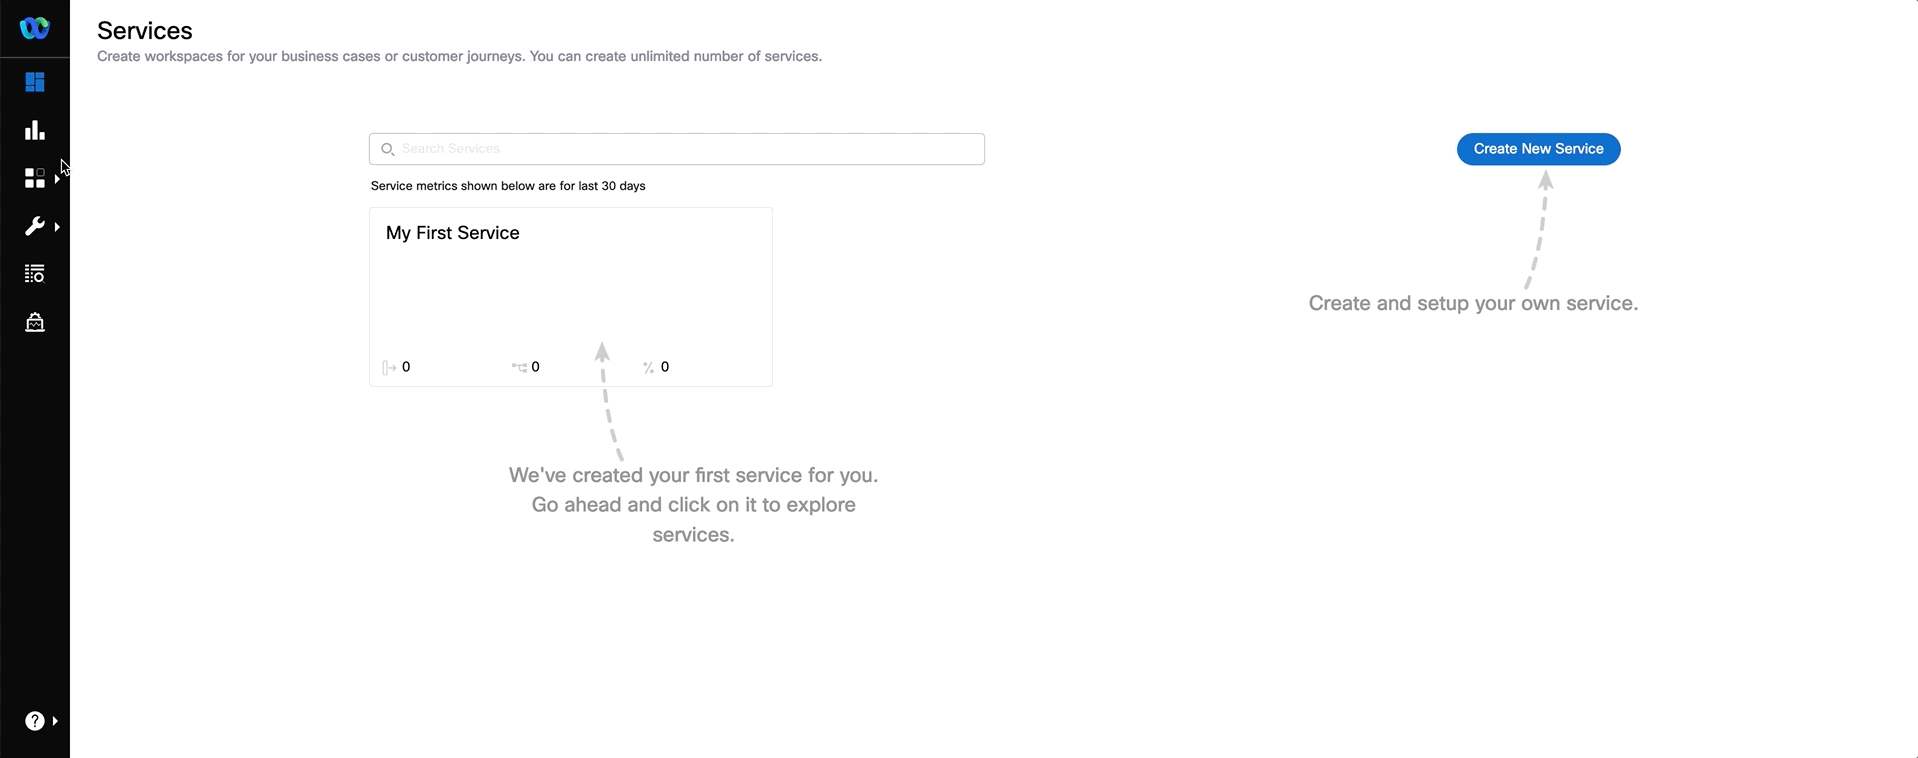
5) Navigate to Services and click on CREATE NEW SERVICE

6) Set your name Agnostic Flows DO NOT MODIFY in the Service Name. This will create a new service.
Note You can choose a different Service name. It is just an exmple.
7) In the service click on FLOWS -> CREATE FLOW
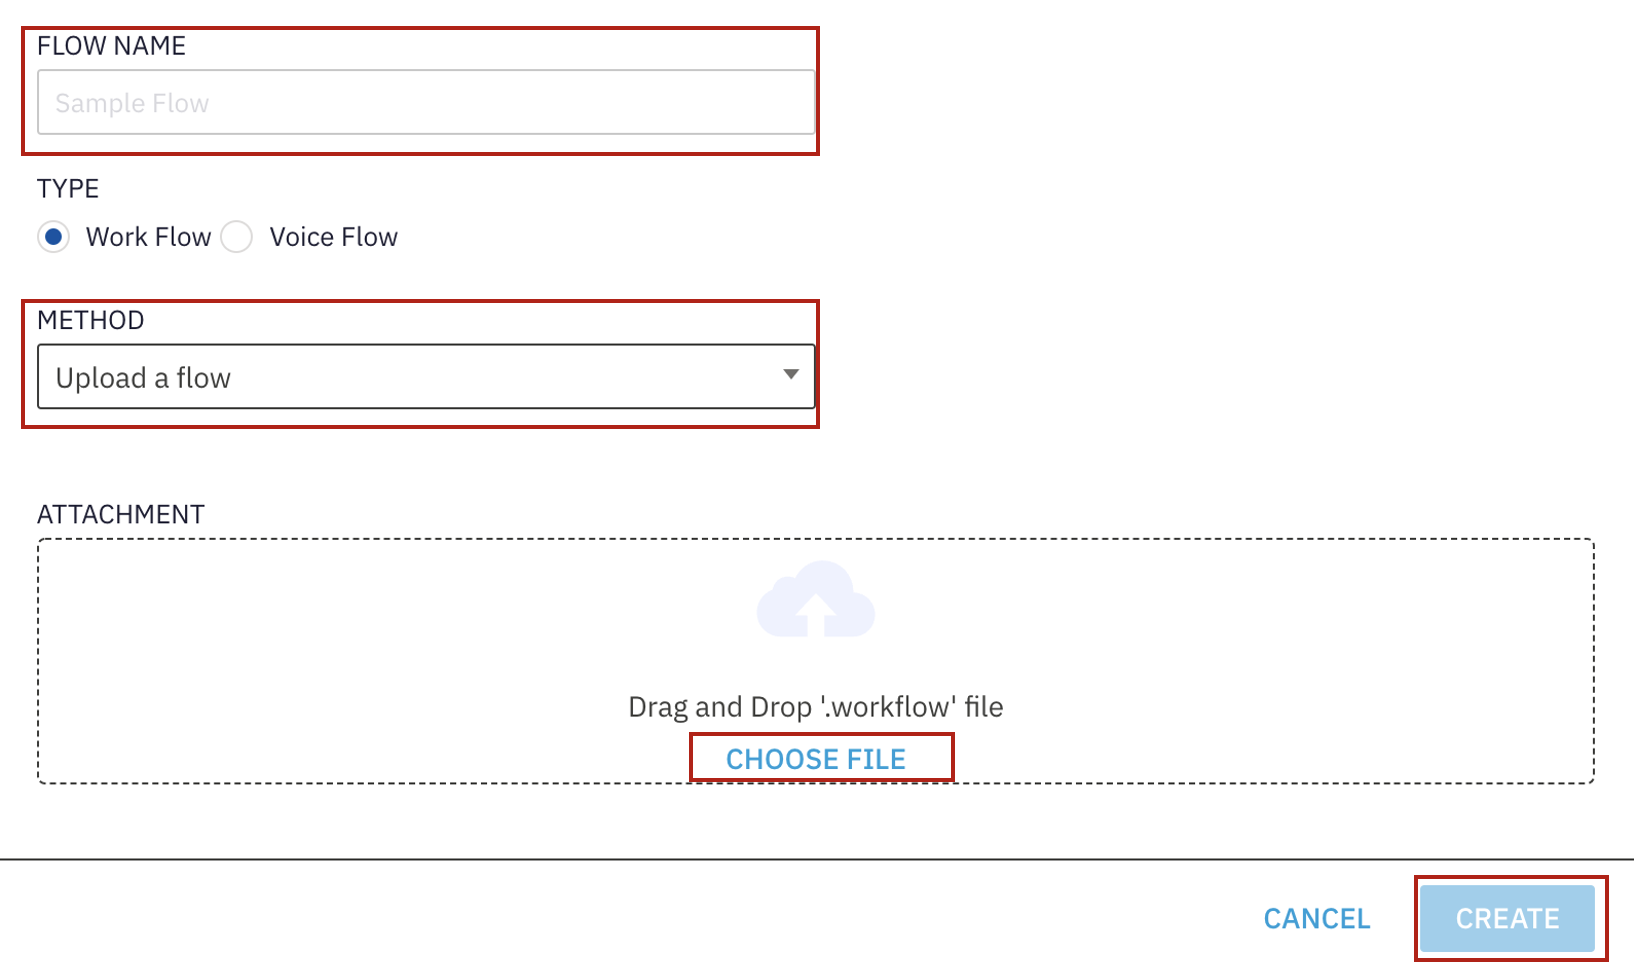
8) In the FLOW NAME section set Task Close Flow
9) In the METHOD select Upload a flow. In ATTACHMENT click on CHOOSE FILE and select the Task Close Flow.workflow file
10) Now you can click on CREATE button
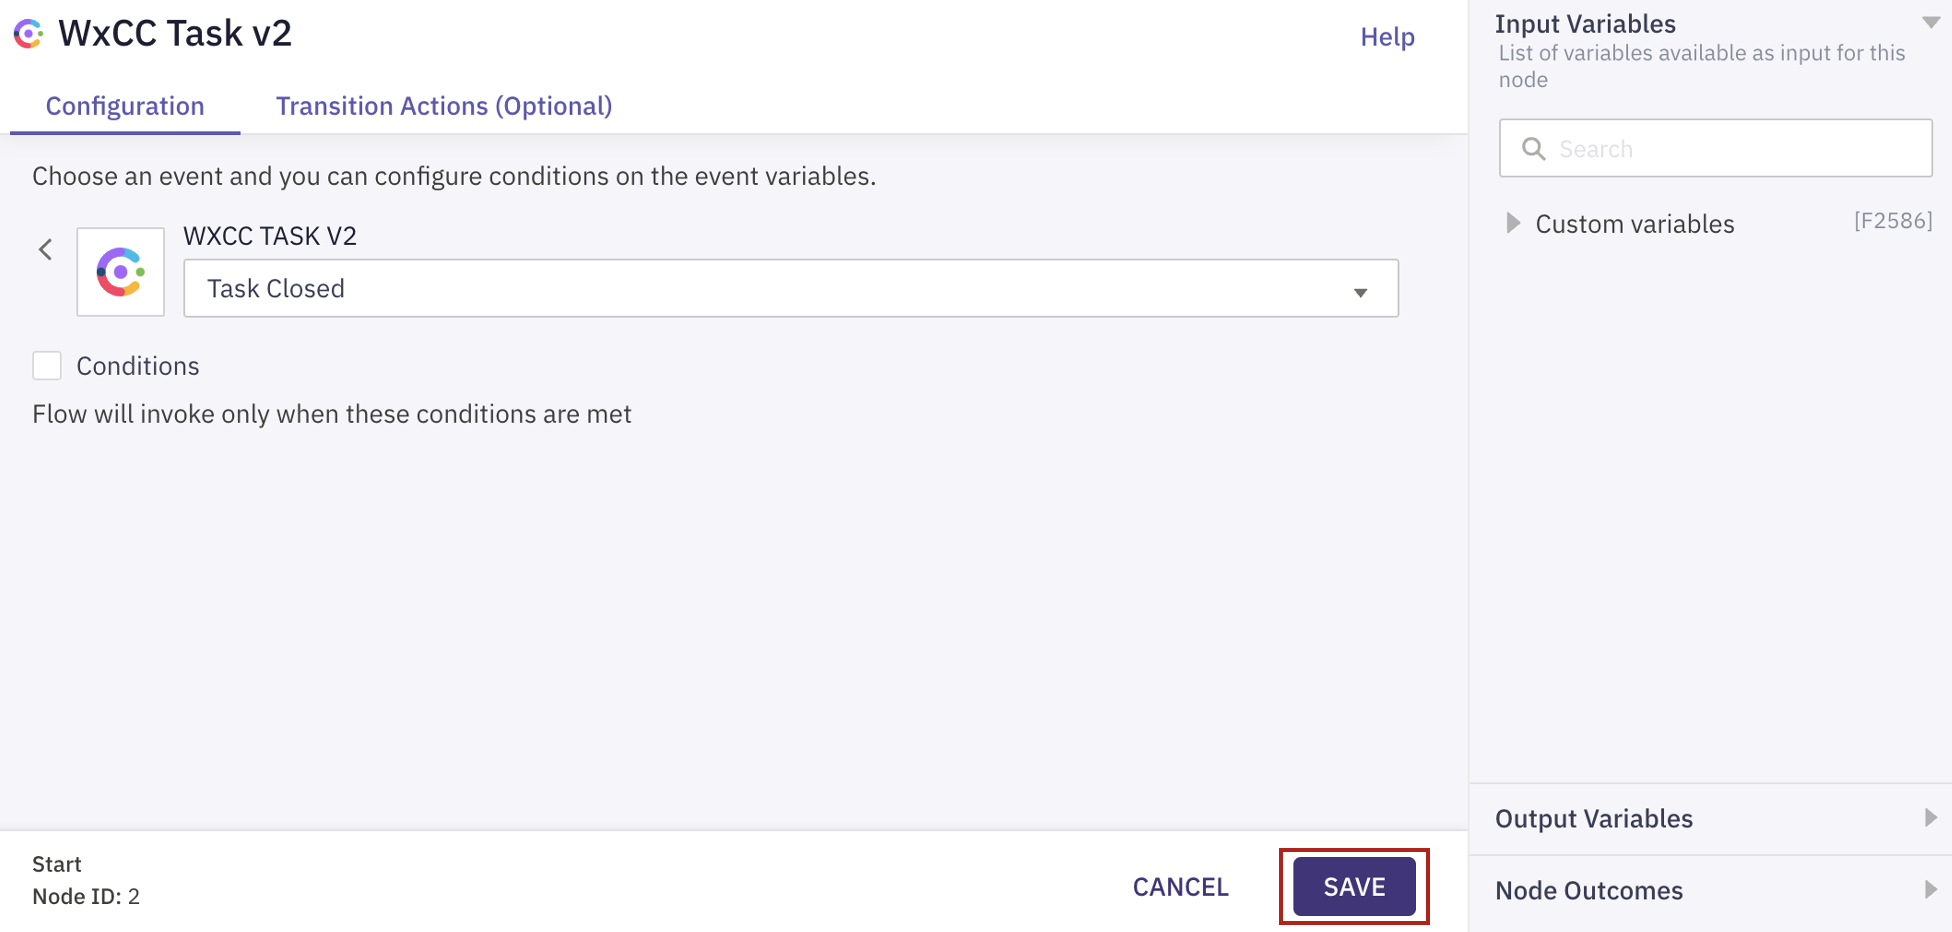
11) In the new menu click on SAVE and then MAKE LIVE. You should get the message that “Flow successfully made live”
12) Repeate steps 7 - 11 for Task Routed flow and Task Modified Flow
Step 3. Setup agents in Portal (Agents, Team, MMP)
This step shows how to access the admin portal and navigate the different configuration menus to create a Site, Team, and Multimedia Profile that will be assigned to the Contact Center user.
Users
The users have the following preconfiguration
| User Role | User email |
|---|---|
| Agent | cl2agent<ID>@email.carehybrid.com |
| Supervisor | cl2sup<ID>@email.carehybrid.com |
Note: Your <ID> was provided to you personally. <ID> is the unique number equal to your POD.
User Settings
| Entity | Name |
|---|---|
| Multimedia Profiles | MMP |
| Site | Site |
| Team1 | Team1 |
| Team2 | Team2 |
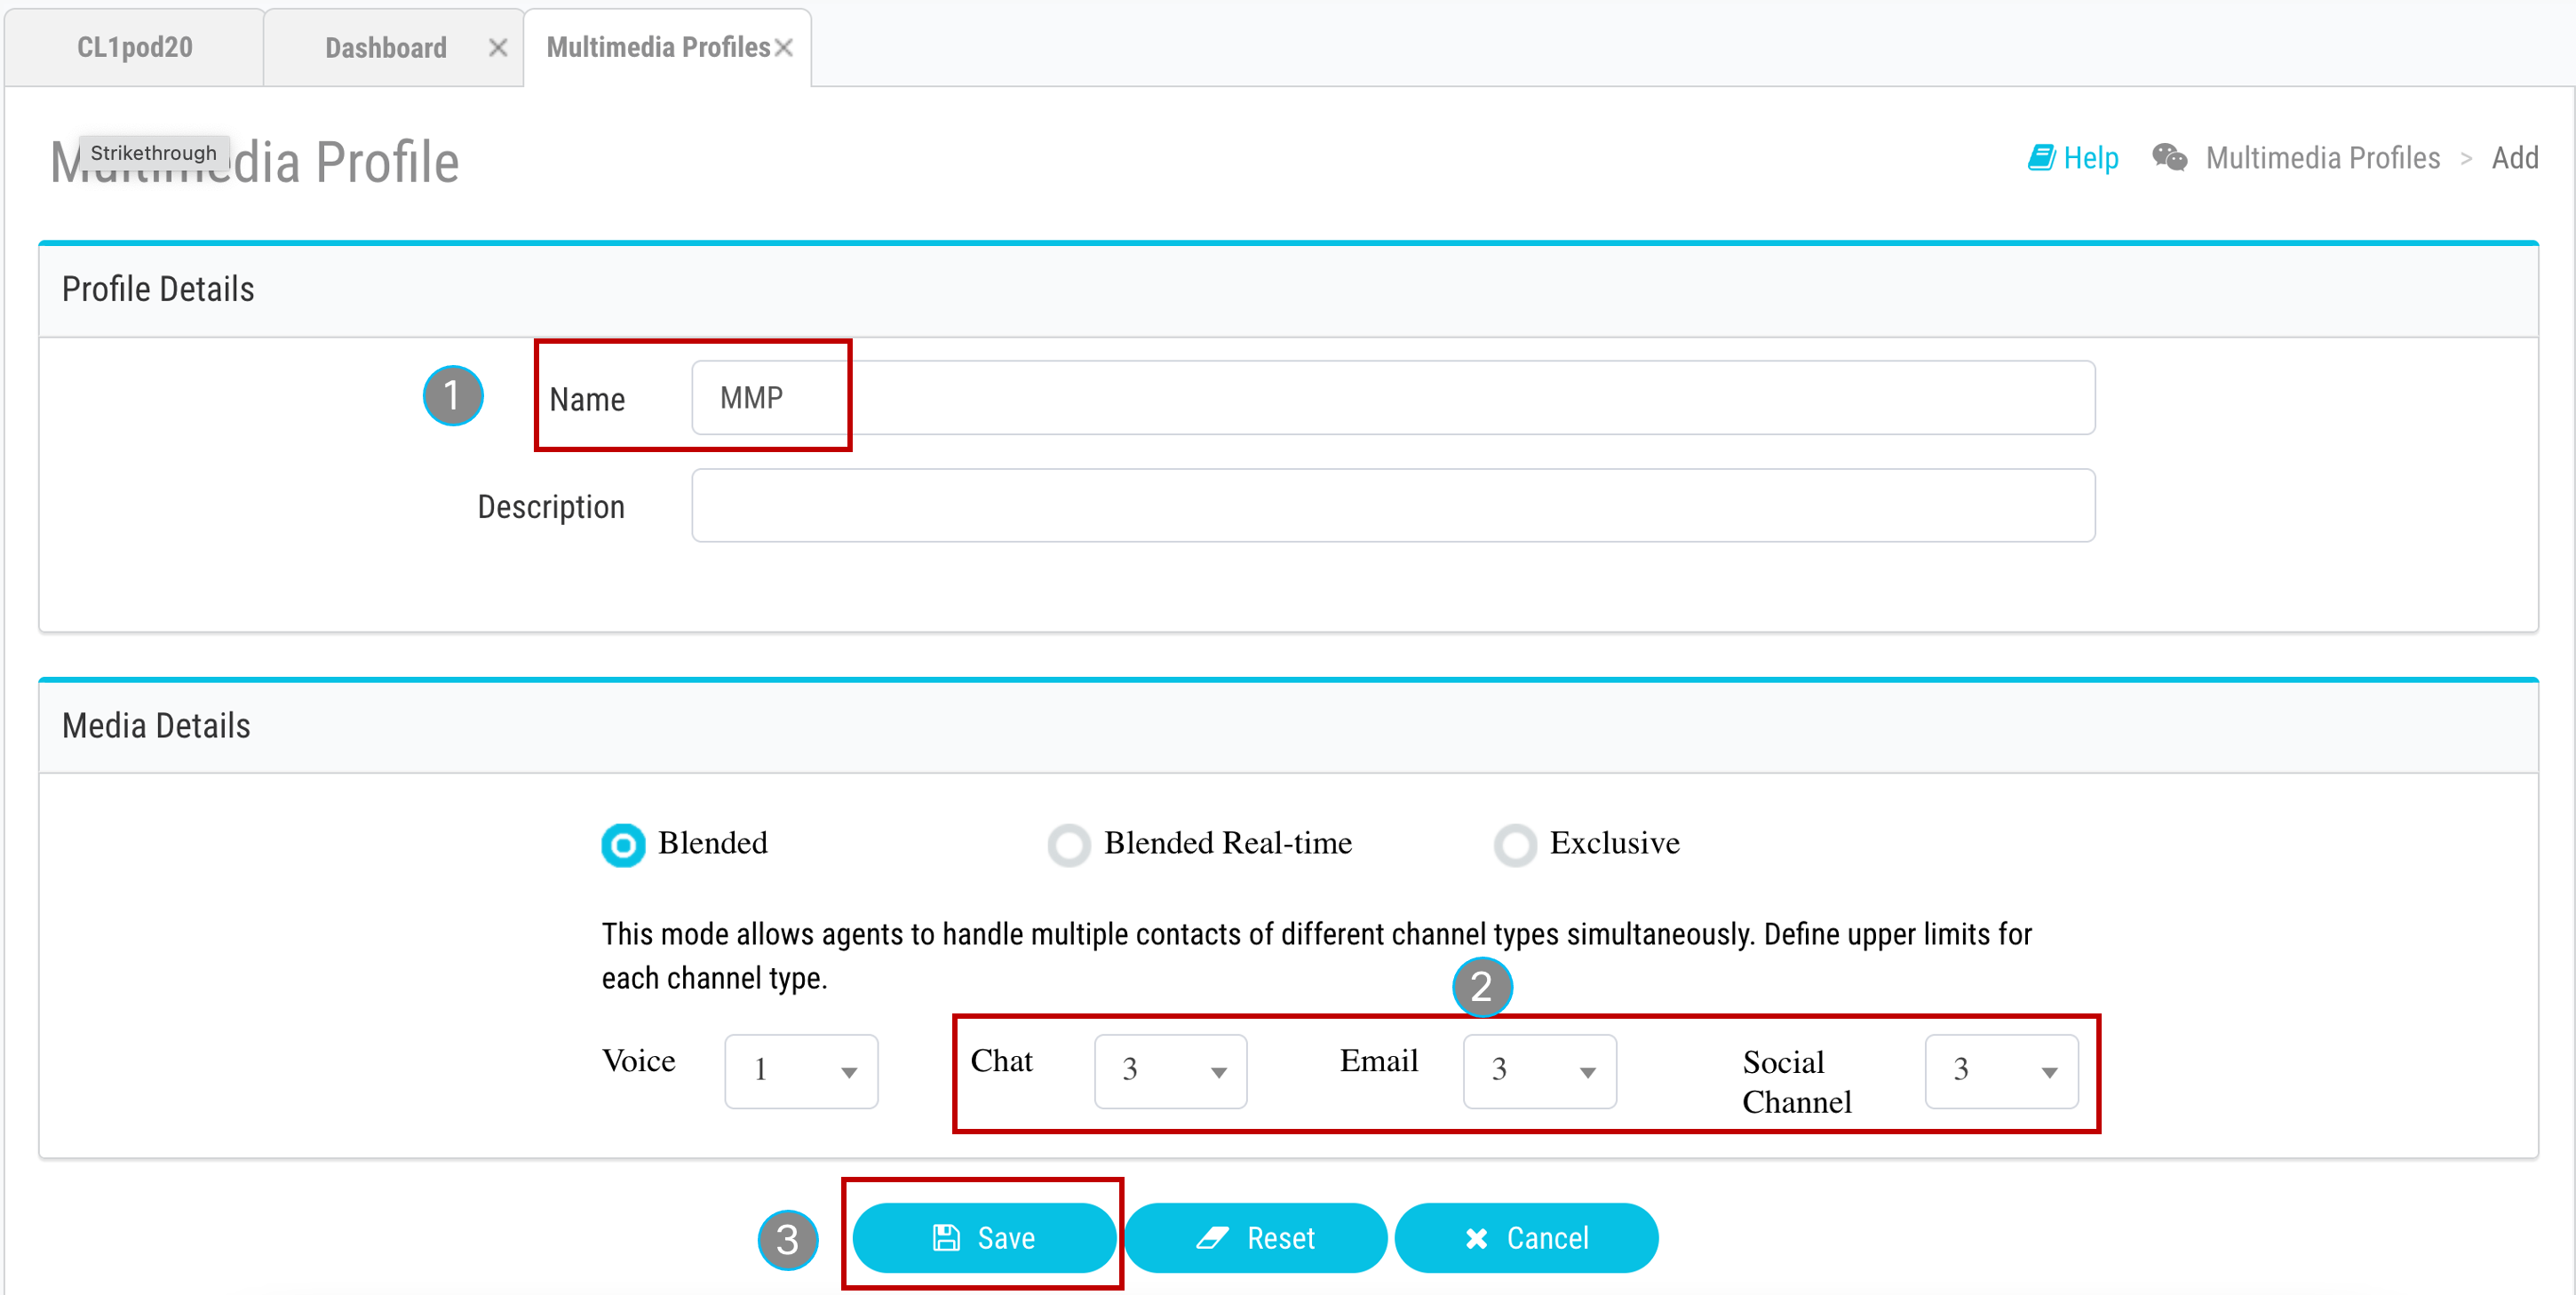
1. Create new MultiMedia Profile
-
Login to Managment Portal by accessing https://portal.wxcc-us1.cisco.com/portal.
-
Enter the admin email address (cl2admin<ID>@email.carehybrid.com) and click Sign in
-
Click on Provisioning and select Multimedia Profiles.
-
Click on
+ New Multimedia Profileto open Multimedia Profile configuration page. -
Input Name as
MMP. -
In the Media Details section, select the blended multimedia profile and input
1for Voice,3for Chat,3for Email, ,3for Social Channel and click on Save button.
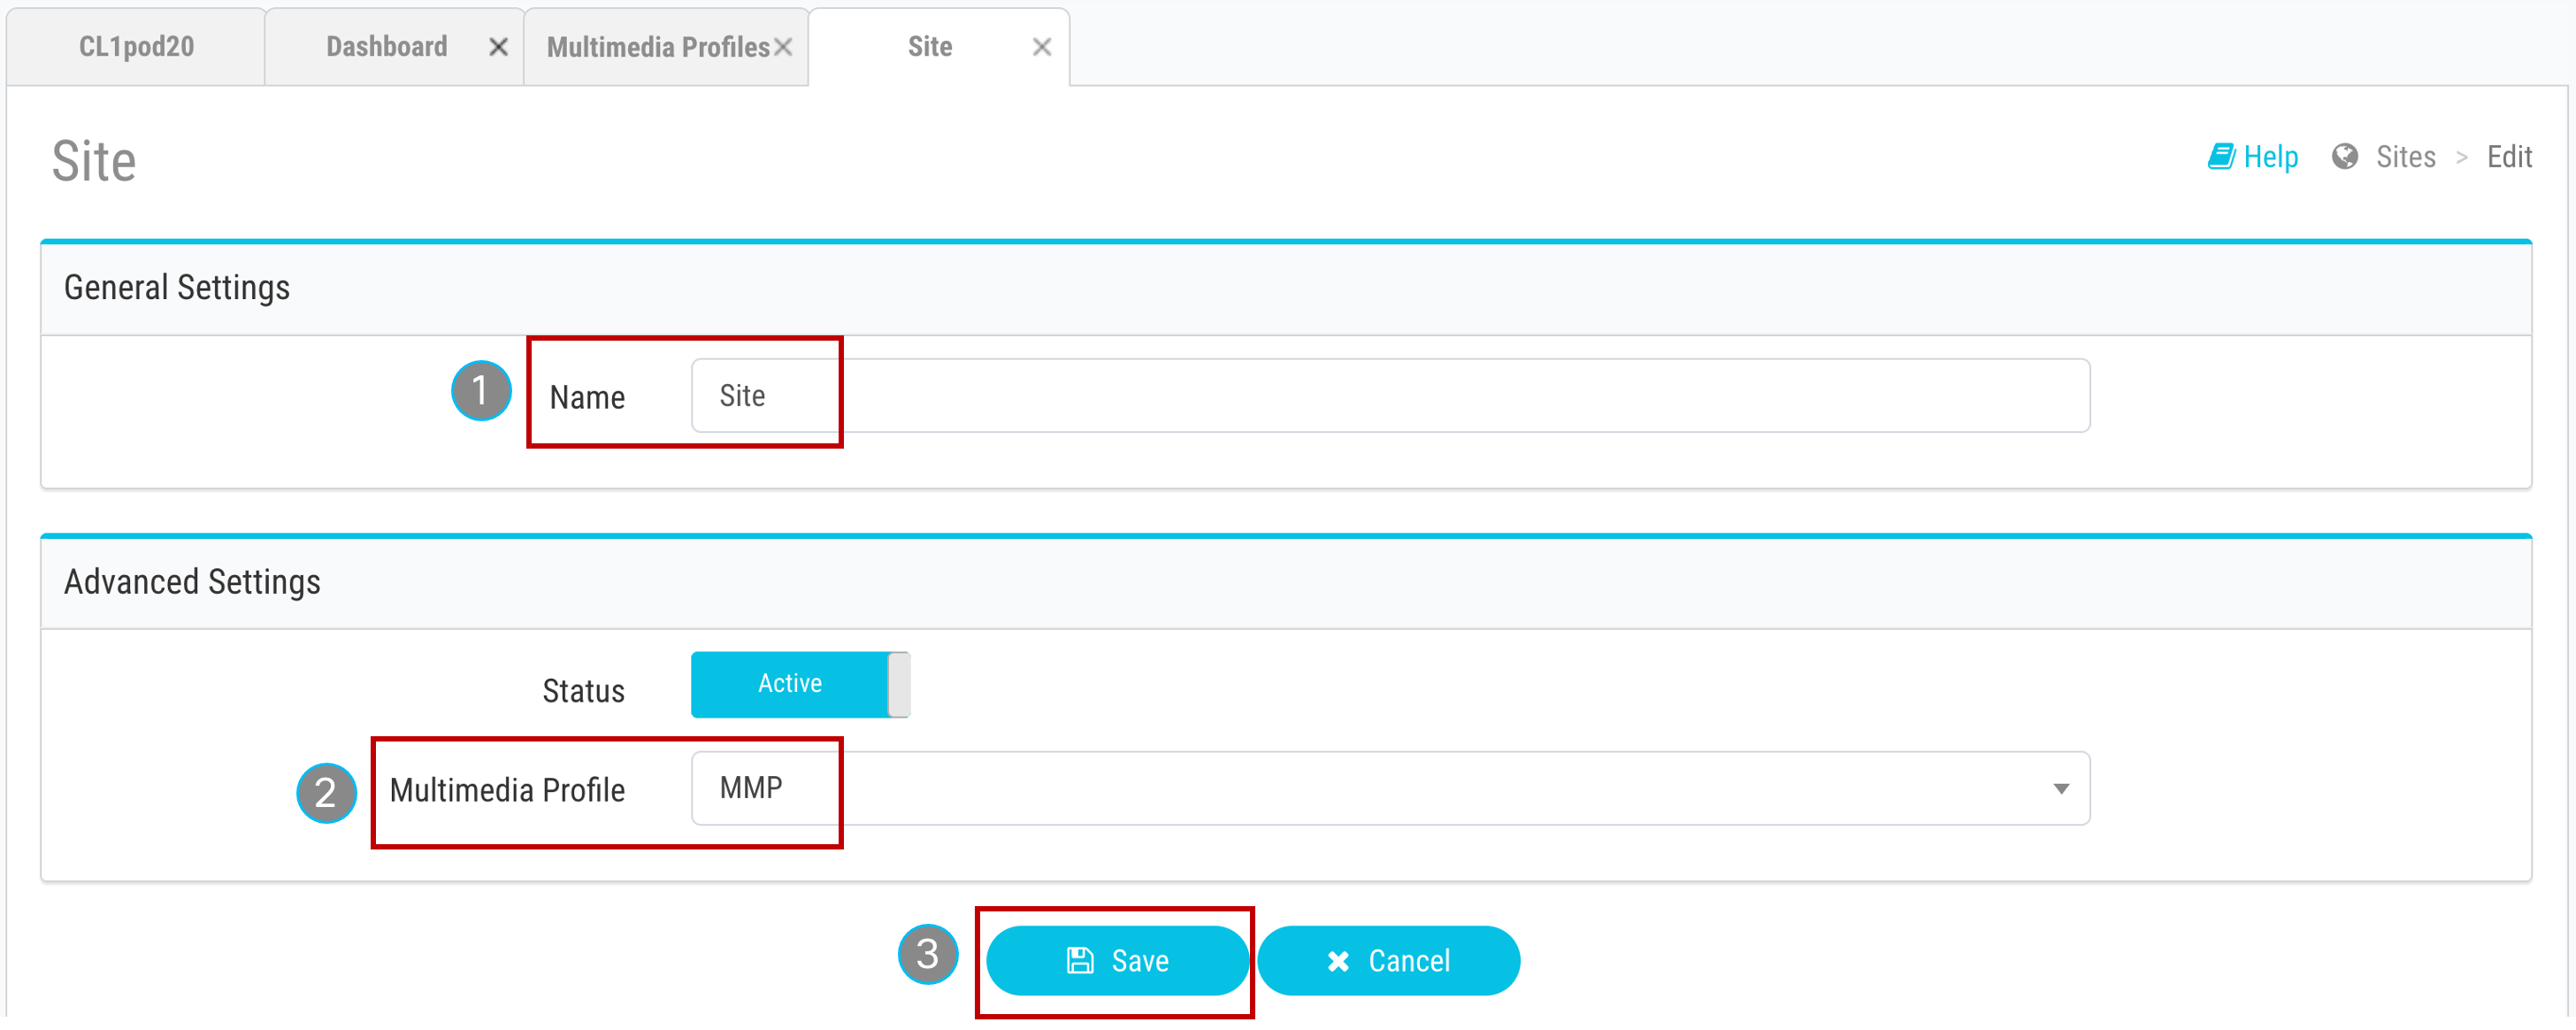
2. Create new Site
-
Navigate to Provisioning and select Site.
-
Click on
+ New Sitebutton and provide the Name asSite. -
Select
MMPin the Multimedia Profile drop down and hit Save.
3. Create new Teams
-
Navigate to Provisioning and select Team.
-
Click on
+ New Team. -
Select
Sitefrom the Site drop-down. -
Input Name as
Team1. -
Use the default Type
Agent Based. -
Select
MMPin the Multimedia Profile drop-down. -
Left as a default value Global Layout in the Desktop Layout drop-down and hit Save.
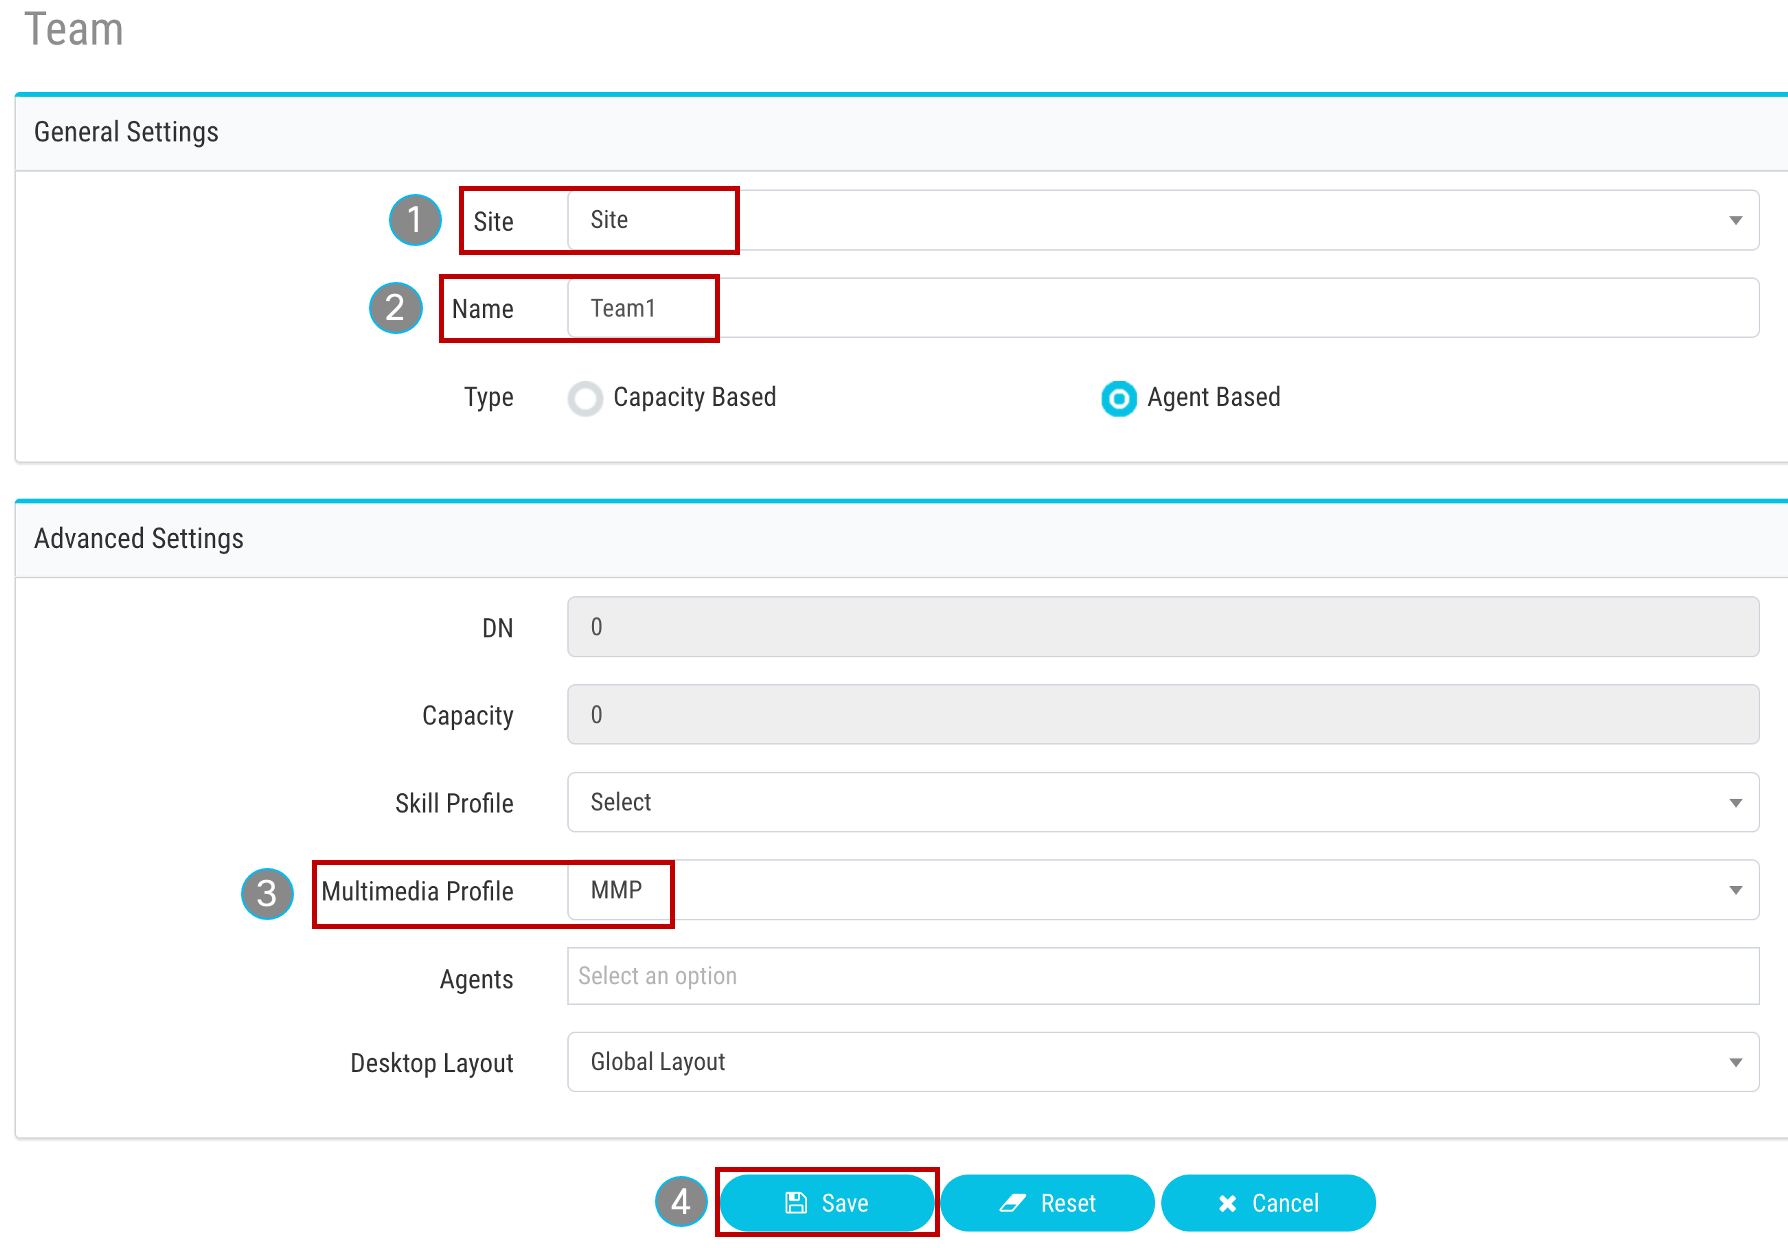
- Please follow the same steps as above to add an extra Team as
Team2.
4. User Configuration
-
Click on Provisioning and select Users.
-
Click on
...for the Agent user, to launch the Edit view for a particular User configuration. -
Make sure that the User Profile is set as Premium Agent User Profile
-
Click on Contact Center Enabled toggle to move it to On.
-
In the Agent Settings section, select
Sitein the Site drop-down. -
Click the Teams area and select
Team1andTeam2. -
Select
Agent Profilein the Agent Profile drop-down list. -
Select
MMPin the Multimedia Profile drop-down and hit Save. -
Make sure that the user are now shown with the Contact Center Enabled flag as
Yesand Status asActive.
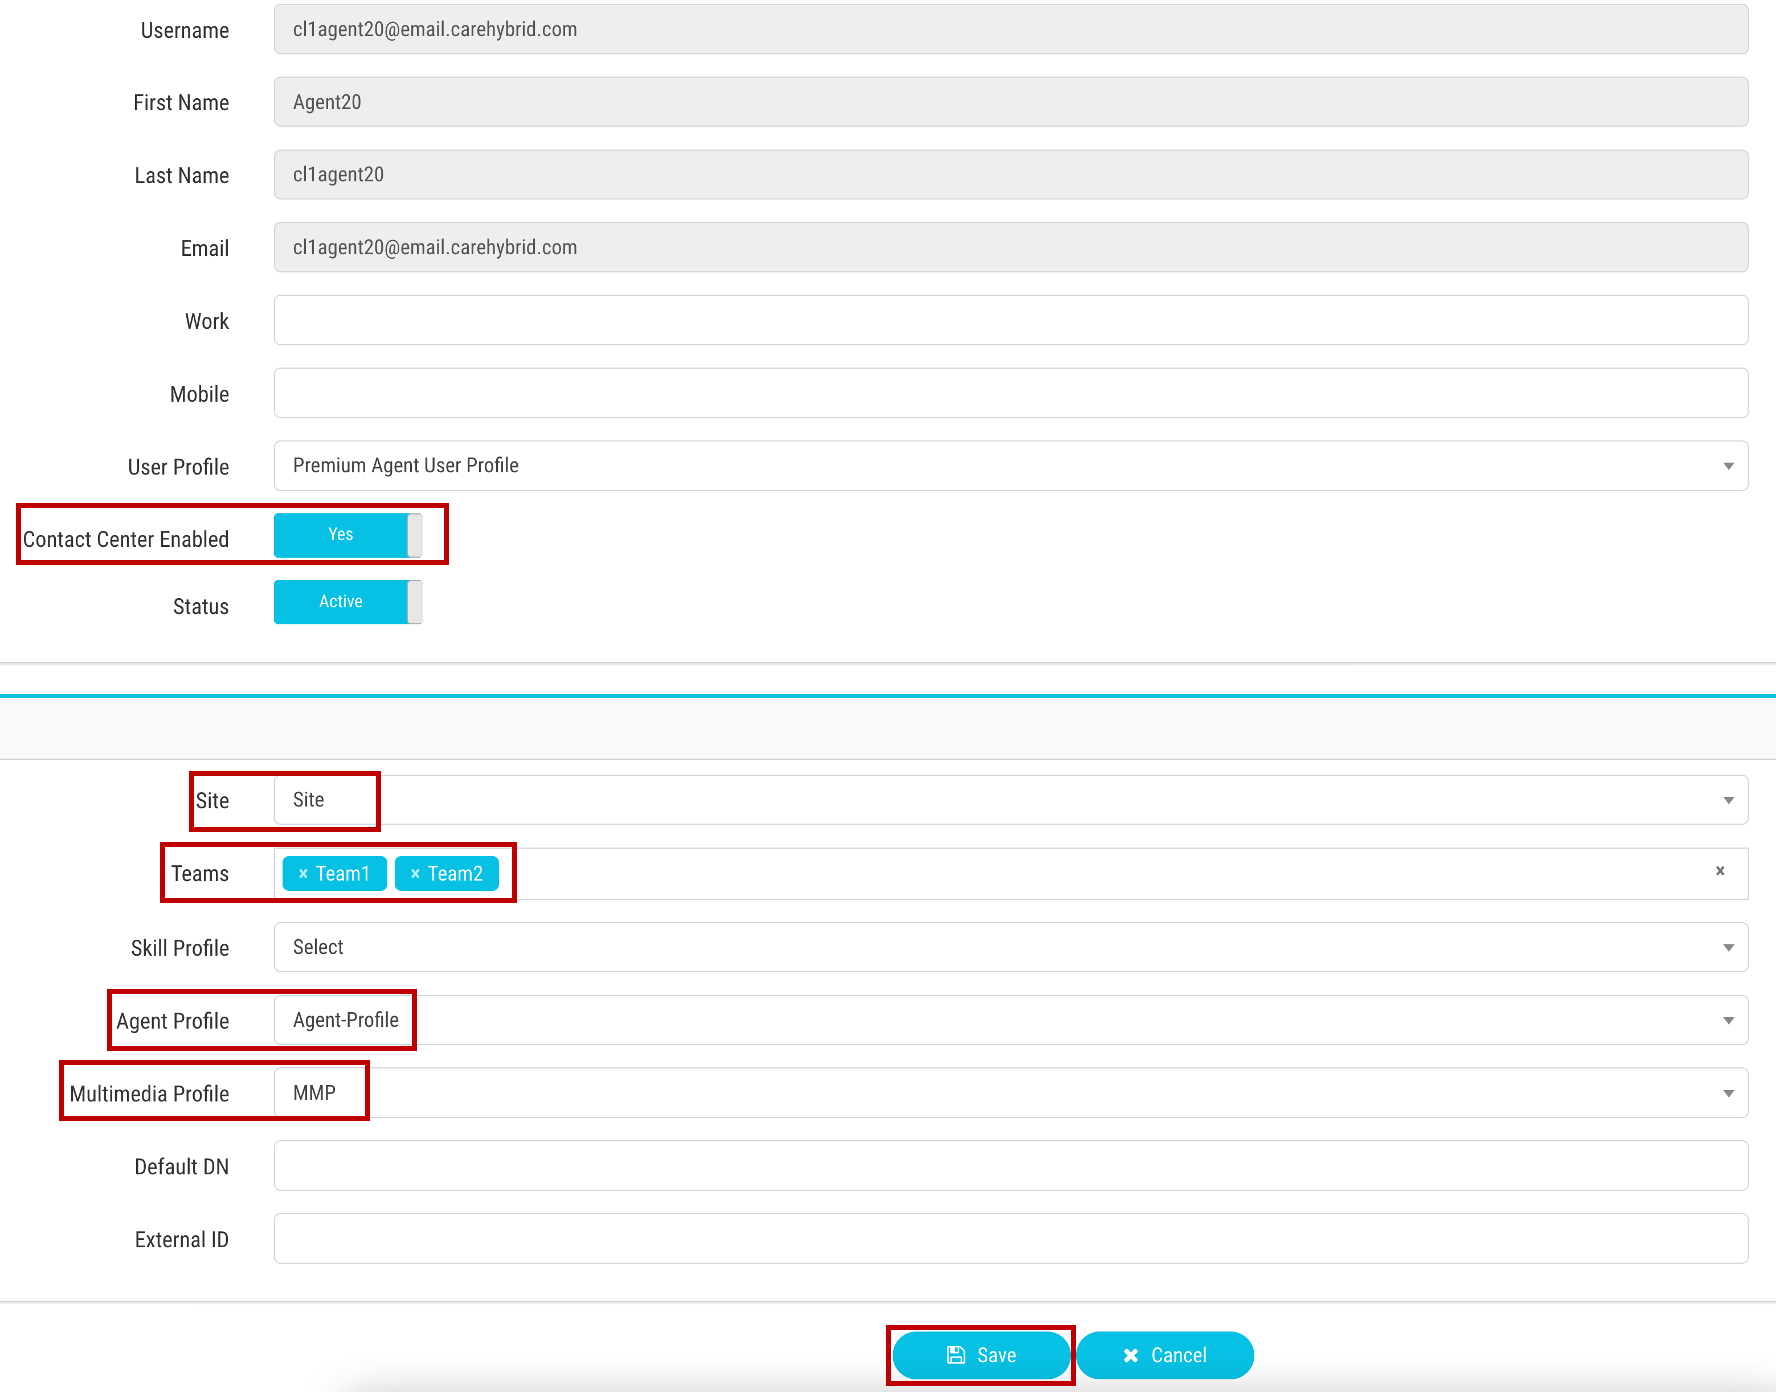
- Please follow the same steps for Supervisor user.
Access to the Agent Desktop
Note: To log in to the agent desktop, use either a separate web browser or a new incognito web page. This will prevent any browser caching issues with admin and agent credentials.
-
Navigate to https://desktop.wxcc-us1.cisco.com/ in a new browser or in incognito mode.
-
Enter the agent’s email ID
cl2agentX@email.carehybrid.com. -
Enter the Password for the appropriate Username.
-
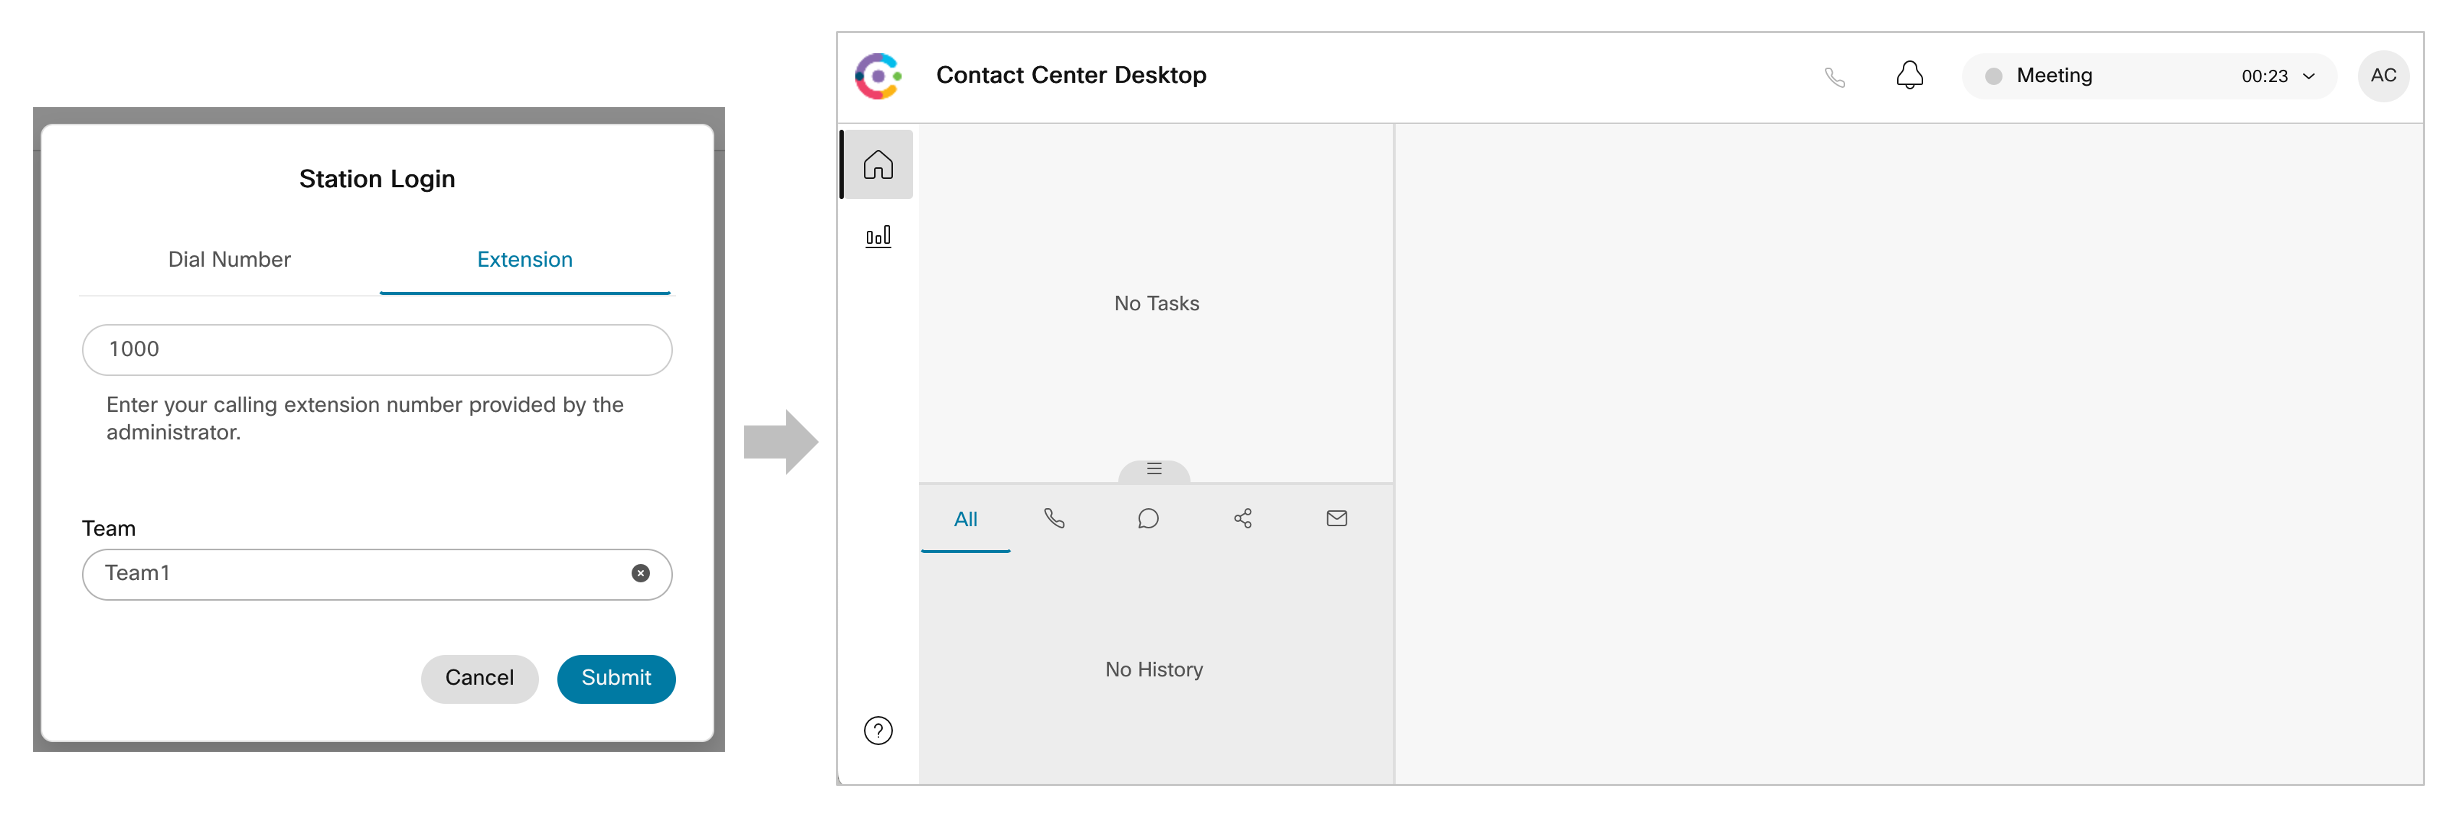
In the Station Login pane, select “Extension” and put any number, for example, 1000
Note: The Webex Calling service is not activated at this tenant we need to set an extension only once during login.
- Select the
Team1and click Submit. Make sure that you are successfully logged in to the Agent Desktop. Now you can continue with the next section.